


WARNING! Content may induce drooling.
We have my Chocolate Fudge & Honeycomb Cake, a Brooklyn Blackout Cake, my Twice Baked Chocolate Meringue Cake in Vegan form & a *BONUS* Lamb Wellington courtesy of my friend (to be) Gordon Ramsey.


Hello friends!
I am back from a slightly unexpected hiatus – I apologise hugely for missing the newsletter last week but life and work inconveniently got in the way and I barely had a moment to think, let alone write you all the next installment in my weekly memoir. But I am back and I promise to not go anywhere again unless I win the lottery (you’ll catch me sipping coconut cocktails on some remote island for the rest of my days) or something super pressing comes up (like getting engaged again but let’s hope that’s a one and done sorta situation pls!).
So I may have left out a teeny tiny piece of info when I was filling you all in on my New York trip in the last Bite – I got engaged! In my favourite city, with my favourite person at my favourite time of the year…and I got food poisoning the night before which decided to strike quite literally 5 minutes before James was about to propose.
So let me set the scene a little. There we were, sat in the hotel room, watching slightly bemusing footage of people in Times Square camping out at 4 pm ready for the ball drop (I have so many questions - where do they go toilet? how do they get food? and let’s circle back again to the toilet question??), getting ready to go out for a little early evening stroll in Central Park on New Years Eve, as James had made us reservations at the Aman Hotels Jazz Club later in the night. Wonderful! Cute! Romantic! Never been to a Jazz Club before. Couldn’t have been more thrilled.
My plan was for us to go see the Saks Christmas lights (bad idea, it was mayhem), maybe check out Radio City Hall, have a mooch around Central Park, take a walk down to see the Rockerfella Tree as I had booked us to go ice skating there that evening pre Jazzing (never happened) and grab a little snacky snack for the road before we got our glad rags on to down a load of bubbles and see in the New Year.
Perfect, perfect, perrrrrrrfect.


Until we were strolling around Central Park (inevitably lost but that’s always the joy) and my stomach gurgles to the point it stops me in my tracks, the sweats furiously kick in, your eyeballs pop out in horror and you just know, something is about to go down and you need to get to a bathroom stat before you redecorate everything within a mile radius of yourself with vomit and other miscellaneous fluids which needn’t be discussed here but I think we can all use our imagination. On top of this already stressful unplanned interlude, I would like to add that I, OF COURSE, was wearing white sweatpants because what else would you be wearing when you get food poisoning?? The timing of it couldn’t have been more god damn PERFECT.
We rush (I say rush but it was more like a tentative, mild jog, cause ya know, no sudden movements) back to the hotel, which thankfully was just off Central Park, and head back to the room…where we are met at the room door by hotel staff who were also rushing into the room holding a champagne bottle, candle and flowers. Did the penny drop at that moment? Absolutely, but there was zero effs given in that moment in time that I had ruined all element of surprise of a proposal that James had spent months planning because food poisoning from fried chicken consumed the night took priority.
We waited outside the room for what felt like an eternity as they insisted on finishing the decorating. There I am standing in a puddle of my own sweat, stomach roaring with fury, anxiously pacing around, skin clammy, hands cold - they FINALLY open the door and leave the room, James very quickly proposed, I very much laughed (and said yes), I ran off to the bathroom where I spent the whole night (and the 3 days after) and we plan to live happily ever after.
Who said romance was dead??


We have got a lot of deliciousness to work through this week so going to get right to it. On the menu this week for everyone, we have:
Brooklyn Blackout Cake. The latest recipe from my ‘Around the World’ series and oh me, oh my, she is FILTHY. A solid chocolate cake (not a million miles off my ‘ultimate’ choc cake, with a super solid choccy frosting recipe so lots of good base components for you to keep in your back pocket).
Gordan Ramsey’s Lamb Wellington. A little diff sorta recipe hitting the decks today but a yum sorta number which should ONLY be tackled when you are feeling mentally strong and a little bit spicy because it WILL drive you to the point of drinking the wine straight out the bottle. Yes, I am speaking from experience.
And for my besties having an Extra Bite, we also have:
Chocolate Fudge Sponge & Honeycomb Cake feat a Feuillitine Crunch Layer. This is very much a hybrid of two cakes I have shared previously before so you know what that means? Yup. Double the yum.
My Double Baked Warm Chocolate Meringue Cake…but Vegan. It’s One Bake, Two Ways. Everyone deserves a slice of nice ya know?
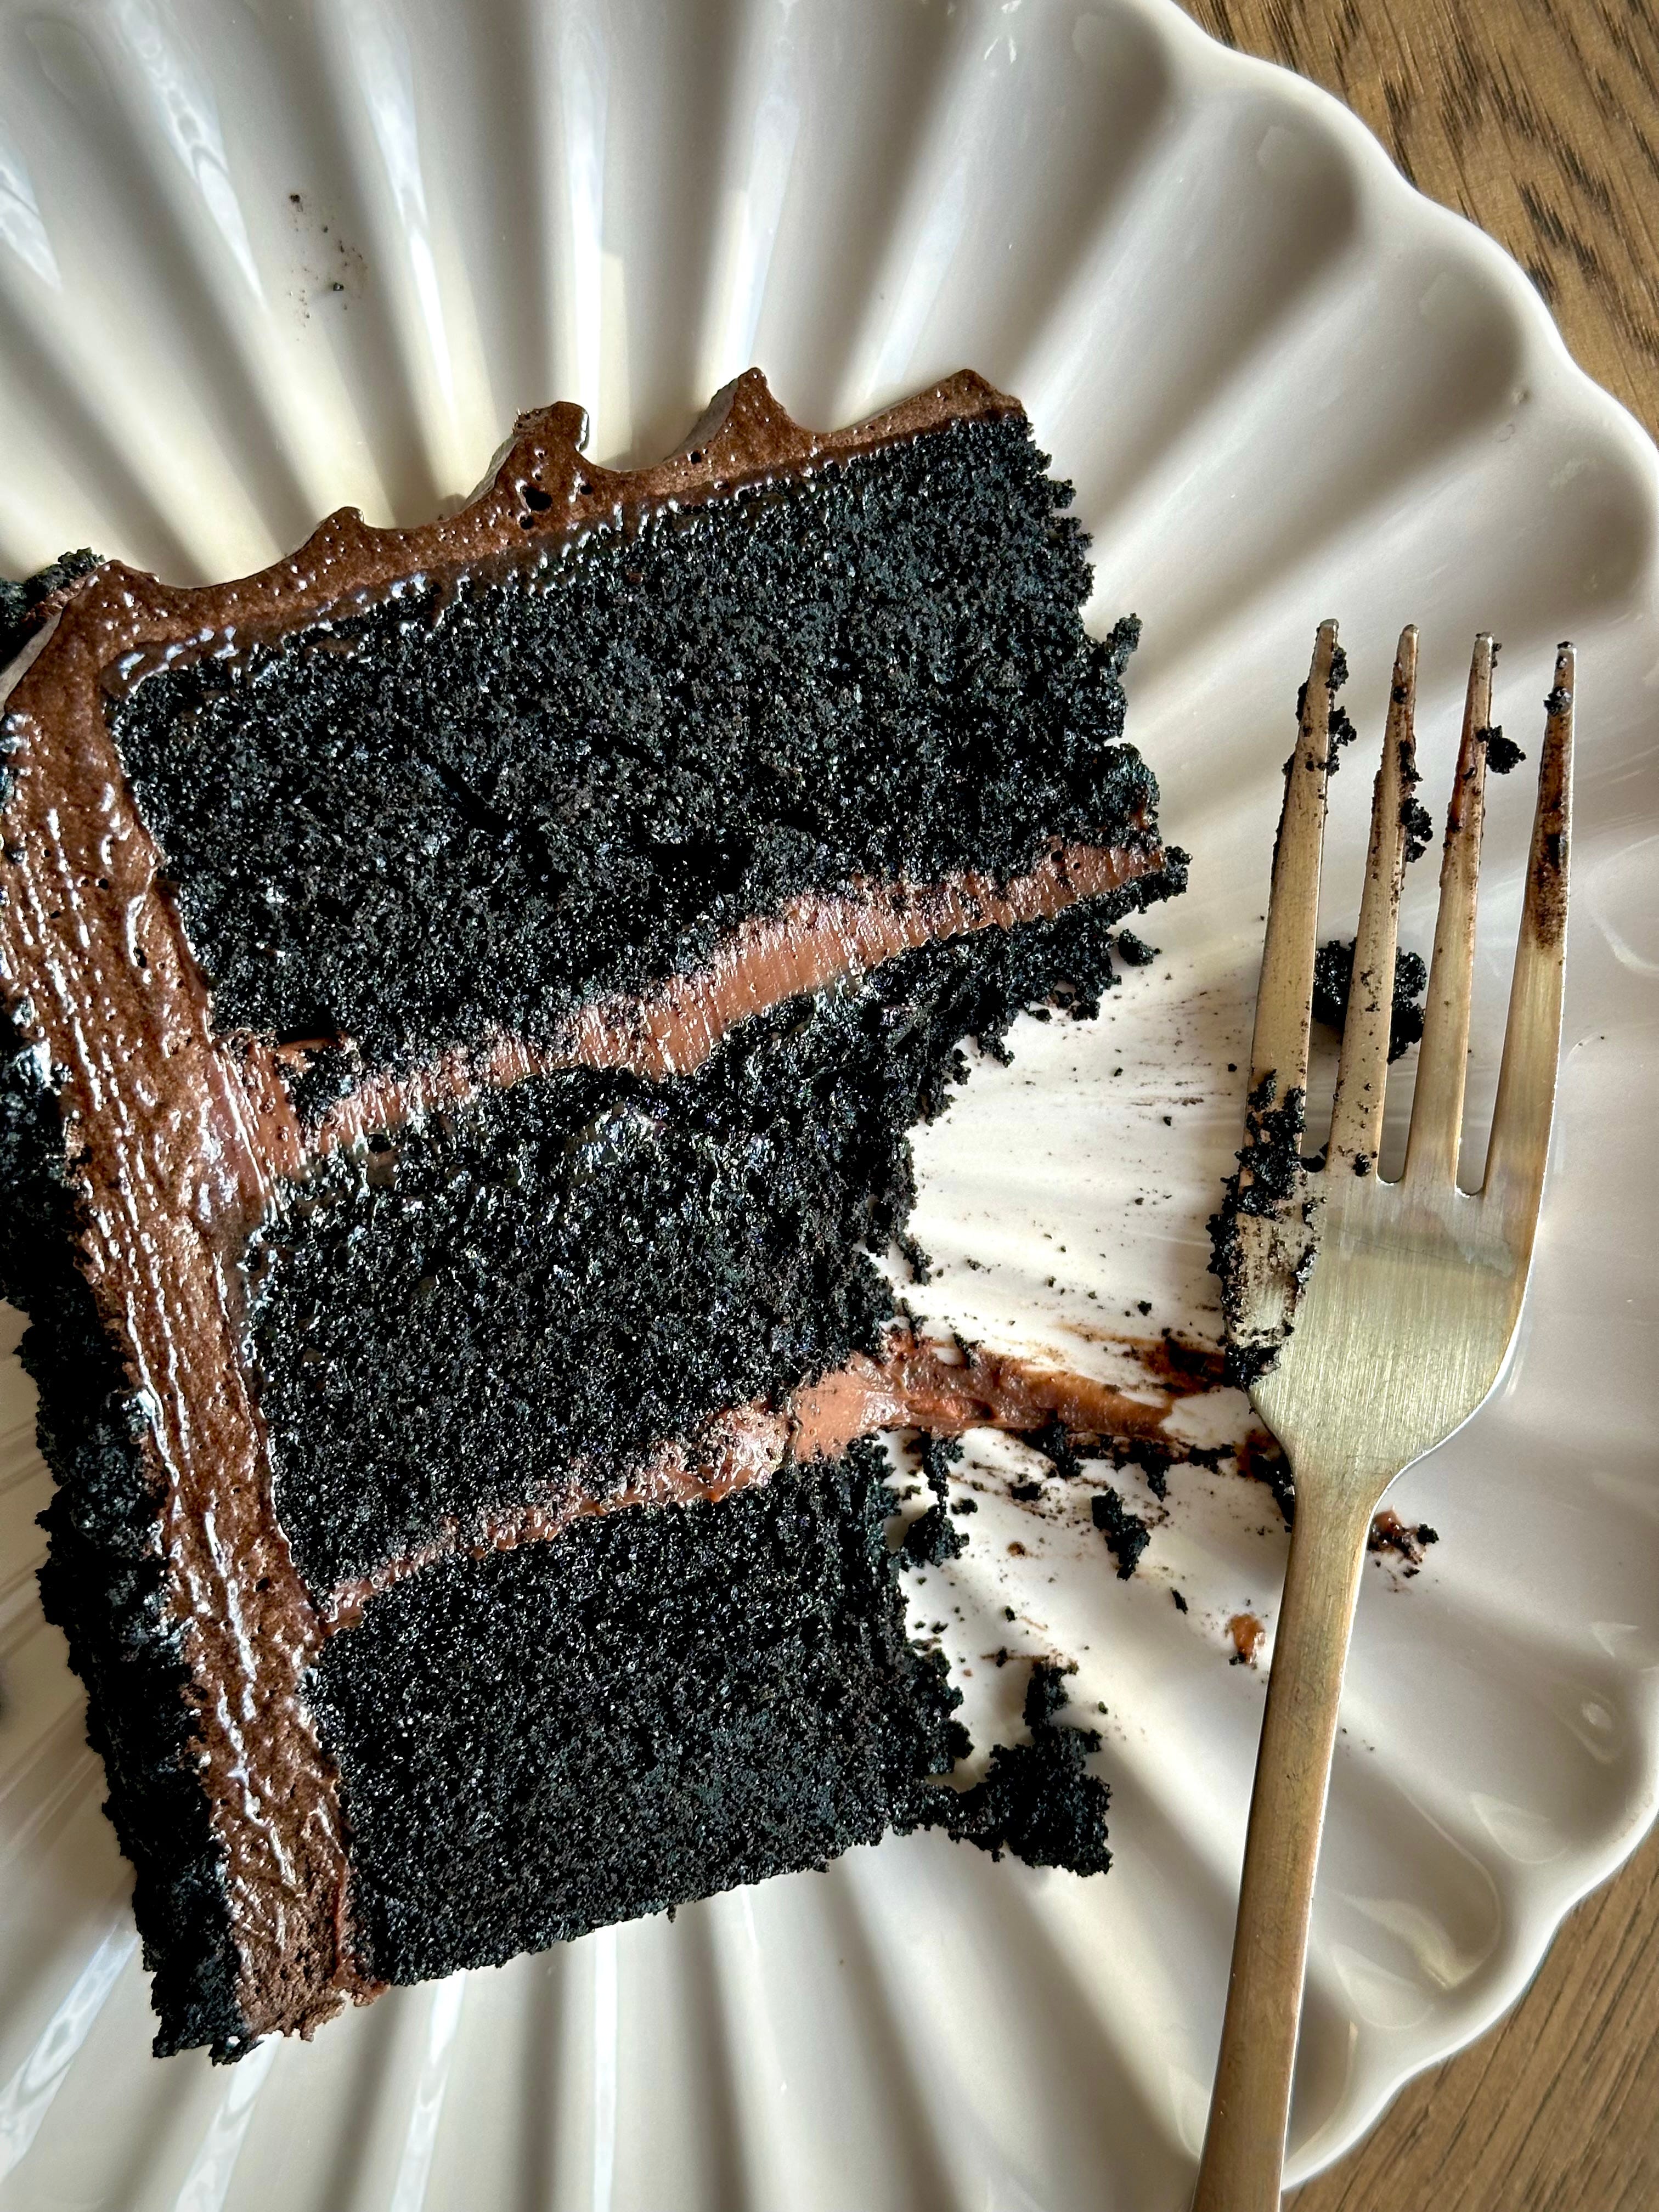
First up, I am serving up my Brooklyn Blackout Cake – the latest cake from my insta series (which yes, you are getting earlier than everyone else because you deserve it). When I say this cake hits the top 3 of that list for me so far, I MEAN IT. It is filthy, it is outrageous and it is incredibly naughty. It’s rich, it’s in your face, it’s over the top and it’s everything you could want in a chocolate cake and more. Bruce Bogtrotter eat your heart out.


It’s made up of layers of moist chocolate sponge sandwiched with layers of chocolate pudding and covered in chocolate frosting and chocolate sponge crumb. Are you ready for the choccy horror show??? And by horror, I, of course, mean FILTH.
Recipe Makes: 3 x 8 inch / 20 cm Sponges

Y O U – W I L L – N E E D –
Sponge
225 g Plain/AP Flour, sifted
105 g Potato Starch, sifted
3.5 tsp Baking Powder, sifted
170g Black Dutch Processed Cocoa Powder, sifted
660g Light Brown Sugar (don’t doubt it, it is true but also don’t stress it ok)
Pinch of Sea Salt
3 Large Eggs
1.5tsp Vanilla Bean Paste
300g Buttermilk or Natural Yoghurt
150ml Vegetable Oil
330ml Freshly Brewed Coffee (I used 2.5 tsp of instant coffee + 330 ml hot water)
Chocolate Pudding
35 g Cocoa Powder, sifted
50 g Cornflour/Starch, sifted
300 ml Double/Heavy Cream (you can sub for whole milk)
4 Large Eggs, yolks only & beaten
300 ml Whole Milk
140 g Light Brown Sugar
¼ tsp Sea Salt
130 g Milk Chocolate, chunks
1 tsp Vanilla Bean Paste
Chocolate Cream Cheese Frosting
250 g Salted Butter, room temp
150 g Unsalted Butter, room temp
160 g Full Fat Cream Cheese, room temp
140 g Cocoa Powder, sifted (I used a 75:25 mix of normal cocoa & black dutched)
500 g Icing Sugar, sifted
75 ml Whole Milk, warm
25 ml Golden Syrup, optional
1 tsp Vanilla Bean Paste
M E T H O D –
First up, preheat the oven to 150°C Fan/170C/Gas Mark 3 and grease and line 3 x 8 inch / 20 cm cake tins.
Add all the dry ingredients to a bowl and use a balloon whisk to mix until well combined.
In a separate bowl, add all the wet ingredients and again, use a balloon whisk to mix until everything has emulsified (aka come together and is one smooth liquid).
Pour the wet mix into the dry and use the balloon whisk to begin mixing. Switch out to a rubber spatula and use to clean the sides and bottom of the bowl to make sure there are no flour pockets. When there are no visible streaks of flour left, evenly distribute the batter between the three tins. NOTE: I will say be pedantic and weigh each one to ensure all sponges will bake at the same rate.
Pop in the oven and bake for 38 minutes. Remove from the oven and allow the sponges to sit in the tins cooling for 15 minutes before turning out onto individual sheets of clingfilm/saran wrap. Before wrapping the sponges, allow them to sit for 5 minutes to air their bottoms (sounds weird but trust me on it) and allow any excess moisture to dry off. Wrap the sponges (not too tightly, let them breathe a little) and leave to completely cool.
In the meantime, make the chocolate pudding by adding cocoa powder and cornflour to a saucepan. Mix until combined before going in with the double cream and milk.
Use a balloon whisk to mix until smooth, ensuring there are no cornflour clumps.
Add the egg yolks, sugar and salt and mix again until combined.
Place the pan over a medium heat and gently cook until thickened. I am talk scoopable, whisk will stand up on its own in it, sort of thick - not will run off a spoon thick. You don’t want the custard bottom to catch on the pan so stir this often to avoid.
Remove from the heat and add the chocolate chunks and vanilla. Stir until the chocolate has melted before transferring the custard to a large, shallow dish to cool. Cover the top with clingfilm/saran wrap to avoid it crusting over and forming a skin.
Once the cake and the custard have cooled, construct the base of the cake. Level out any domed sponge tops and keep the scraps to one side. If your tops are level, slice off a think layer from the top and reserve till later.
Place one of the sponges onto your serving plate and add ¼ of the cooled custard on top. Use a palette knife or back of a spoon to level out. Place another sponge on top and repeat until you reach your final sponge. Use the remaining 2/4 of the custard to top and create a crumb coat. Be gentle as the cake won’t be completely stable. Once coated, leave in the fridge to set for at least 4 hours but preferably overnight.
Once the cake has set, make the chocolate frosting by adding the butters and cream cheese to a stand mixer bowl. Use the paddle attachment (or whisk attachment if using an electric hand whisk) and cream together. It will take some time but have faith and increase the speed slowly for it to all come together.
Add in the cocoa powder, icing sugar and warm milk and mix again until everything is combined and an even colour.
Go in with the golden syrup, if you are using, and the vanilla bean paste and mix again until smooth. You want a stiff but velvety soft, spreadable consistency.
Use the frosting to generously smother the cake and decorate however you wish. I went for smooth sides and a swirled top. Place it in the fridge to set for another hour.
Grab the reserved cake scraps, reduce to a crumb (break it down with your fingers), before coating the sides and top with it. Place back in the fridge to set before using a hot knife to slice and serve.
TIP: if you are worried your pudding is too loose, you can add another tbsp of cornflour OR, you can scrap and double the quants for the chocolate frosting and use that to sandwich, crumb coat and decorate. Either way, you are in for a TREAT.
Adding this recipe to the Last Bite recipe archive today because whilst it may be slightly different to the food content and recipes I normally share with you all, it is still a worthy winner of a dish. As part of being an ambassador for a brand, sometimes you get asked to create content for them around a theme, a celebration, maybe a religious festival (they alllll come out the woodwork a day or two before Diwali let me tell you) or have the content focused on some tenuous link to whatever month we are currently in (hi any brands reading this, I love you really. TEE HEE, OOP).
This month I was challenged to make something I have never made before. The brief was kinda along the lines of the New Year, New Me that a lot of people spew out but that sorta stuff never sits right with me so YES whilst I am always up for a challenge, especially food related, I am not going to say this is the start of a ‘new me’ cause let’s face it, existing me is already pretty great (jokingggg…but seriously).
With that being said, I jumped at the chance of making something I have always wanted to give a go but inevitably chicken out when push comes to shove because I thought it was too much effort. I’m pleased to say I was absolutely correct in thinking that it was indeed a sh*t tonne of effort but also hugely relieved to say it was totally worth it. It tastes SO GOOD.


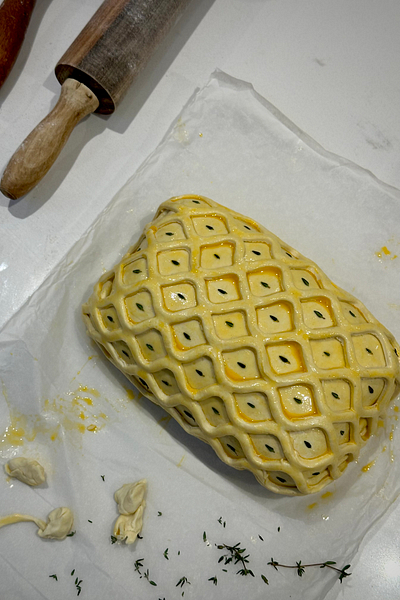
So here we are, it’s Gordan Ramsay’s Lamb Wellington folks. Do it when you’re feeling mentally strong and brave and PREP AHEAD. I cannot stress enough that prep is key – get the crepes and duxelles all made the night and give yourself less stress on the day so all you gotta do is bake, make, eat and repeat.
Recipe Serves: 6
Y O U – W I L L – N E E D –
Meat
600 g Lamb Loin/Cannon
Duxelle
350 g Button Mushrooms
2 Cloves of Garlic, grated or finely chopped
4 Sprigs of Thyme, leaves only
100 ml Red Wine Jus (I subbed for 100 ml Red Wine + 1 Chicken Stock Cube)
100 ml Double/Heavy Cream
Crepes
60 g Plain Flour, sifted
1 Large Egg
140 ml Whole Milk
10 g Wild Garlic (I subbed for 10 g chives)
Salt & Pepper
To Construct
5 Slices Parma Ham
2 Puff Pastry Sheets (or 1 if you opt to not lattice)
Pinch of Thyme Leaves, to decorate - optional
M E T H O D -
FOR THE LAMB:
Heavily season the lamb with salt and pepper (bottom and top) before searing in a very hot pan. Caramelise as quickly as possible to avoid over cooking (I mean just let it kiss the pan, colour and turn).
Remove from the pan and leave to sit.
FOR THE DUXELLE:
Pulse the mushrooms in a blender until fine before adding to a hot pan with a glug of vegetable oil. Allow the mushrooms to sweat for a few minutes before adding the thyme and garlic.
You want to cook the mushrooms until all the water has evaporated.
Next in is the red wine jus (I subbed for red wine plus a stock cube which worked very well) and cream. Give it all a good mix and gently simmer until the mix is sticky and the liquid has evaporated again (don’t stress if the butter splits).
Transfer the duxelle from the pan to a shallow tray and leave to completely chill.
FOR THE CREPE:
Whisk the milk with the flour and 1 egg, and season with salt and pepper. Give it all a good mixy mix with a balloon whisk.
Finely chop the wild garlic (I subbed with chives), before adding to the bowl and mixing again.
Add a glug of veg oil to a large -stick pan and place over a medium heat.
Once the pan is hot, use a ladle to pour the batter into the pan. Give the pan a swirl to even out the batter and leave to cook for a few minutes. You’ll know when to flip when the edges have crisped up – don’t force it! Let it gently brown before flipping over and cooking again for another minute or so.
Repeat the crepe process with the remaining batter. Leave the crepes to cool.
CONSTRUCTING THE WELLINGTON:
Lay 3 long layers of cling film on a table or your worktop and lay two crepes on top (make sure the crepes are the same width as your lamb loin/cannon).
Carefully lay the parma ham on top, covering all the crepes. Use a spoon to transfer the chilled duxelles on top and press down with the back or with an offset palette knife to create an even layer on top of the crepe.
Place the lamb on top of the duxelle (long edge of the lamb sitting on the short edge of the duxelle) and use the clingfilm to help you tightly roll and wrap. And I mean TIGHT folks. Squish that alllll together so it’s nice and cosy.
Pop this in the fridge for at least 2 hours (the longer the better - overnight is perfect).
When you are ready to bake the pastry, unwrap the lamb and place it at the edge of the sheet. NOTE: Keep the pastry on the pre-wrapped baking sheet it comes with OR roll out your pastry on a sheet of baking paper. Trust me, it makes moving the constructed welly so much easier later on.
Tightly roll once again, leaving the pastry seam at the base of the wellington. Wrap the exposed sides as you would with a present, or tuck underneath.
Egg wash the pastry on all sides.
If you want the lattice top, grab the second sheet of pastry and use a lattice roller to firmly press the indentations. I learnt the hard way here - don’t use the roller from edge to edge. Leave yourself an inch border from the pastry base before you roll, otherwise it will be a mess and you will lose your head (facts).
Gently pick up the pastry, and lightly pull apart to expose the lattice pattern and carefully layer on top. Tuck the sides underneath and egg wash once again.
I was extra and added thyme leaves on top in between the lattice holes but honestly I have no life so don’t do this.
COOKING THE WELLINGTON:
Allow the wellington to reach room temperature whilst you pre-heat your oven to 180°C/355°F/Gas Mark 4. Place a metal tray on to the middle shelf of the oven.
Once heated, transfer the wellington onto the hot tray (you can keep it on your sheet of baking paper for ease) and cook for 10 minutes (according to the thickness of the lamb, reduce cooking time if the lamb is thin).
Then, raise the the oven temperature to 210°C/410°F/Gas Mark 7 and cook for a further 9 minutes (according to Gordon but mine needed more like 20 mins in total) to achieve a nice golden brown colour.
Rest for 10 minutes and slice with a serrated knife to serve.
Here’s a snapshot of how it all comes together, whilst you unravel.
Now, I pretty much pride myself on making a damn good, fudgey, super chocolatey sponge – you know the sort which may just stick to your teeth a little? And the best bit about it is, it’s one of the easiest and quickest cake sponges to make too. This one couldn’t be simpler: wet mix + dry mix = heaven. The sort of maths I can always get behind. When baking and creating new recipes, there is normally a key person who has inspired it.
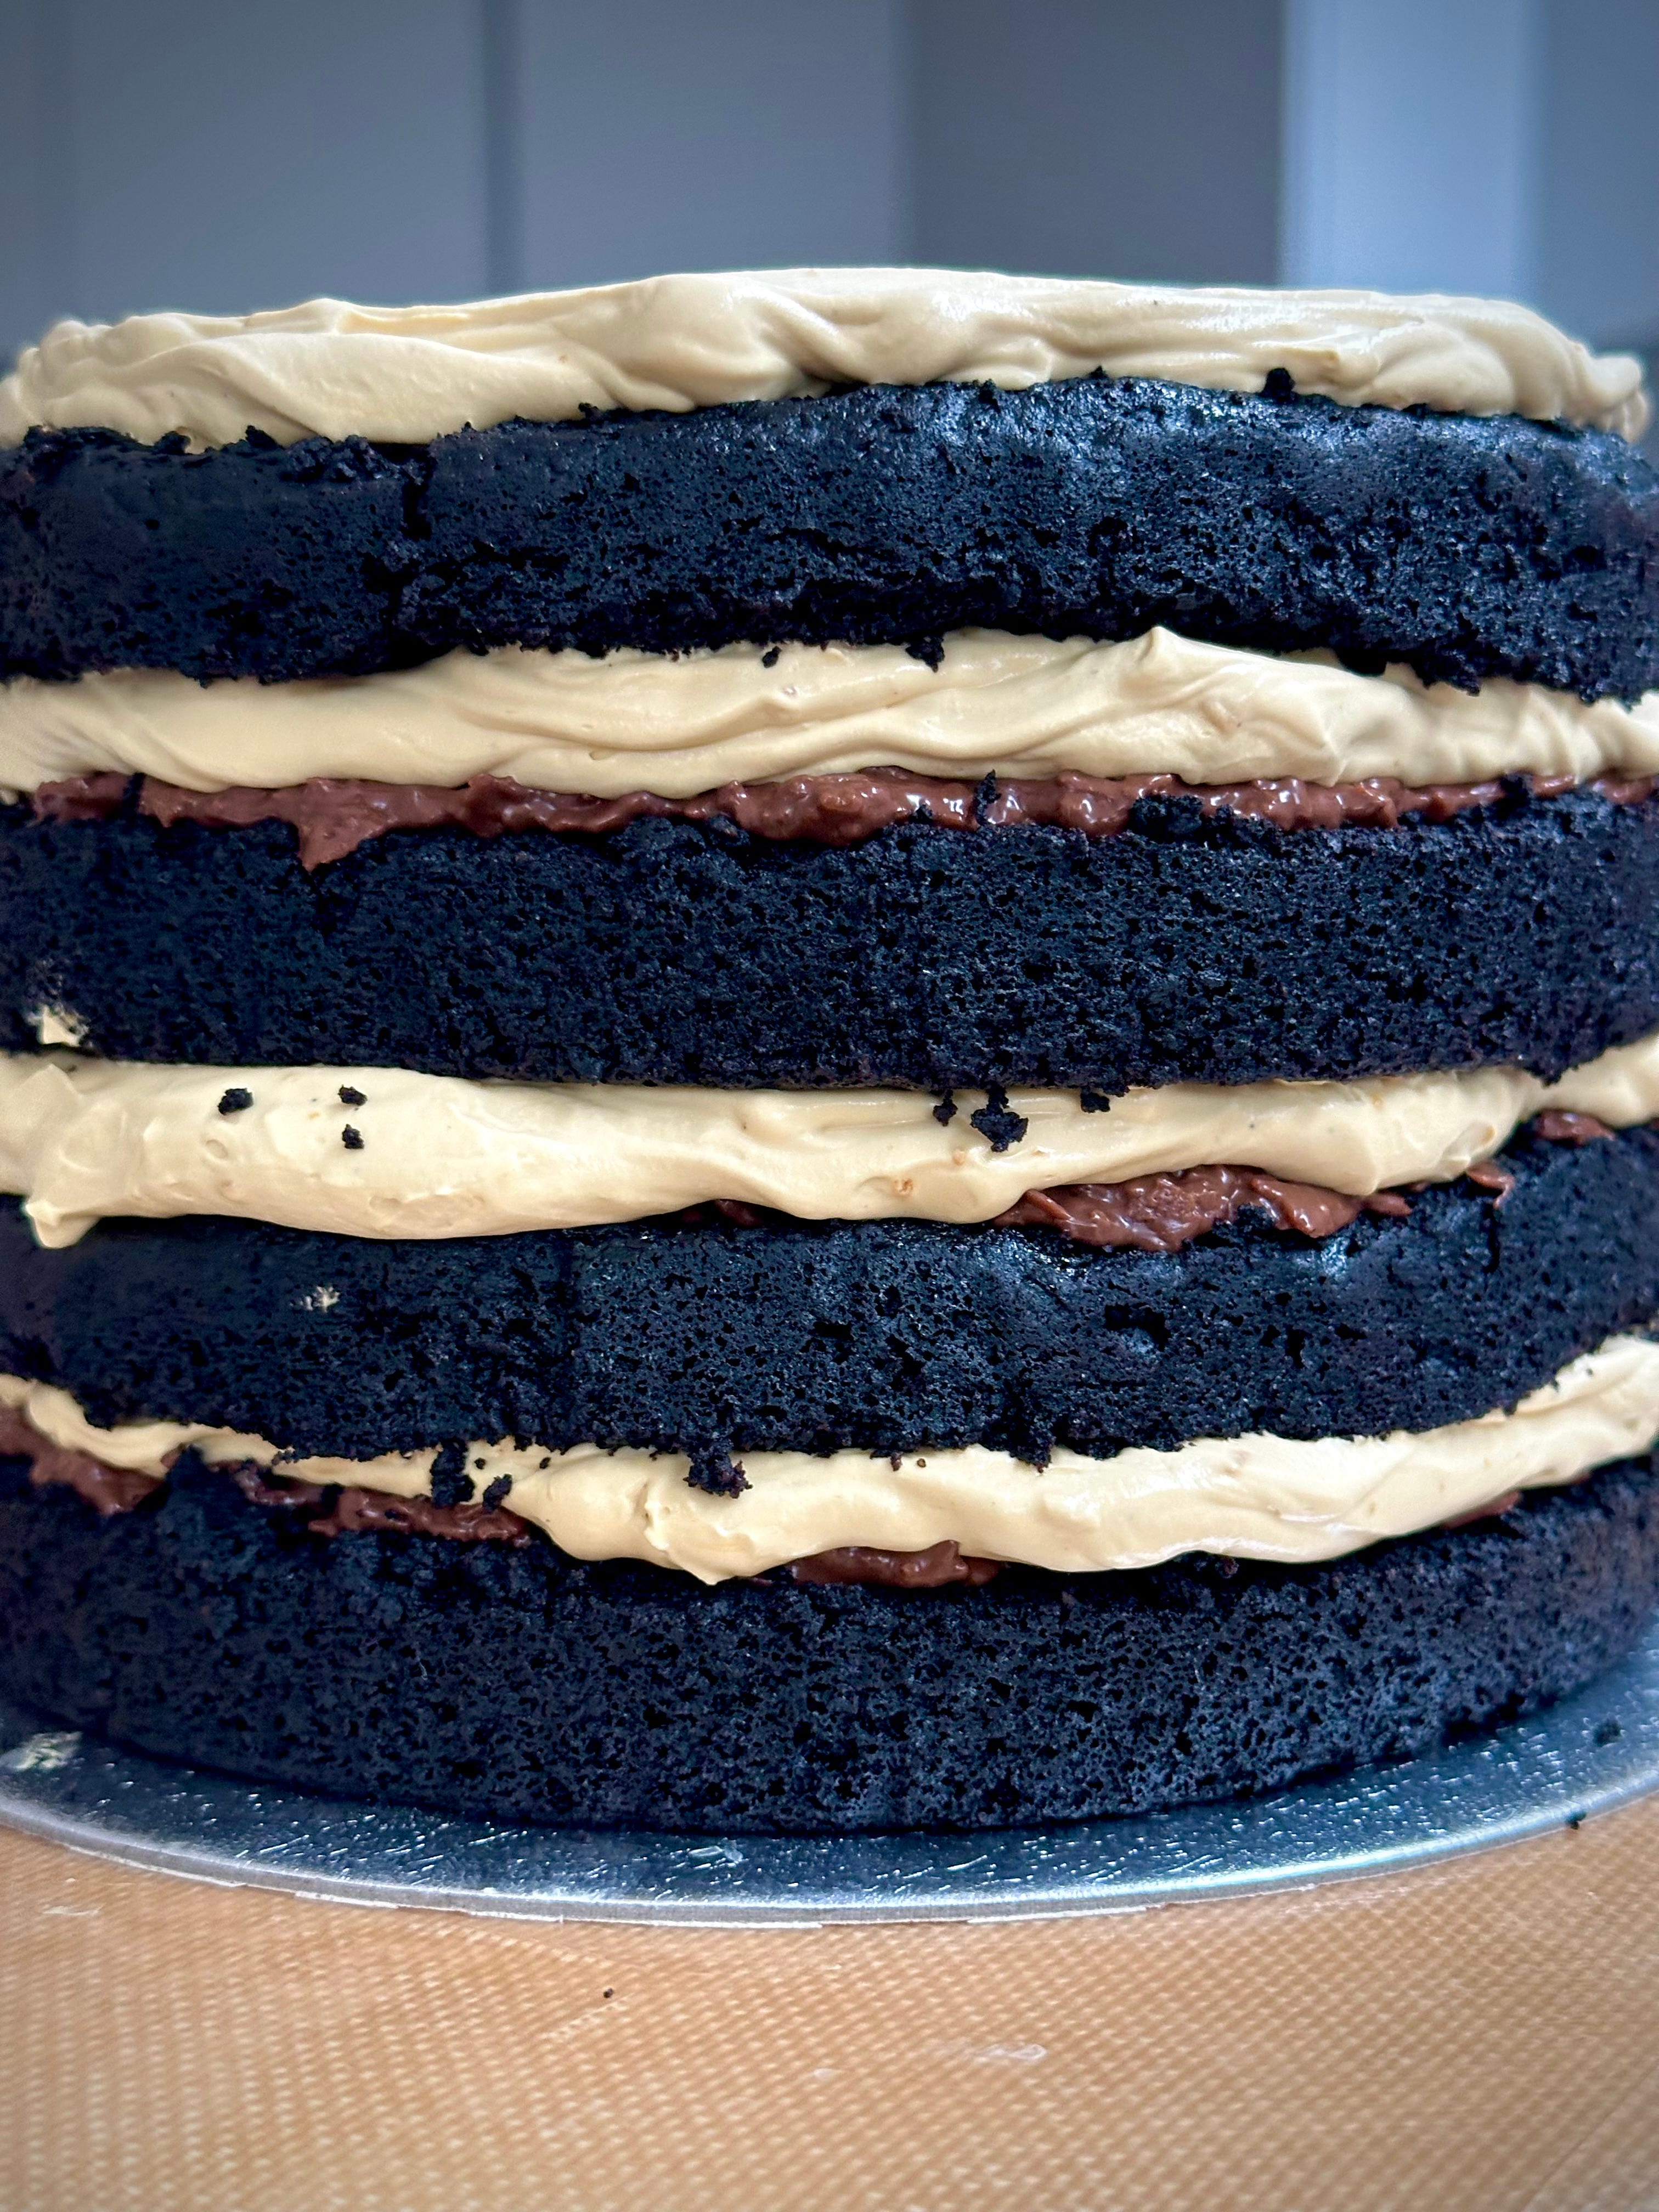
My Chocolate Fudge Sponge & Honeycomb Cake is paired with a deliciously light mascarpone cream which is spiked with plenty of vanilla bean and honeycomb which gives a deserving glorious golden sheen for this indulgent god tier cake. Make it once and you’ll make it forever.
I made this cake for my GBFF Antony (ya know the one who got the boot in week 3 of my series of Bake Off – I know he’s reading this so hi, worst Indian in the tent) for his birthday. A mildly towering cake, packed full of all the yums, filth and deliciousness for someone truly special in my life (gross). The sponge is super similar to the one I made for my birthday and shared with you last year but with a few tweaks (this one only makes 2 sponges, as opposed to 3) and is presented with a few more layers for that extra jazz and wow but on a slightly more achievable scale.


Recipe Makes: 2 x 8 inch / 20 cm Sponges
Keep reading with a 7-day free trial
Subscribe to The Last Bite to keep reading this post and get 7 days of free access to the full post archives.