

Serving Up A Slice of Nice
With my Black Forest (ish) Basque Cheesecake and the ULTIMATE Thanksgiving recipe from gal pal Rachel Green - a Traditional English Trifle.


Shall I say it? I’m just gonna say it.
I don’t want to alarm any of you but…we have 32 days left until Christmas. That’s right, just a little over a month and guess what? I am massively not ready for it.
As a self-professed Christmas lover who insists she thrives and comes alive at this time of year, I find myself somewhat…unprepared that it’s really happening. Like did this year really happen? What on earth have I done with my year? I really couldn’t tell you what I even did with my last week so I have returned from what was supposed to be a rejuvenating trip away (hi jetlag) with a mild sense of panic thanks to the fact that I have yet to buy any presents, not thought about a single festive dinner and there’s not a single bauble, nutcracker or fairy light in sight.
And don’t even get me started on my 2023 ‘Things I want to Achieve’ list. Safe to say, it’s gonna rollover to next year. I heard 2024 is where it’s all at anyway.

I don’t know what is up with time at the moment but life feels like someone has pressed the fast forward button and has forgotten to press pause. Truth be told, I am quite looking forward to that period of time between Christmas and New Year where no one knows what day, time or year it is just to have a chance to breathe (and nap. Man I bloody love a nap).
So with that in mind, I am FORCING myself to feel festive because I feel like the next time I blink, it’s going to be 2024 and I’ll be yearning for this time of year again. In the next few newsletters, there’ll be lots of festive treats, nibbles and desserts coming up, including:
My Ultimate Roast Potatoes (I know everyone says they have the ultimate recipe but newsflash: they are lying to you). Mine are gloriously roasted with garlic, lots of thyme, basted in marmite and sprinkled with semolina and a heavy grating of parmesan for a super crunchy crust. They are delightful and truthfully, I am salivating just thinking of them.
My Festive Shortbread. I have been making these for years now (dare I say before they started trending on Instagram?) and are a great edible gift for others (and yourself). You can make them fancy, you can keep it basic but my shortbread recipe is elite and if Paul Hollywood says so, who are we to argue (me. I have argued with him but only when he is wrong).


My Boozed up Brownies. I rarely share recipes for things like brownies as there are so many that already exist and in the world of all things bakes and cakes…they are pretty – dare I say it – boring? My version is everything but boring. My Chocolate Orange & Salted Caramel Brownies are not only deliciously naughty but they are gluten free too – win for all (unless you’re vegan).
My Mini Lemon Meringue Tarts. These are the perfect ending to any dinner party and I will show you how easy it is to nail a perfectly set lemon meringue tart. On top of that, I’ll show you a number of ways you can decorate the tarts including making the meringue look like a tree, a snowman or keeping it classy with some simple piping.


Let the countdown begin (she says, mildly exasperated)!

As this week officially marks the start of the Festive Season – the tree is going up and the Buble is about to be played til I am sick to the back teeth of the guy. Now is about the sorta time I start to think about something that I vow to never do ever again, every single year without fail. That’s right. It’s time to start GINGERBREADING.


I hate myself for actively choosing hell every single December but I feel now that the annual meltdown over constructing a gingerbread house is almost…tradition now? Like Christmas doesn’t feel like it’s Christmassed without it ya know? Plus, it makes me feel like I am mildly putting my two Architecture degrees to good use. If any of my old tutors are reading this, I TOLD YOU I WOULD MAKE IT.
My first and favourite design was based very loosely on Who-Ville and by loosely, I mean it totally took on a mind of its own once I started going and ended up looking like nothing I had originally planned but I loved it nonetheless anyway. My gingerbread recipe is a fool-proof, solid recipe and makes for the perfect foundation for any elaborate designs you may have up your sleeve. Alternatively, if the thought of a stress induced few days constructing a house doesn’t sound like a hoot to you, why not bake up the biscuits and give away as edible stocking fillers, gifts (to others AND to yourself) or as a base for cheesecakes, pies, tart crusts or even buttercream.

This year my theme is Ridiculous. And by that, I mean I want to make something utterly outrageous, stupidly unnecessary and has a strong undertone of stress to it. I shan’t show you my inspo pic just yet because in true Libra fashion, I know it will end up looking the complete opposite but can’t wait to show you my Before & After pics once it is done (of the house and myself included – the change is VAST in both instances).
My gingerbread is spiked with orange and is packed full of festive spice and zing. The ginger is loaded in abundance – ground, stem and syrup is used and it tastes deliciously warming once baked.
Recipe Makes: 1 x 3 Small Houses or A LOT of Gingerbread Biscuits (I’m talking well over 150 small biscuits)

Y O U – W I L L – N E E D –
390 g Unsalted Butter
315 g Dark Brown Sugar
170 g Golden Syrup
50 g Stem Ginger, finely chopped (optional)
1 tbsp Stem Ginger Syrup, from the jar (optional)
1 kg Plain Flour, sifted
1 tbsp Bicarbonate of Soda, sifted
2.5 tbsp Ground Ginger, sifted
1 tsp Cardamom, ground
Pinch of Salt
Zest of 1 Large Orange
M E T H O D -
Add the butter, sugar, and golden syrup to a pan over a medium heat and cook until melted. Remove from heat.
Add the stem ginger and ginger syrup to the pan, if you are using. Alternatively, you could use crystallised ginger for a subtler hit of zing. Use a balloon whisk to mix and make sure the butter is thoroughly incorporated.
Add the flour, cardamom, ground ginger, orange zest, bicarbonate of soda and pinch of salt to a large bowl. Use a balloon whisk or fork to mix well to ensure they have all blended together.
Pour the melted butter into the flour and mix using a wooden spoon to bring the dough together.
Once cool enough to touch, lightly knead with your hands. I like to use the dough whilst it is still warm as it will begin to firm up whilst cutting out the shapes. TIP: Make sure you keep any dough you are not using covered with clingfilm or a clean kitchen cloth to avoid the dough going hard. If it does and it becomes too stiff to roll, microwave for 10 second blasts until the dough becomes soft again.
Flour the worktop and roll out some of the dough to approx. 2.5mm thick. Keep the remaining dough in the ball and covered to keep warm. Use a stencil or paper cut out of a house as your guide and cut out all the needed shapes using a knife. Alternatively, just use a cookie cutter if you’re gifting or using the biscuits as edible decorations.
Place the cut-out pieces onto a lined baking tray and pop into the freezer for 30 mins. TIP: Roll your dough directly onto a silicon baking mat or greaseproof paper before cutting to make it easier to transfer onto a baking tray.
Preheat the oven to 180C Fan/390F/Gas Mark 6.
Once the biscuits are firm and frozen, pop into the oven for 12/13 mins.
Remove from the oven, place the stencil back on top of the biscuits and trim any surplus dough and leave to cool on a wire rack.


The next recipe we have this week is something I made this for the first time last year and there is no way that was ever going to be the last. I grew up watching Friends and would eagerly wait for 8 pm on a Friday for the next episode to drop, so if you’re anything like me, you gotta make it too – for nostalgia sake (and for the look of horror on peoples faces when you tell em beef and peas have a cameo).
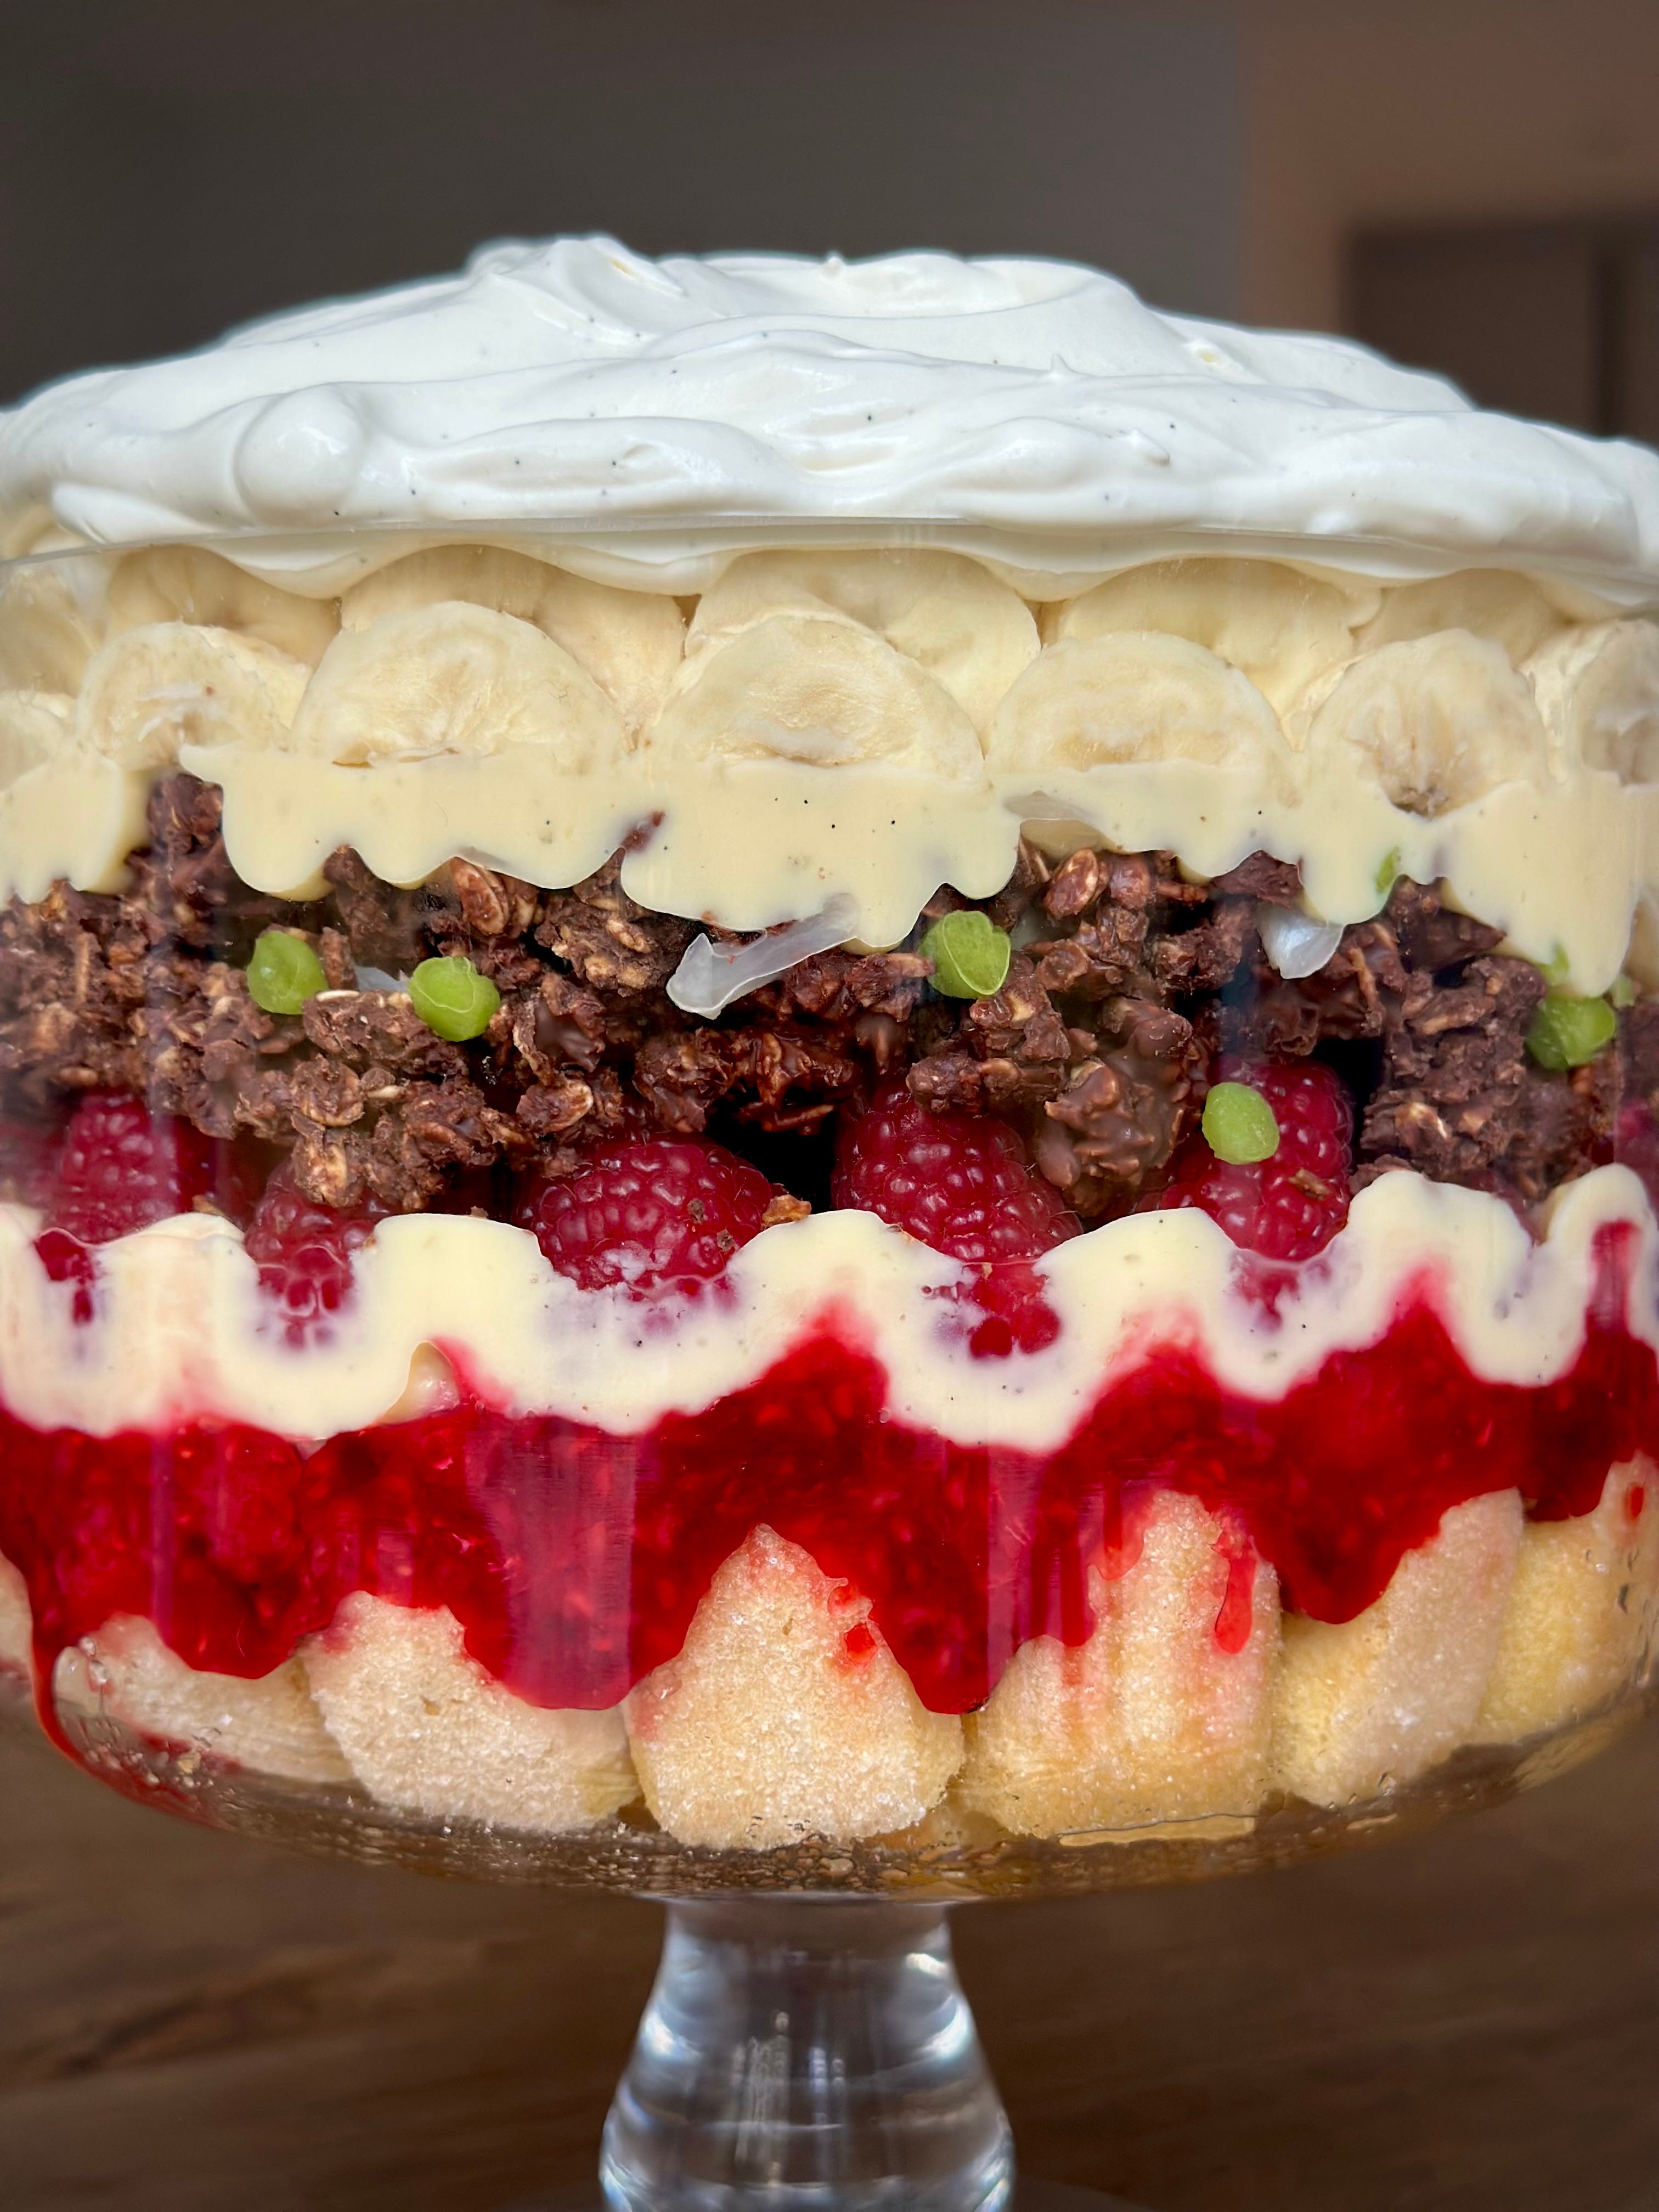
We got layers of:
Ladyfingers dipped in Lemon Syrup
Homemade Raspberry Jam
Custard…which I made from scratch
Raspberries
More Ladyfingers
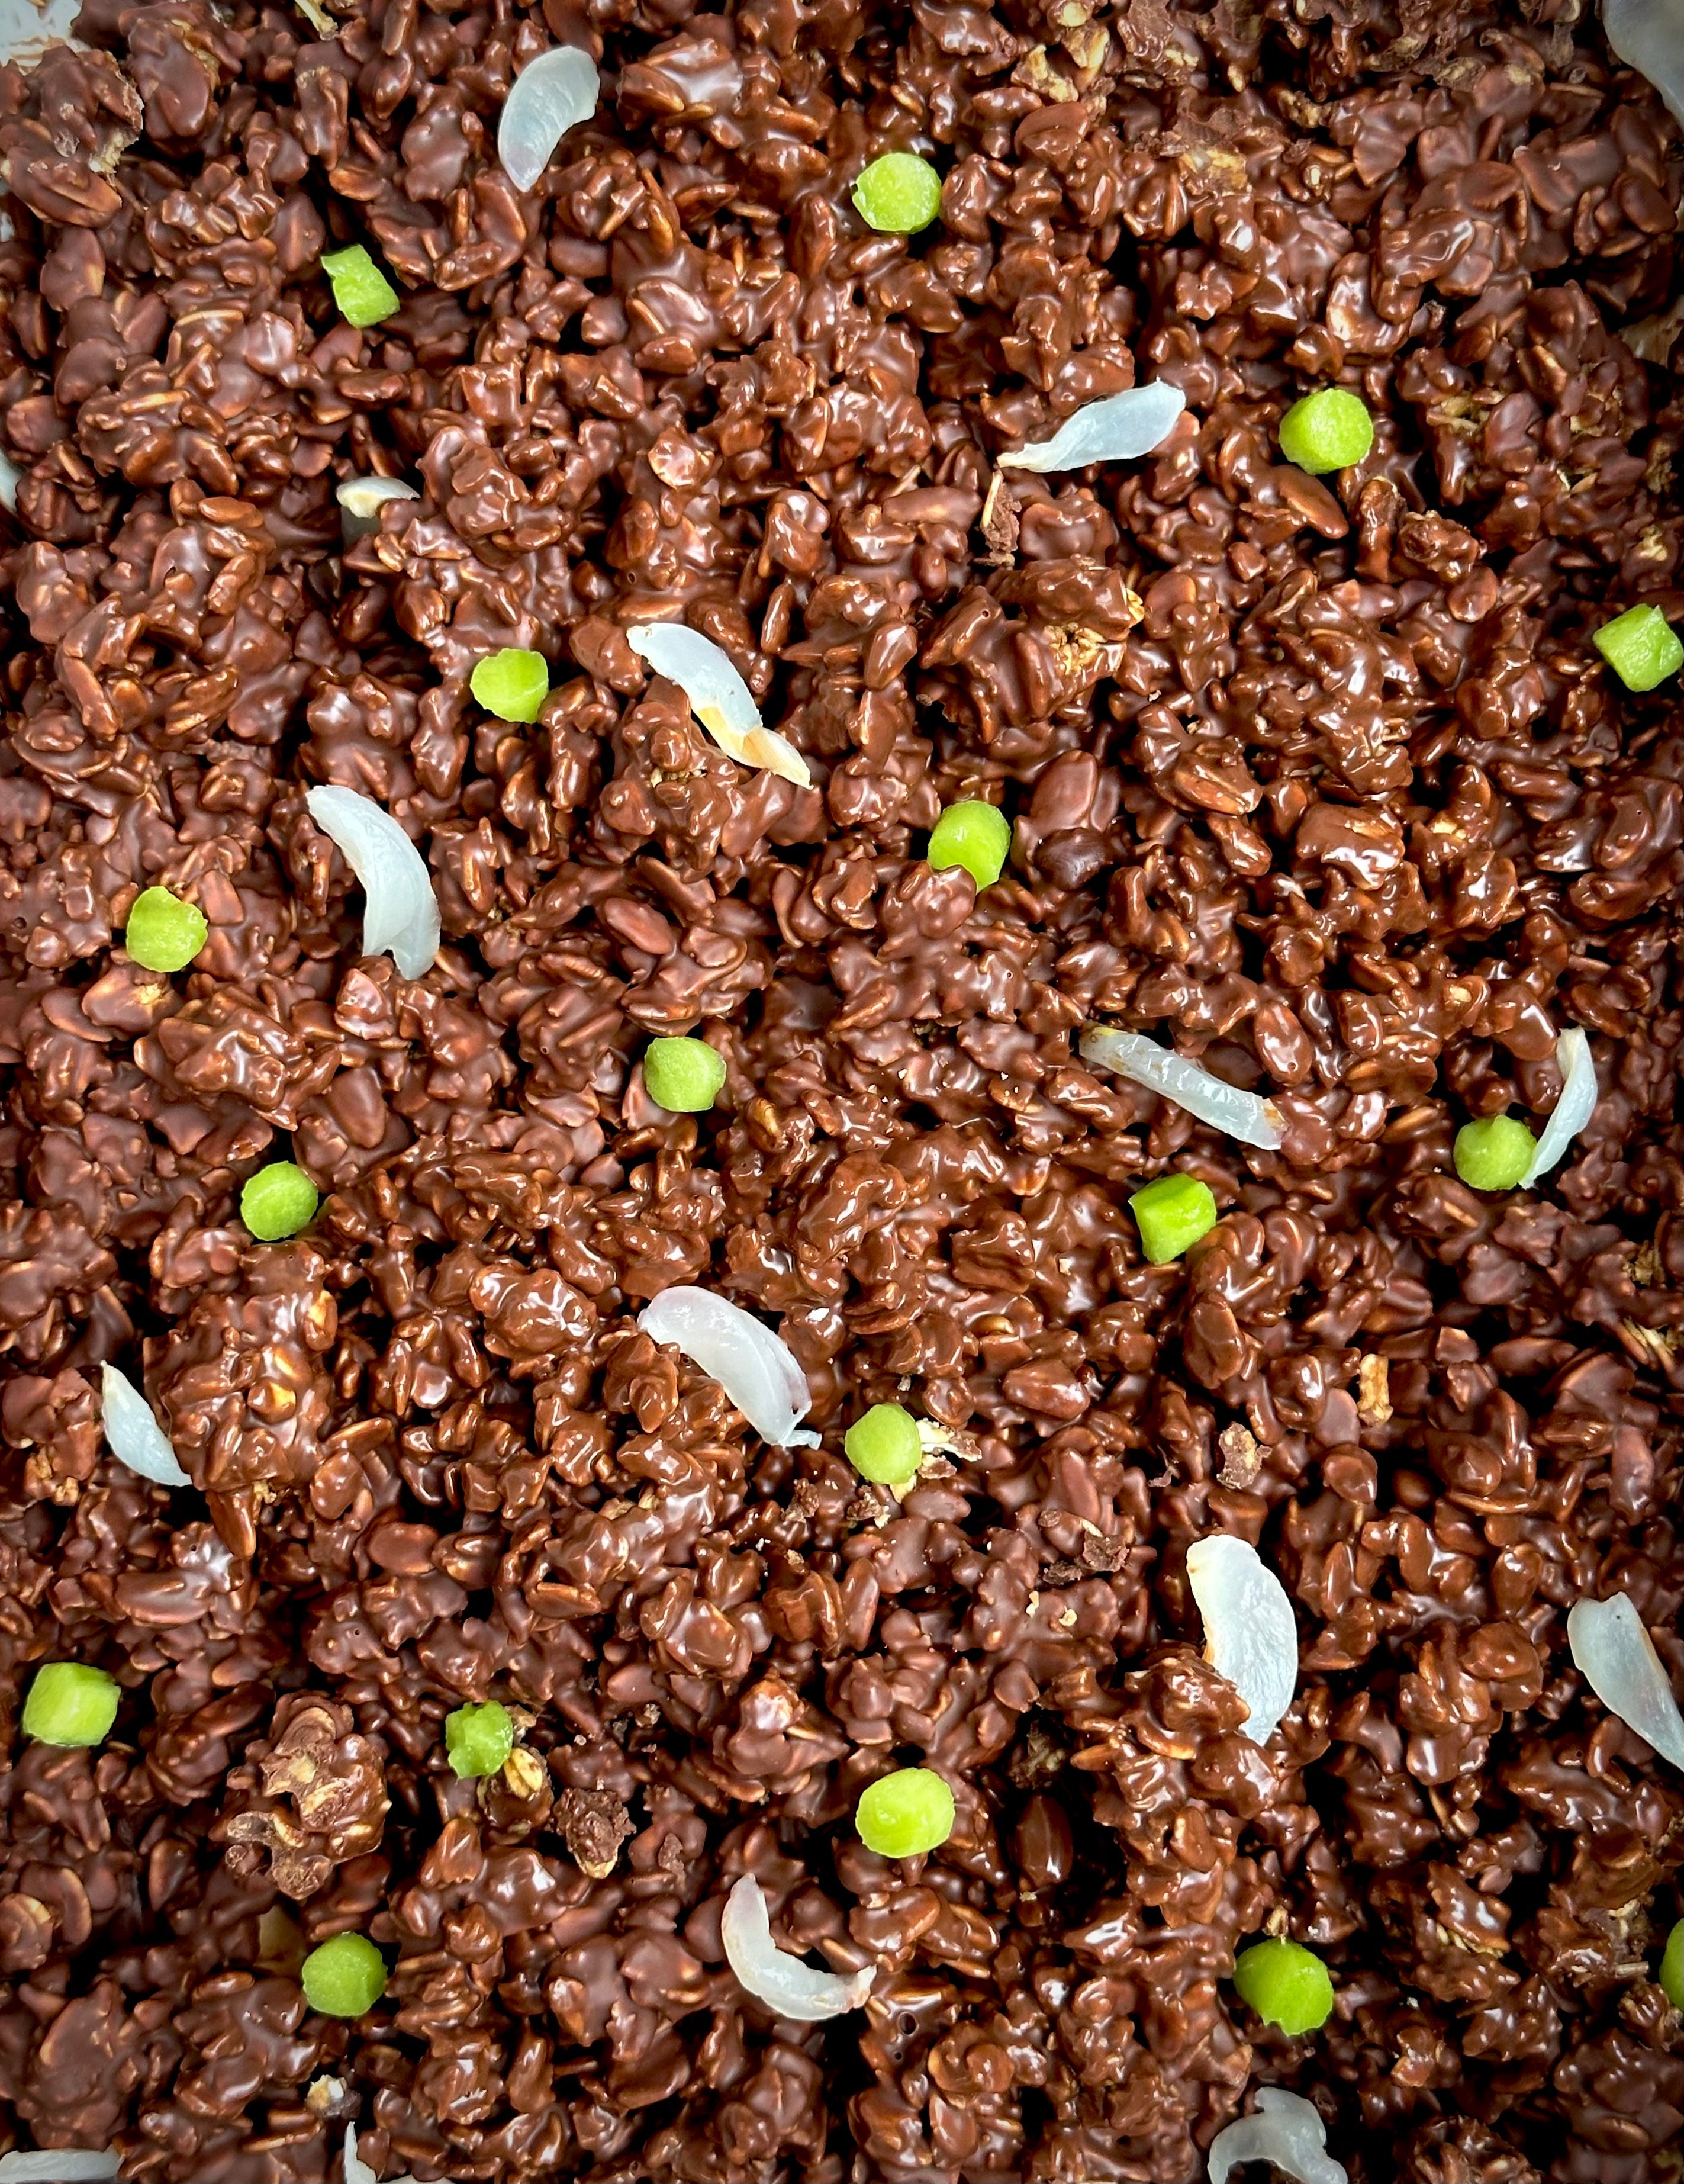
Beef sauteed with Peas and Onion aka granola mixed with melted chocolate, onions made from lychees and kiwi peas
Then more Custard
Bananas
Then I just put some Whipped Cream on it.
Did I ever envisage sharing gal pal Rachel Green’s Traditional English Trifle? No. But would it be rude to not share the fun? Absolutely.
You’d be amazed at how many people last year thought that I
A. Thought this was how you actually made a traditional English trifle
B. Thought I had indeed put beef into said trifle
C. Couldn’t believe I was spooning in said beef into my mouth
Question is: could it BE any more delicious??
Recipe Makes: 1 x 120 oz / 3.4 kg Trifle Bowl

Y O U – W I L L – N E E D –
Ladyfingers
250 g Sponge Fingers
200 ml Water
1 Lemon, juice & zest
190 g Caster Sugar
Raspberry Jam/Compote
400 g Frozen Raspberries
Squeeze of Fresh Lemon
40 g Caster Sugar
10 g Cornflour, sifted
Custard
500 ml Whole Milk
1 tsp Vanilla Bean Paste
6 Eggs, yolks only
100 g Caster Sugar
25 g Cornflour
Sauteed Beef w Onions & Peas
250 g Granola (get one with no nuts or fruity additions)
125 g Dark Chocolate, chunks/callets
125 g Milk Chocolate, chunks/callets
2 Lychees, peeled & sliced
1 Kiwi, skinned and sliced
Whipped Cream
400 ml Double/Whipping Cream
40 g Icing Sugar, sifted
1 tsp Vanilla Bean Paste
Additions
Handful of fresh Raspberries
1 Banana, ripe & large
M E T H O D -
Let’s get started with the sugar syrup for our sponge fingers. Add all the ingredients (bar fingers) into a pan and place over a medium heat.
Bring to a boil before reducing to a simmer and allowing the liquid to reduce to a syrupy consistency – this will take approx. 10 minutes. Leave to one side and leave to cool.
For the compote, the fruit, sugar, and squeeze of lemon into a pan and place over a medium heat. Allow the raspberries to soften and partially break down, leaving some whole for a bit of a bite – this should take no more than 10 minutes.
Once the fruit is near the consistency you like (cook this for longer if you want something smoother), sprinkle in the cornflour and gently stir, cooking out the flour for a few minutes before transferring the compote to a bowl to completely cool.
For the custard, add the milk and vanilla to a pan and place over a medium heat. Bring to the boil.
Whilst the milk is heating up, in a bowl, add the sugar, egg yolks and cornflour. Use a balloon whisk to mix until smooth, working through the gritty stage.
Once the milk is near boiling, pour 1/3 into the yolks and immediately stir until smooth. Pour this back into the saucepan and reduce the heat to a simmer. Use a balloon whisk or rubber spatula to mix and keep the custard cooking until thickened. You are after a thick pourable consistency so keep this cooking until it coats the back of a spoon well.
Transfer to a bowl and cover with clingfilm to avoid it forming a skin and leave to completely cool.
For the beef, add the chocolate to a bowl and either place it over a pan of simmering water or pop into the microwave to melt. Once melted, remove from the pan/heat and add in the granola. Mix well to coat everything completely and transfer the chunks to a large baking tray to set.
For the peas, remove the skin from the kiwi and slice (you want the green sides, not the middle part with the seeds). Use the tip of a piping nozzle to punch out holes which will be your peas. For the onion, peel the lychee (or use tinned, much easier), destone, and cut into slithers to replicate sliced onions. Leave to one side.
When you are ready to construct, make the whipped cream by adding everything to a bowl and use an electric hand whisk to mix until you reach medium peak.
To construct, dip your sponge fingers into the cooled syrup and add a layer to the base of your trifle bowl.
Top the custard with a layer of the raspberry compote and smooth down the top using the back of a spoon, helping it go into the nooks and crannies of the soaked sponge fingers.
Transfer the cooled custard to a piping bag (makes it easier to transfer neatly to the bowl) and pipe half of the custard over the compote. Use the back of a spoon to smooth down the top.
Add any remaining compote on top, alongside some fresh raspberries around the outside (just visually looks nice – you could scrap this and just use your compote).
Next is another layer of soaked sponge fingers. If you prefer your sponge fingers to have a bit of bite to them, only soak them for a minute or so – the longer you leave them, the softer they will be.
Top the fingers with some ‘beef’. Scatter over your set ganola, adding some ‘peas’ and ‘onion’ to the mix as you go along. I like to position a few of the kiwi and lychee segments around the outside to make sure they are visible.
Next you go in with the remaining custard and smooth down the top once again.
Slice the bananas and arrange however you fancy on top. I went for a double layer of them lining the outside of the bowl, so they are visible and then finished off with a layer of sliced banana in the middle.
To finish it all off, you top it all off with a mountain of whipped cream. Use the back of a spoon to swirl the top to keep it rustic and homely.
And there you have it, a Tradition English Trifle courtesy of Rachel Green.
And then moving onto the final bite for the week which is my Black Forest Basque Cheesecake. Combining a classic flavour combo with a classic bake equals a BIG move for Rubes. I had this bake on my mind whilst I was strolling around Toronto on the hunt for some good bakes and nothing left me quite in the sugary haze I was craving. Cue the ongoing list of bakes on my phone under the note titled ‘MUST BAKE URGENTLY’ and right at the bottom of the list was this beauty.
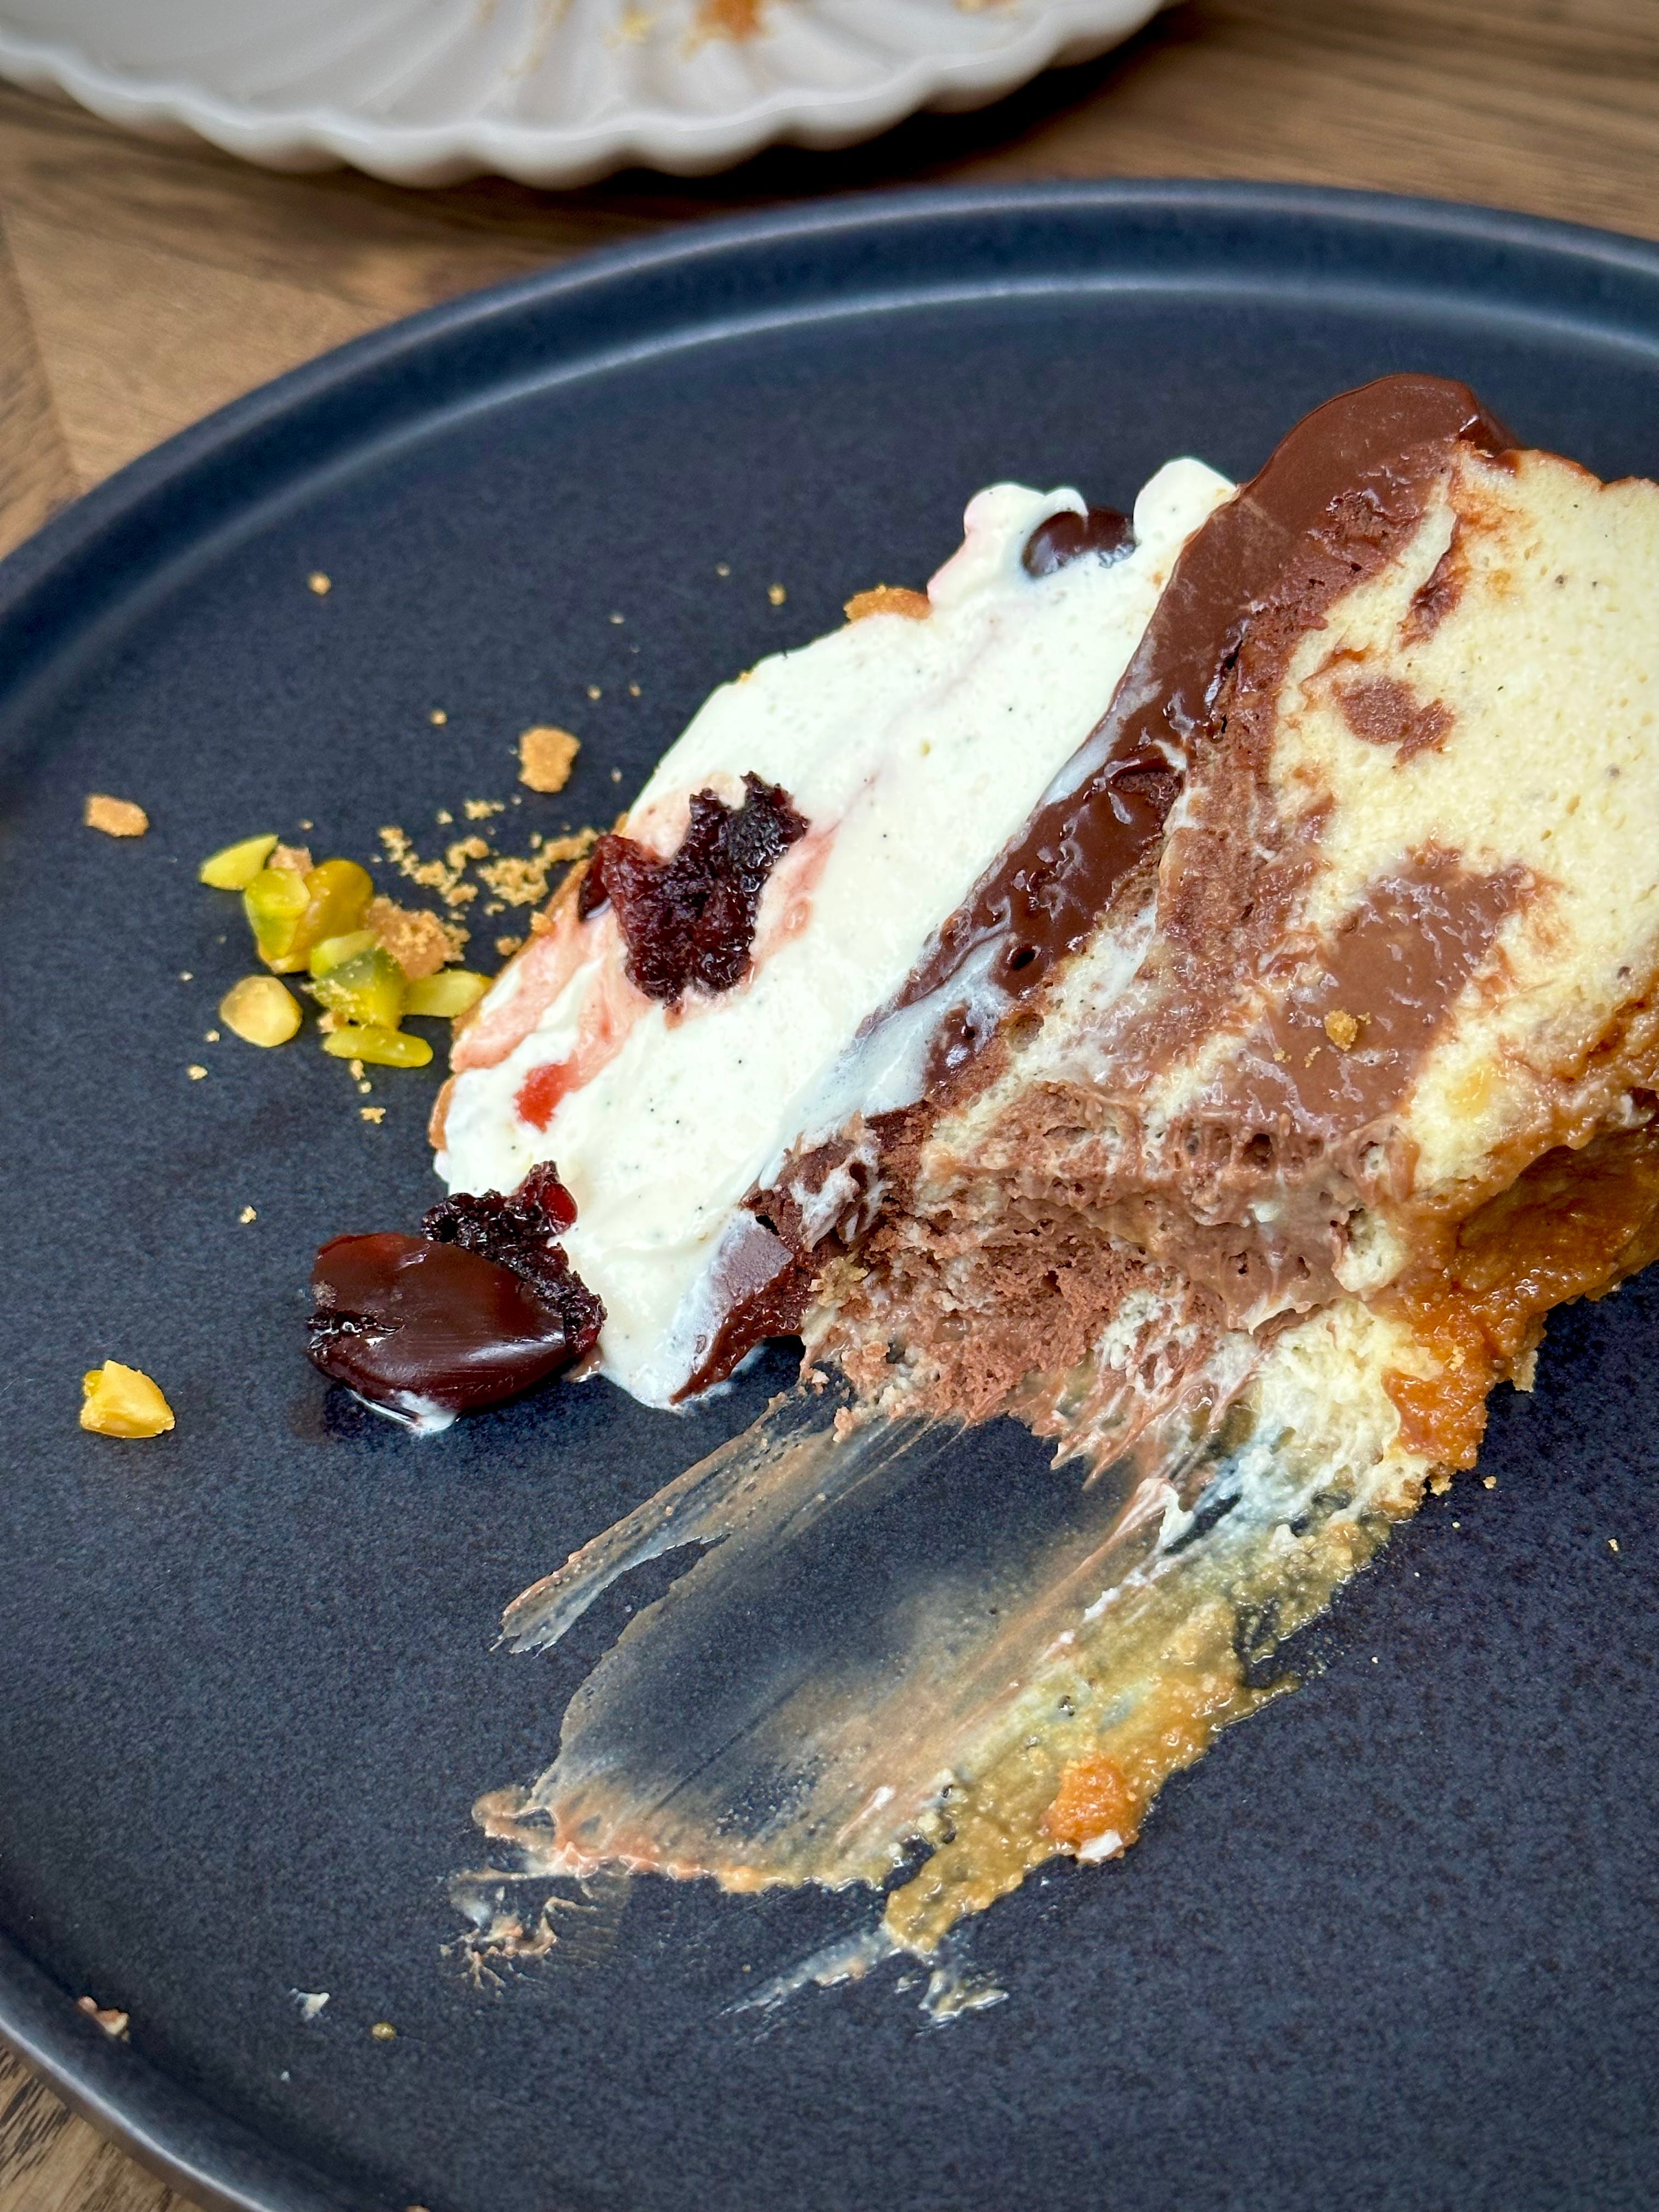
I’ve made many basque cheesecakes before – the salted caramel topped with pistachio and raspberry sort (you can get your grubby mitts on that recipe soon), the vanilla sort, the chocolate sort, the sort where you burn the top too much and it tastes incinerated and now this sort.
The perfect sort.
My version sits on a ginger biscuit base for a bit of texture but has this indulgently, melt in the mouth, velvety smooth filling which isn’t underbaked, nor overbaked…just baked just right and then topped with a thick chocolate layer (which isn’t quite a sauce but also doesn’t snap), a generous heap of vanilla laden chantilly cream, a mountain of syrup soaked cherries and then finished with some chopped pistachio and a light scattering of biscuit crumb to make it look all fancy.
The thing I love about making this is that whilst it looks super high maintenance and she would be demanding your attention every two seconds, it’s actually one of the most fuss-free, easiest, hands off dessert you can make. Which means it is PERFECT for hosting season – this looks after itself whilst you look after the wine/champagne/charcuterie board/snacks/kids/husband/wife/yourself (delete as appropriate).


Recipe Makes: 1 x 23 cm / 9 inch cheesecake
Keep reading with a 7-day free trial
Subscribe to The Last Bite to keep reading this post and get 7 days of free access to the full post archives.