

Not Mindful, Not Cutesy, Not Demure.
Not on my baking watch folks. Back with the good stuff with my Triple Chocolate & Cinnamon Babka, Key Lime Pie Loaf w Ginger & Coconut and Honeycomb & Chocolate Tiramisu. All hail FILTH.


Hey Friends!
I’m back with another delicious edition of the newsy – a little later into the evening than originally planned but that is possibly down to the fact I am currently juggling life, work and relationships alongside moving AGAIN. I never do choose that simple life, do I?
It feels slightly mad (and a bit déjà vu-ey) to be talking to you about that as I remember detailing my every stress about it, pretty much this exact same time last year. I swore not to move for a while, and here I am, 11 months down the line, doing just the thing I said I wouldn’t do. Our last day in this house is the 30th of September and currently I have packed one box. I do not want to make the same mistake as last time and leave everything to the last week because I am not sure my anxiety could handle that again so we’re going for slow and steady to win the race (against time?? Against the landlord?? Against who Rubes?? WHO???).
Before you question my insanity at my third move in about 4 years/5 years (??), don’t cause I KNOW. But truth be told folks, I think it is time I became an adult (gulp) and look for somewhere James, Milo and I can call ours. Like properly ours. Like not have to ask the landlord whether I can hang a photo on the wall sort of ours. One where I don’t wince every time I knock and scratch something because I know it’ll get taken out of my deposit sort of ours. The type where I’m not subject to someone deciding on a whim whether to increase the rent or no longer renew the contract sort of ours. The sort of ours which leaves me undoubtedly indebted to a bank for a very, very, very long time. Which when I write it like that…doesn’t sound so fun???
So yeah, that’s me - on the move, date set in stone, destination yet to be confirmed, one box of my life packed with a gazillion yet to go and all I can reaaaally think about is the plethora of baked goods, treats and delight that are strewn across my worktop? As you can see, I have my priorities sorted and I hope I may never change. You are SO gonna love the spread on the menu this week. It is delightfully naughty and has a little something to tickle everyone’s pickle – whether that be bread, cake or dessert, I have got you covered.
Substack is notifying me with every word I type that I have once again (shock) gone over the word limit. Yeah yeah, I get it. I’ll get to the good stuff. Yeesh.

We are in for a BANGING newsy edition this week folks – the menu lined up is sexy, sensational and sumptuous. The three words you may not automatically associate with baking but the three words I aspire each one of my bakes to be. If we are looking for a good time, I am going to make sure it’s damn memorable and whichever one tickles your pickle, you are in for a treat.
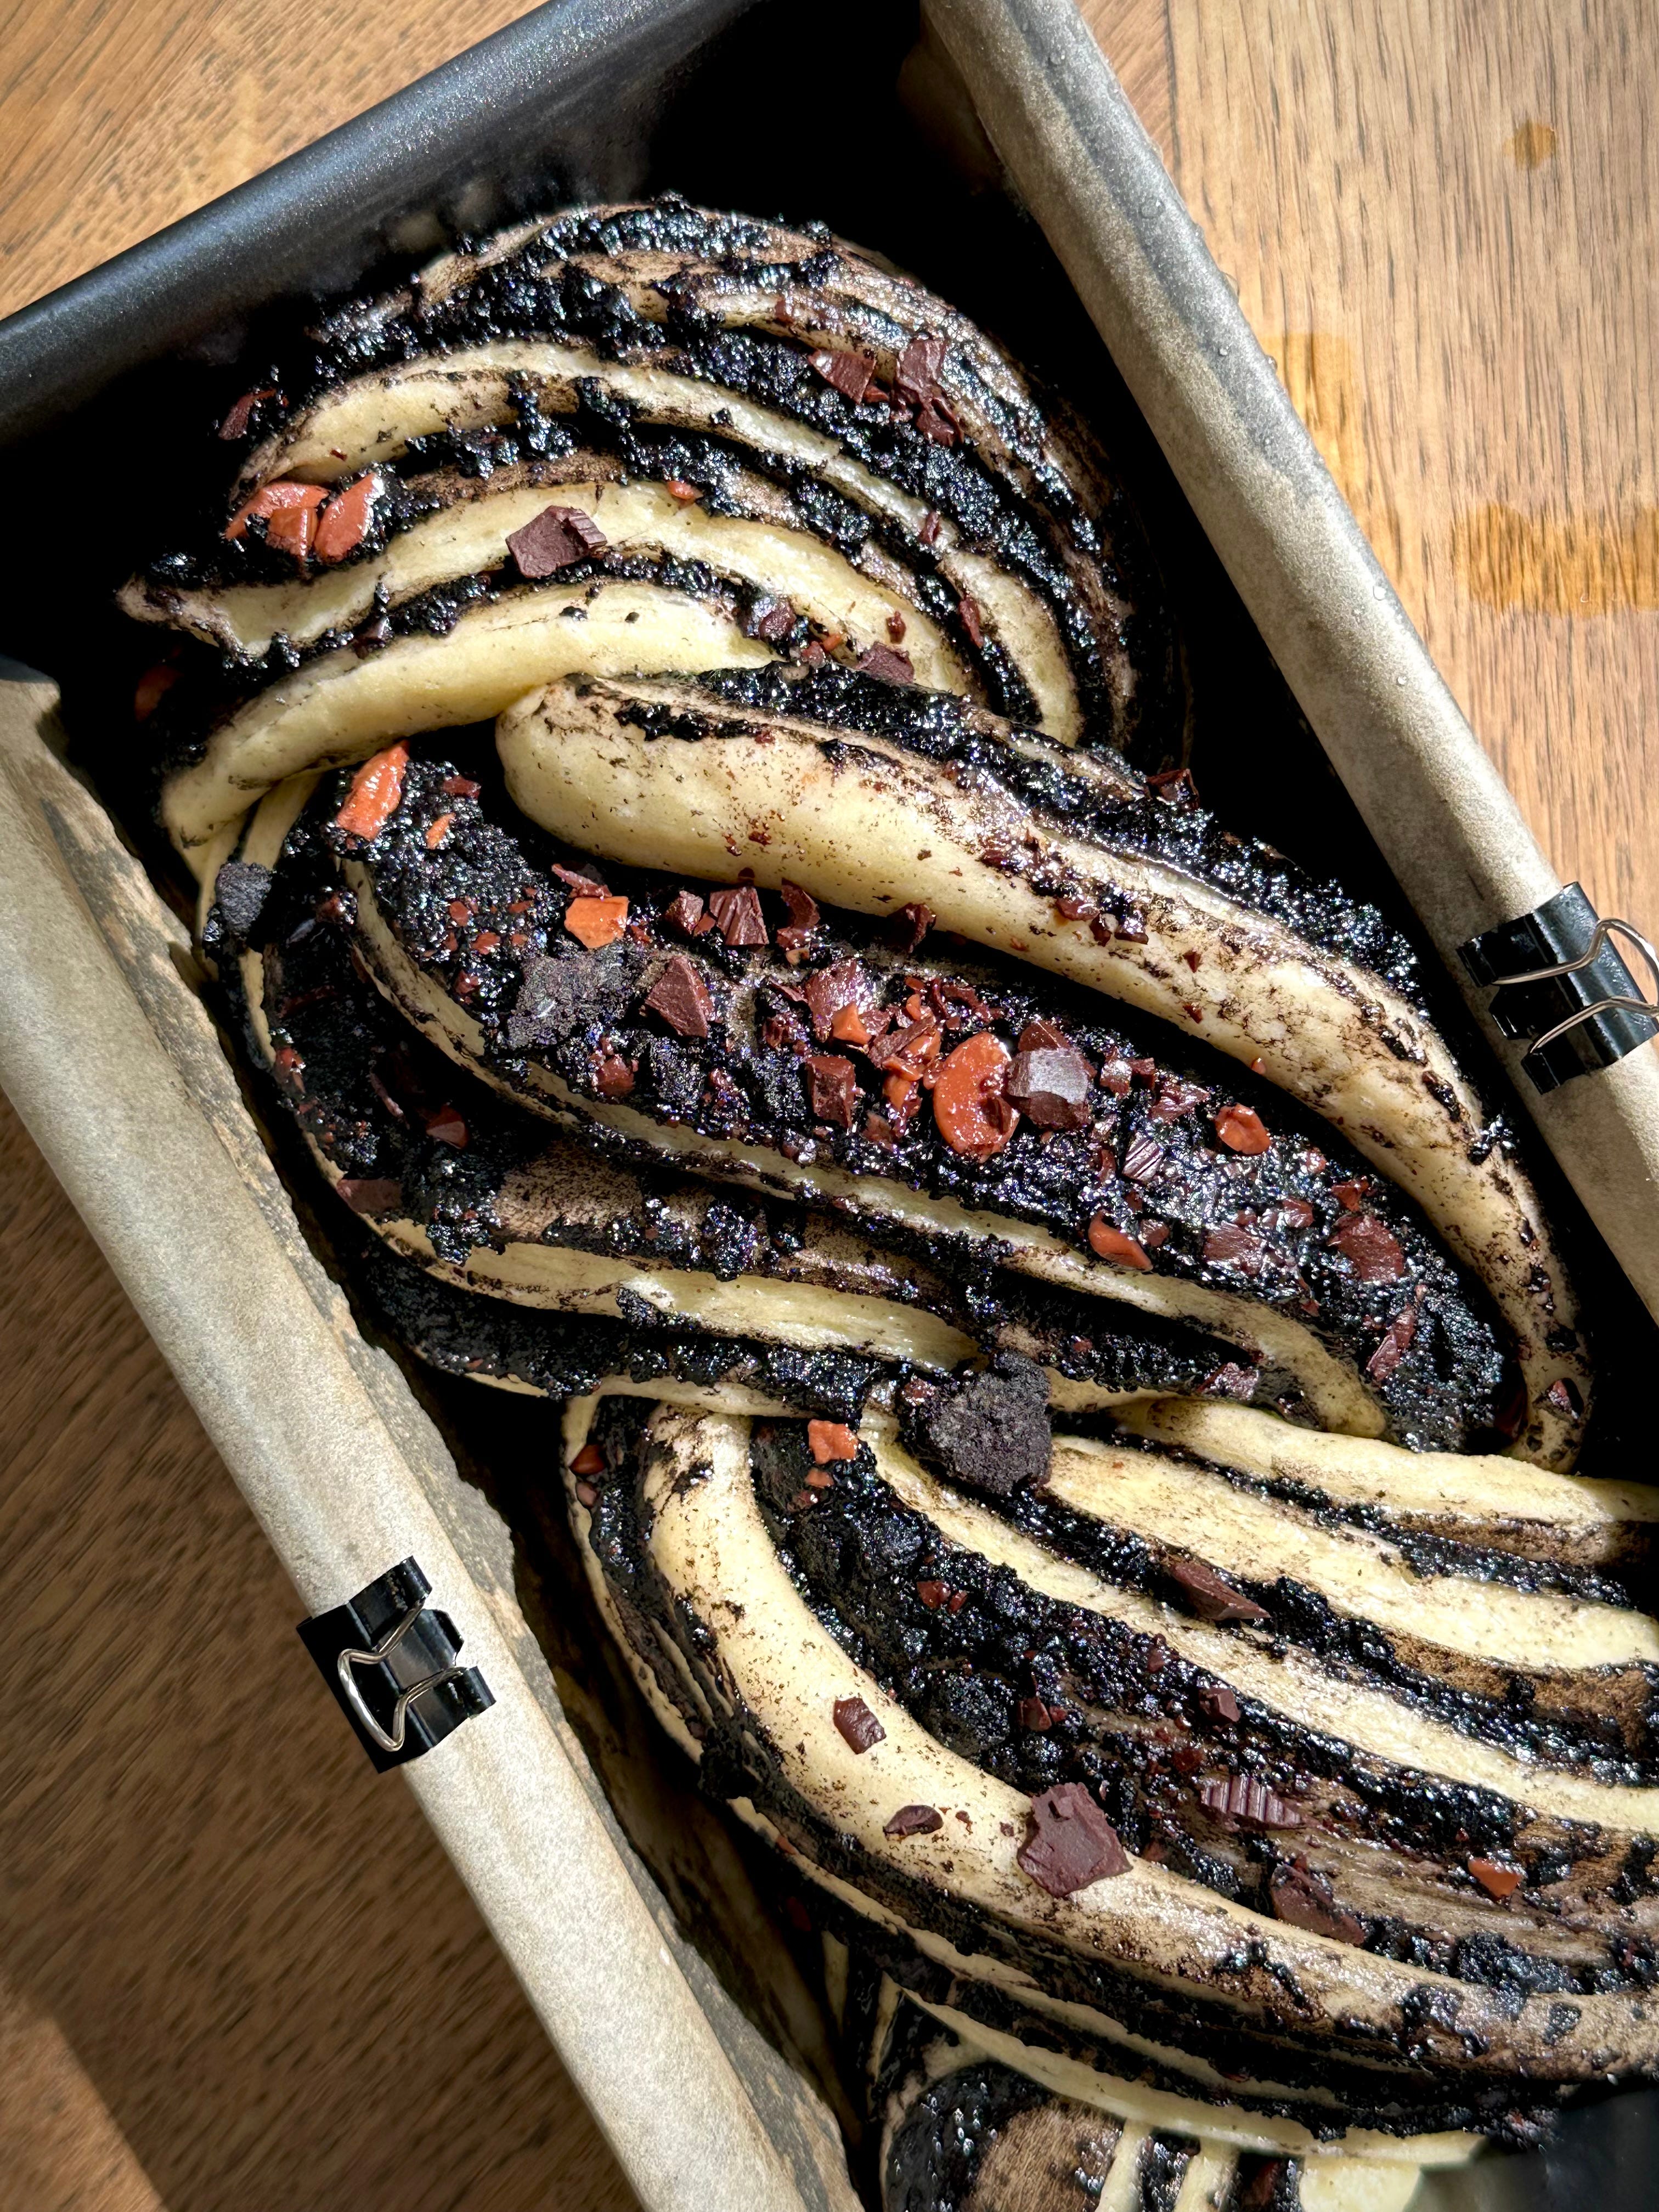
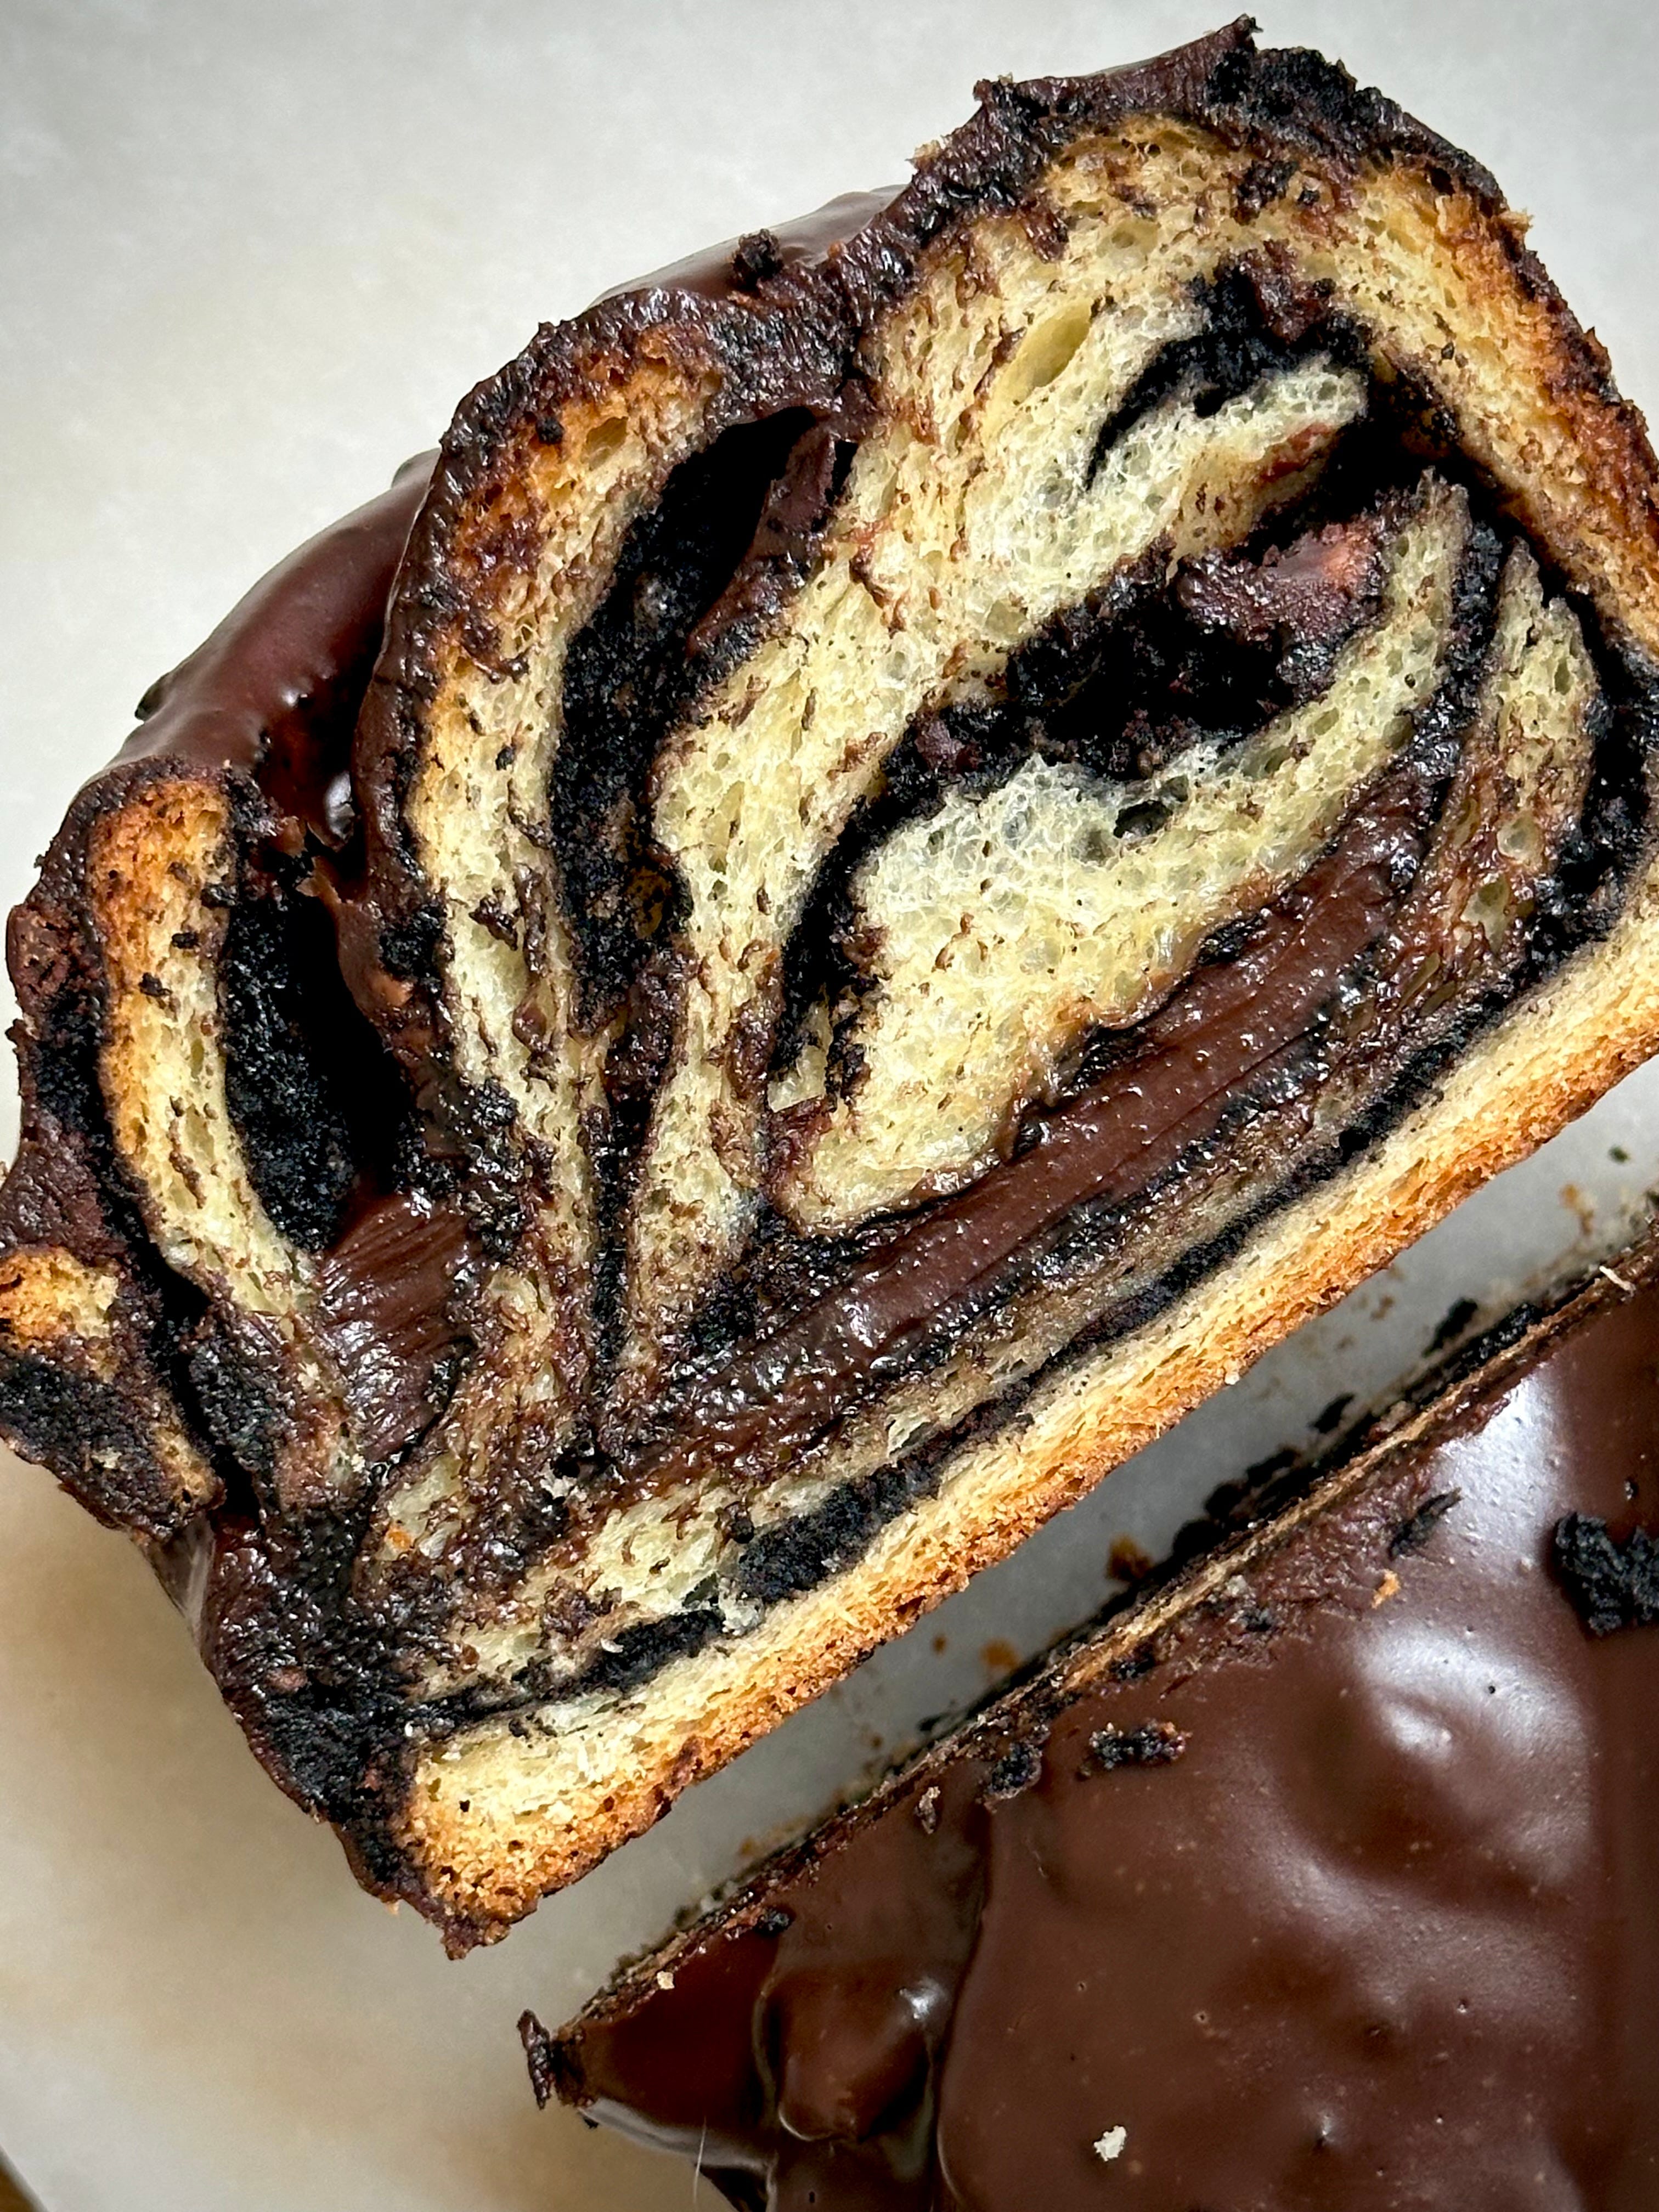
Up first, we have my Triple Chocolate & Cinnamon Babka. If you don’t know what a babka is, I also refer to this as swirly twirly bread for obvious reasons and hopefully that does the trick in giving you some idea as to what this is. Cause one lot of chocolate isn’t enough, I’ve tripled (there is a solid case to say its actually quadrupled) it and then teamed it with cinnamon and a peanut butter glaze which sounds wild but it works TRUST ME. Each slice is a surprise, each bite is addictive and each time you’ll tell yourself no more and then immediately find yourself gobbling down another hunky chunk of it. A good weekend baking project for anyone looking to flex their skills a little.
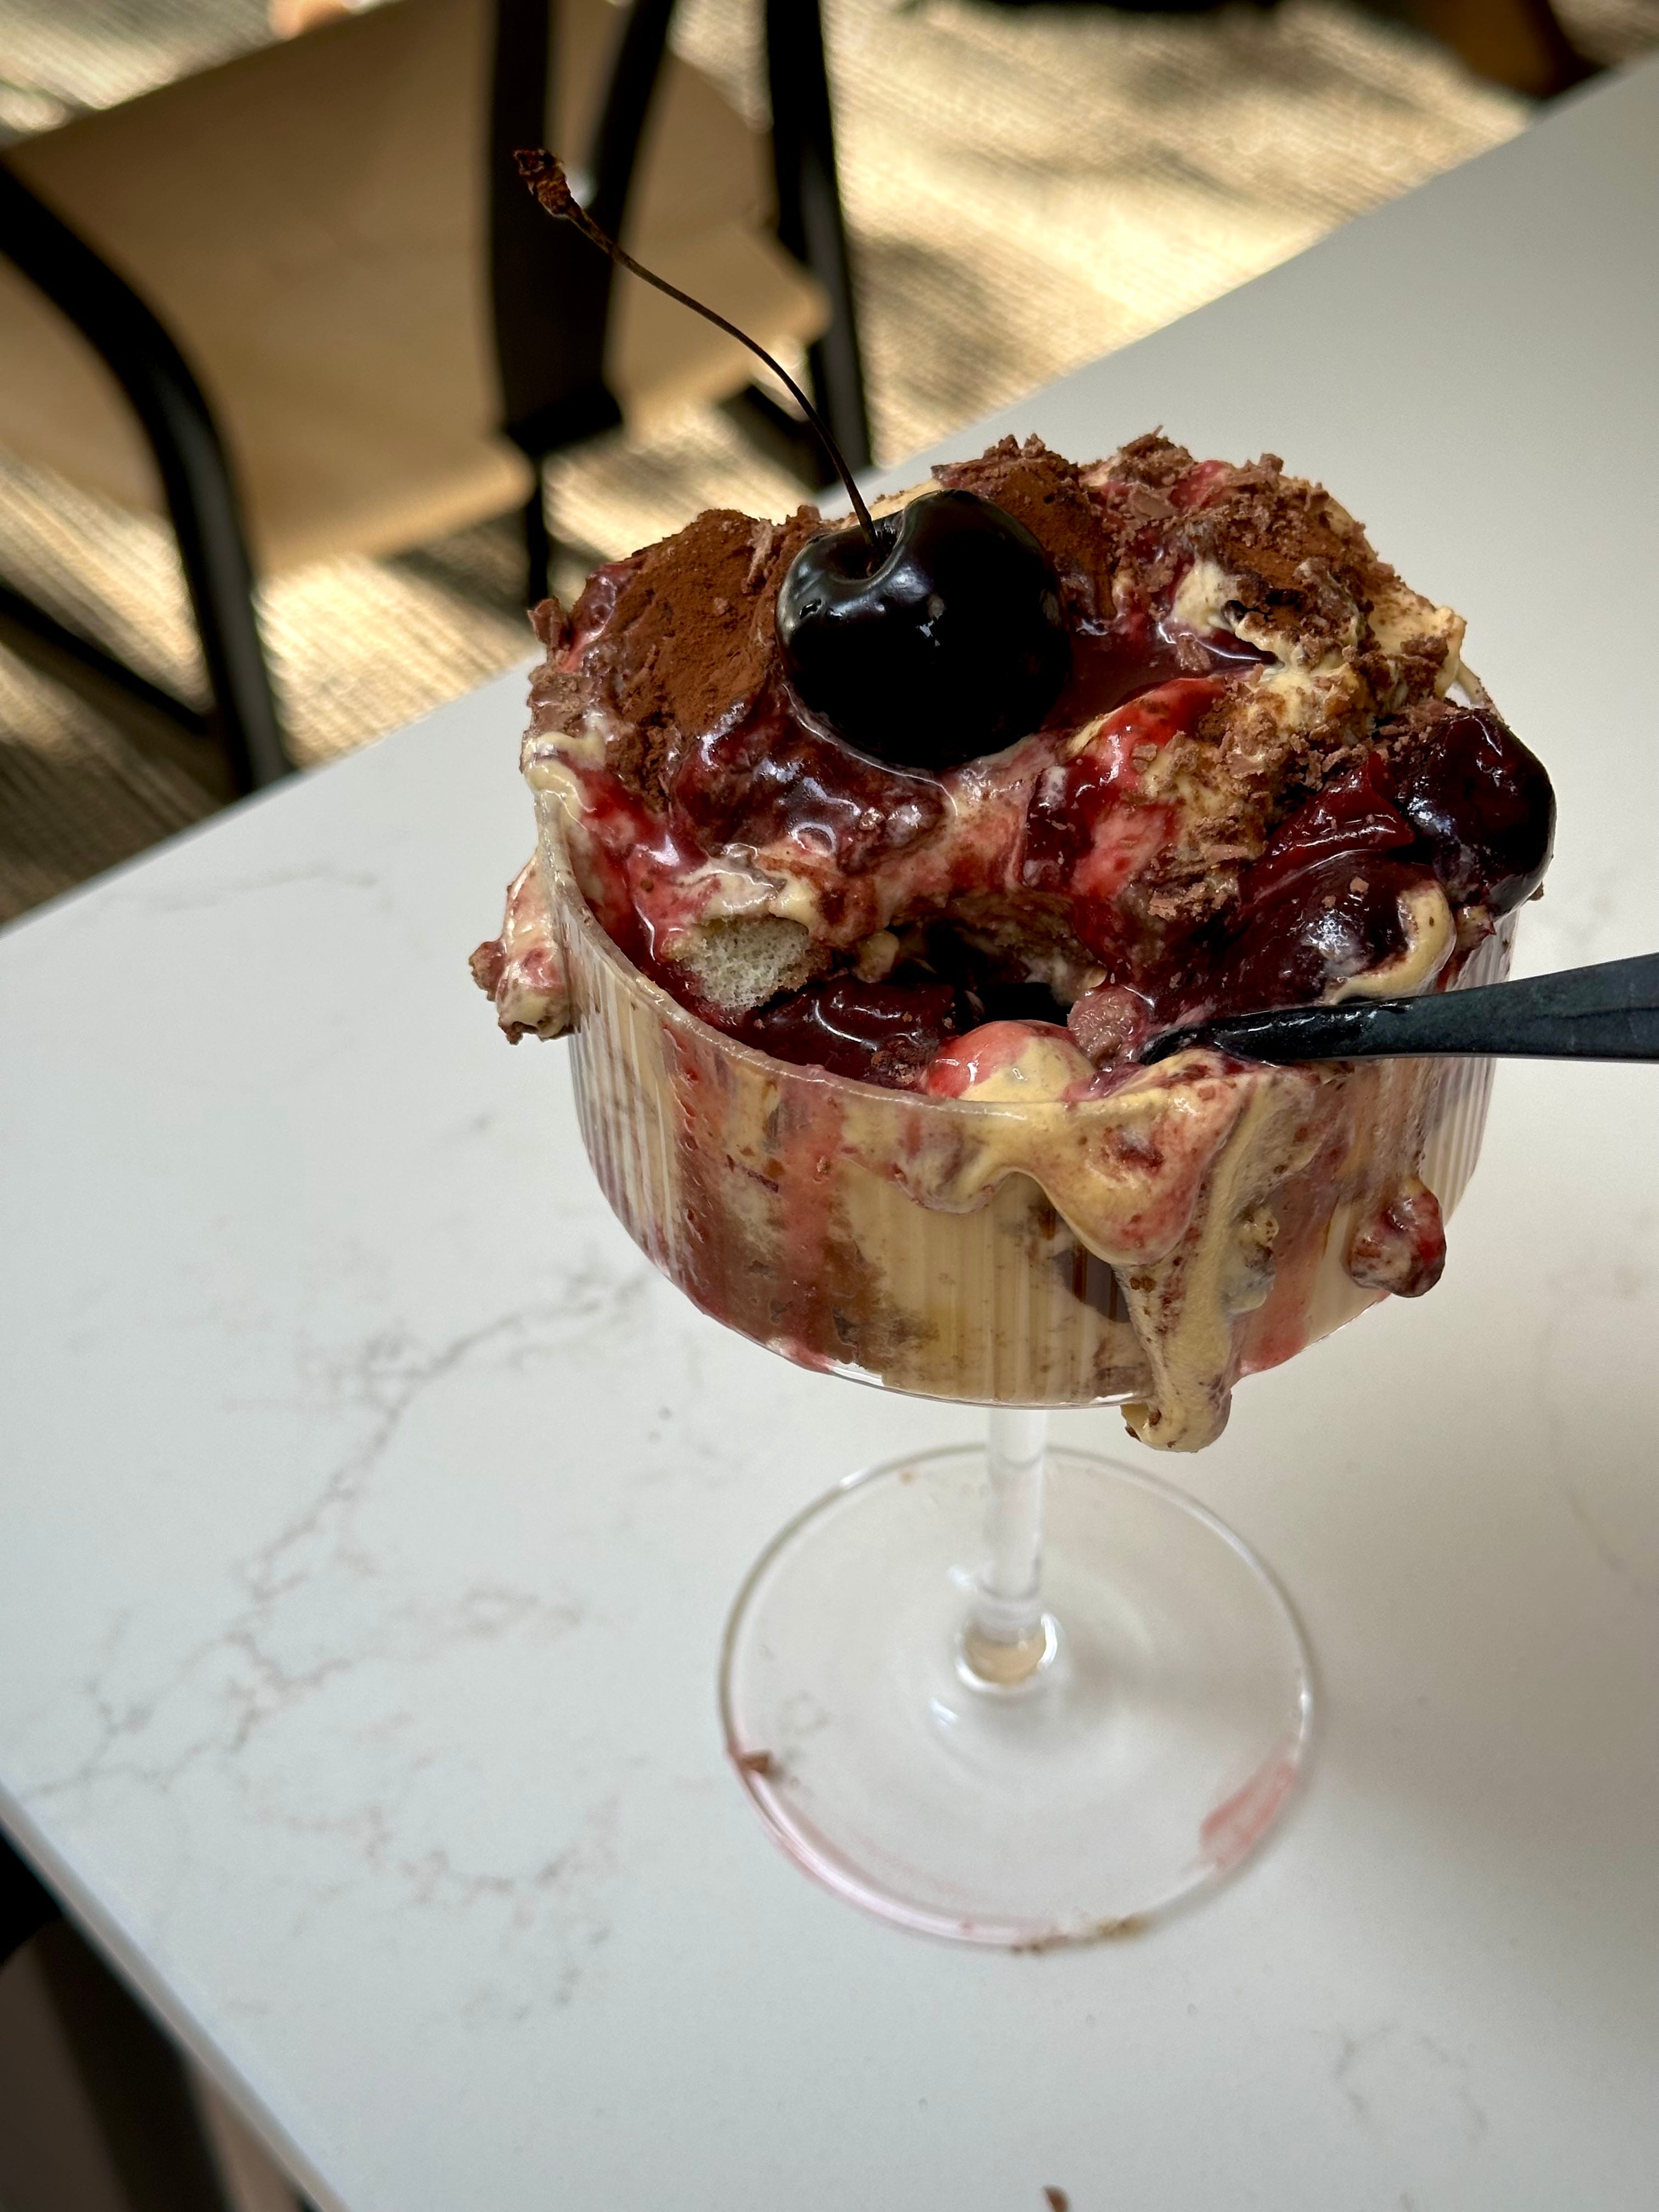
Then we go for another variation of my beloved tiramisu but somehow make it even more indulgent, scrumptious and incredible than any other iteration you have had of it before. My Honeycomb, Chocolate and Cherry Tiramisu is a great easy, prep ahead sort of bake and one that doesn’t require much skill or any fancy pants equipment. Just an electric hand whisk and an empty belly and you’re good to go. It’s a deadly combo that keeps on getting better the longer it is left in the fridge. Served up classically or sundae style, I promise you’re gonna love this one, whichever way it comes.


Finally, we have my Key Lime Loaf with a Ginger Crumb and Whipped Coconut Cream. I have been trying for weeks to get this one just right and pleased to say it is so worth the wait. The loaf recipe in this is SUBLIME. I don’t say that lightly – I have made many a drizzle style loaf before but this one is truly the best. If limes aren’t your thing (which I would say give this a chance even if they aren’t), then switch it out for another citrus fruit but this is a banging recipe that is versatile and easy.

I don’t know about you but my fave bit about going out to dinner is demolishing the bread basket. And then annihilating the second round of bread basket. Comtemplating the third and then inevitably being to full to eat any actual food but ask me if I have any regrets. Ask me. Cause I’ll tell you every single time folks, I have none. A life without carbs is a life not well lived in my eyes and this bake is the epitome of happiness for me.
Whether it be the buttery sort, the savoury sort, the sweet, dry, chewy, stale sort or the long, short, thin or fat sort. I shall never discriminate against my carby friends – they have always been there for me when needed and I shall always be there for them. What’s the root of my unwavering loyalty to all thing’s gluten? Bread was the first thing I really delved into when first started baking. I remember very distinctly that the first bread I ever made wasn’t just a standard white cobb, or some bread rolls or something of equal chill measure.
No.
This plonk went straight in headfirst with a Chocolate and Cherry Plaited Loaf. Why? Cause I saw it was a Paul Hollywood recipe, the ingredients list looked VERY manageable and it didn’t require a stand mixer to make. It turned out overproved, ended up triple the size I assumed it should have been and was as dry as a rock whilst also being underbaked (I don’t understand that sorcery) but boyyy did it taste delicious. The driest, tastiest morsel I ever did try and why? It tasted of nothing but satisfaction. My first ever proper bake (fairy cakes with my mum who doesn’t measure any ingredients DO NOT count) and it got me obsessed with bread making. From there we dived into the glorious world of couronnes, baguettes, bread rolls, focaccia, the shortest sourdough stint to exist, ciabatta…and babka. Or swirly, twirly fun bread as I also call it.
I’ve spent a long time re-developing a recipe from my book (which fyi, has an incredible Chocolate Streusel variety, using homemade nutella) to make the final product smaller, easier to consume and quicker to make. With this excellent variation, we have the 3 essential food groups well looked after – carbs, tick. Chocolate, tick. Cinnamon Butter, tick. I’ve made two of these loaves this week, demolished one to myself (not in one sitting, I am not THAT much of an animal but did I bite into the loaf like an apple at the end? Also yes) and regrettably gave away the second for my own health and safety purposes.
The bread is pillowy soft, smothered in a chocolate and cinnamon sugar butter, topped with a chocolate biscuit crumb (adds a nice fudginess to the mix), nuggets of chopped chocolate and finished with a glorious mildly salted chocolate glaze. OOOOWEEEE she’s a goodie. I used the Cinnamon Bun Butter I developed for All Things Butter in this recipe but you can substitute with Unsalted Butter plus 1 tsp of Cinnamon Powder. As for any nut allergies for the Peanut Butter, you can opt for a different nut butter or just remove entirely.


Will you fall in love? Yes. Will it make you mildly feral? Yes. Is it filthy? HELL YESSSSSS.
Recipe Makes: 2 x 2 lb Loaf Tins
Recipe Serves: I have no willpower so this is not a good/healthy question for me to answer right now.

Y O U – W I L L – N E E D –
Dough
125 ml Whole Milk, lukewarm (38 to 40C)
6 g Active Dried Yeast
40 g Caster Sugar
300 g Strong White Bread Flour, sifted
6 g Salt
1 Large Egg + 1 Yolk
1 tsp Vanilla Bean Powder/paste
90 g Unsalted Butter
1 Egg, beaten for wash
Filling
125 g All Things Butter Cinnamon Bun Butter, room temp
125 g Light Soft Brown Sugar
20 g Black Cocoa Powder, sifted
75 g Milk/Dark Choc Chips, roughly chopped
65 g Chocolate Biscuits (I used Oreo’s), coarsely ground
Glaze
115 ml Whole Milk
90 ml Maple Syrup
60 g Dark Chocolate
60 g Smooth Peanut Butter (don’t doubt me)
50 g Unsalted Butter
Pinch of Salt
M E T H O D –
PLEASE NOTE – the ingredients makes 2 x 2lb tins so you get two loaves for the price of one. You can alternatively make one big loaf from the same set of ingredients but know the loaf will be massive (nothing wrong with that) and you will have to adjust the baking times to suit (I wouldn’t want to say explicitly for how much longer without testing but add on a good 15 mins extra minimum and go from there). A thermometer probe will be your best friend!
Add the lukewarm milk to a bowl alongside the yeast and a pinch of sugar. Leave to one side for 10 to 15 minutes. Yes we are activating the already active yeast but this is a handy exercise to understand whether your yeast is thriving or nosediving. IF after 10 minutes, it isn’t frothy and bubbly, you know your yeast is dead and you have saved yourself heartache.
Add the bread flour, sugar, salt, eggs and vanilla to a mixer bowl. Pour in the yeasty milk and mix on a low to medium speed for 5 minutes to combine to roughly form a dough.
Add in softened butter, cube by cube, whilst mixing on a medium to high speed for 5 mins until it is fully incorporated and the dough has started to come away from the sides.
Turn the speed down to low and mix for another 10 minutes until soft and elasticated. Do the window pane test to check for gluten development. Transfer the dough to a lightly oiled large bowl before placing it in a proving bag or cover with clingfilm. Leave to prove for 30 minutes at room temperature before popping it in the fridge and leaving to slow prove overnight.
The next morning, make the filling mix by adding the Cinnamon Bun Butter, cocoa powder and light brown sugar to a bowl. Use the whisk attachment to mix until super smooth and well combined. Keep this at room temp to avoid solidifying.
Make your biscuit crumb by separating the biscuits and scraping out the filling. Crush the biscuits by either blitzing in a food processor or crushing with the base of a flat-bottomed glass.
Remove the proved dough from the fridge and transfer onto a lightly floured surface. Divide the dough in half (if you are making two loaves, otherwise keep as one for one big loaf). Gently knock back the dough (basically flatten gently with your hands) before rolling out to a large rectangle approx. 0.25 cm thick. The thinner the better for more layers but ensure the dough is still thick enough to roll without tearing.
Spread over the spiced chocolate butter onto the dough evenly using a palette knife going all the way to the edges. Sprinkle over the crushed biscuit crumb and chopped chocolate.
From the short end, tightly roll up the dough, leaving the seam at the base to keep the rolled dough in place.
Position the dough vertically to you and use a sharp knife to cut the dough in half from top to bottom.
Braid the two strands (basically layer one strand over each other repeatedly) before tucking the two ends underneath for a tighter, neater finish.
Carefully lift (sometimes a dough scraper helps here) the shaped bread onto some baking paper and carefully lower it into your loaf tin. TIP: Cut the baking paper to the same width as your tin, making it easier for you to lift the bread in and out.
Cover the top of the tin with clingfilm/saranwrap before leaving to prove for a further 1.45 hour in an unheated oven with a tray of freshly boiled water at the bottom.
After the second prove, remove the tin and tray of water from the oven, discard the clingfilm and marvel in your wonder for a brief moment whilst you preheat the oven to 170°C Fan/190°C/375°F/Gas mark 5
Pop the tin back in the oven on the middle shelf and bake for 36 to 38 minutes. NOTE: Set a timer for halfway through baking and cover the top of the bread with foil to avoid the top burning if it begins to brown too much.
Once baked, remove from the oven and check the internal temperature. You are after an internal temp of 90 to 92°C / 194 to 198°F.Allow the bread to sit for 15 minutes before carefully removing onto a wire rack to cool.
In this time, make the glaze by adding all the ingredients to a pan, placing over a low to medium heat. Gently melt the chocolate and combine the ingredients until the sauce has lightly thickened.
Remove from the heat and allow the glaze to cool slightly and once your bread is just warm to the touch, place a baking tray under your cooling rack.
Pour the glaze over the baked bread and use a palette knife to remove any surplus from the tops and sides. Once covered, leave to set.
Use a serrated knife to slice and omg have the time of your life.
P.S. Use the remaining glaze as a sauce to spread, smother, slather wherever, whoever and however.
Next up we have my take on arguably one of the best puds around – a tiramisu. Please don’t send the hate mob for me with my impending confession but I stand by it, even if it does mean I may be denied entry to Italy for the rest of eternity. But like…do you ever sit there and just think…tiramisu would be great if it didn’t have coffee in it??? Orrrrr is that just me? I KNOW it literally translates to ‘pick/cheer me up’, which comes from the coffee, but you know what else cheers me up?
HONEYCOMB.
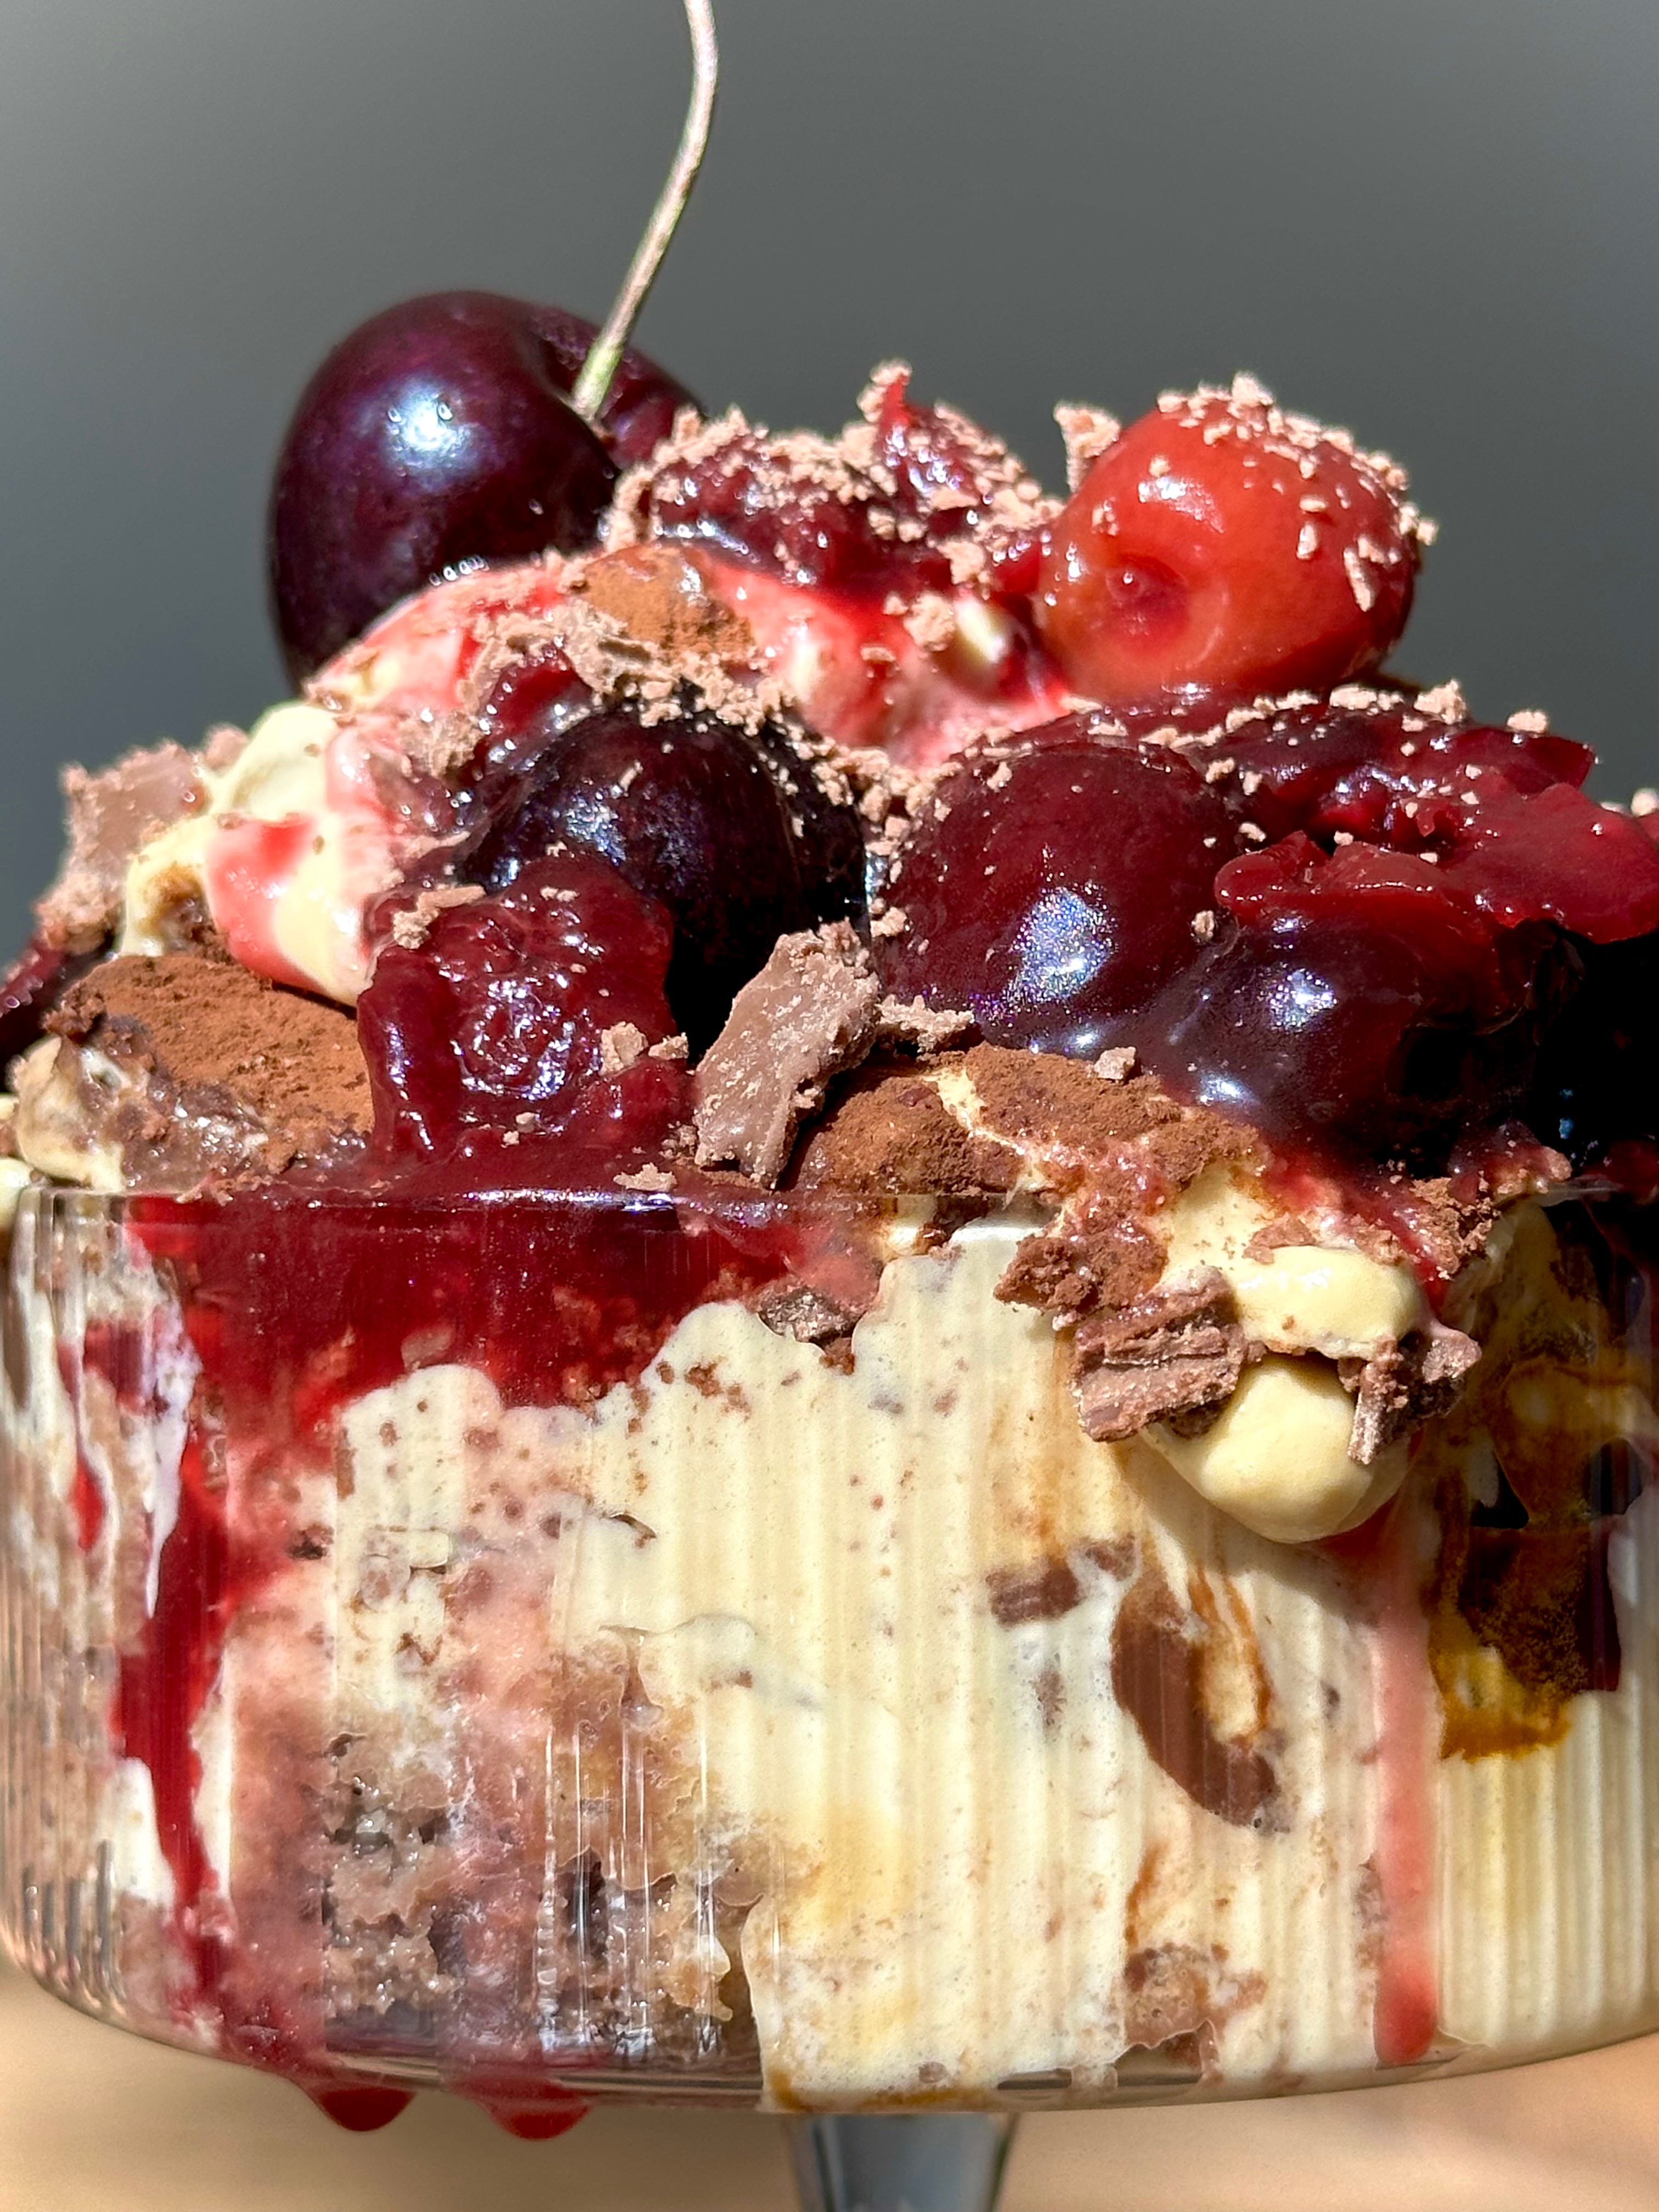
Whether it comes as is, covered in choccy, in a cake (you have to try my Chocolate and Honeycomb cake if you haven’t – it is TO DIE FOR), blizted down to a dust and sprinkled over a dessert, I will take any opportunity to make it (it’s super easy when you know the basics) and is incredibly versatile in its use. Here we are teaming it up with it’s incomparable soulmate chocolate and finishing it with an almondy cherry compote. I am currently VERY obsessed with serving everything up in a glass (yes v kitsch and v old school) but when the glass is this pretty, why not? Of course you don’t have to serve up a slice of nice sundae style but it’s an incredibly easy dessert to make and a great one to prep ahead. I made a variation of this last Christmas which went down a total treat so definitely an all year round win.
I use cherries A LOT at this time of year (easily a top 5 fruit for me) whilst they are in season but equally, a raspberry or strawberry compote would be dreamy – just something a little tart and fruity to help cut through the indulgence of the honeycomb and chocolate and you are onto a winner.


It’s all the things which make the back of your cheeks squeal in delight and you, your soul and your belly, very, very, very happy. Is it a traditional tiramisu? No. But who cares when it tastes so damn good. Food is all about fun, experimenting and importantly, exploring. I swear by my tiramisu recipes and so far, have had zero complaints. My all-time fave is my Malt & Milk Chocolate Tiramisu (available in my new book) but not far behind is this naughty little number.
My only advice when it comes to making tiramisu is, don’t make this when you need a speedy turnaround dessert. This is one of the best to make when you want to pre-ahead but don’t be whipping this out the same day you want it. It needs – nay – it DEMANDS an overnight chill. We want each slice to be sumptuously soft whilst still having its shit together. We aren’t serving up slop city. No, no, no. We are serving straight up perfection so give this time and you will reap the rewards.
Sweet, chocolatey, indulgent filth. Just the way we like it.
Recipe Makes: 1 x 20 by 30 cm / 8 by 12 inch dish
Recipe Serves: 12 generous portions. You could easily get 16 if you aren’t a major greedy guts like me.
Keep reading with a 7-day free trial
Subscribe to The Last Bite to keep reading this post and get 7 days of free access to the full post archives.