

My Pie-d and Joy
Back with another rhubarb tart but this time it’s my Tonka Bean, Coconut & Roasted Strawberry version. Plus a critrussy twist on a Greek dessert and my Coconut & Mango Gateaux Mille Crepe.


Hey Friends!
I hope you are all well this week? The sun decided to creep out of retirement, and I honestly couldn’t be more thrilled. As someone who quite enjoys the dark cosy nights in, I in equal measures love it when the sun is shining but there is still a slight chill in the air. Ya know the sort where you can happily sit outside (with or without an aperol withing reaching distance), wrapped up cosy in a coat, having a yap with your pals (or more often than not, my dog) and be the perfect temperature between not too hot and not too cold? That. Let me live in that sweet spot right there forever more.
The daffodils are starting to bloom, milo still hates the local donkeys and citrus season is upon us. Life feels good, even if I am mightily behind on my never ending to do list. But what’s new folks? What’s new??
That being said, this week, I am loving:
I’ve officially given on up Love is Bland and the severe lack drama and instead binged Severance on Apple TV like my life depended on it. So sure, I barely breathe during every episode, had sweaty palms till the very end and get so consumed by every detail that I am this close ß à to trawling through reddit for further fan theories so I can figure out what the hell is going on but I love it. Do I understand half of it? No. Does it perplex the hell out of me? Absolutely. Is it anxiety inducing? Yes. And yet I never want this series to end. Make it make sense.
Forced Rhubarb. Yup, still. Sorry folks, we have one more newsy on it and then we are onto new things, I PROMISE.
Mexican food, in particular birria tacos. After moving to donkey land a few months back, my craving for decent Mexican food has multiped, electrified and expanded beyond control. There is no where local to me that does good tacos and in this moment in time, I miss London and its ability to satisfy any craving within a 25 to 45 minute time period. If this doesn’t change asap, I will venture back into town for tacos and tacos only. Will the 2 hour commute be worth it? Completely.


Cake. Which thank God am I right?? I am deep in recipe testing and up to my eyeballs in cake and by now, you’d think I could take it or leave it. Turns out I am still just as obsessed as I was back when I started, so it seems like I’ll continue this baking malarkey for a little while longer.
Formula 1. Very excited it returns this month. In a different life, I am a racing driver. In this life, I’m just a wannabe. James got me a very exciting gift for Christmas which lets me race a go kart around a track in Silverstone. Is this going to be a disaster? For sure. Will I record it for your entertainment? Of course, I am a team player folks.
Korean Skincare. My skin fluctuates from sensitive to chill more often than Milo barks at the sight of a leaf moving. Desperately and forever on the hunt to find the winning combo which leaves me with that flawless, poreless glass skin aesthetic I see flooding my social feeds (I know some of it is all smoke and mirrors and filters and the rest but I will still hunt for this perfection even if positively unattainable). I’ll report back on anything I deem worthy of a purchase cause we don’t gatekeep over here folks (substackers just put it behind a paywall instead TEEHEE joking but also mild truth).

We have a quartet of goodies lined up for you this week, with an additional drop at the start of next week for my Extra Bite friends.
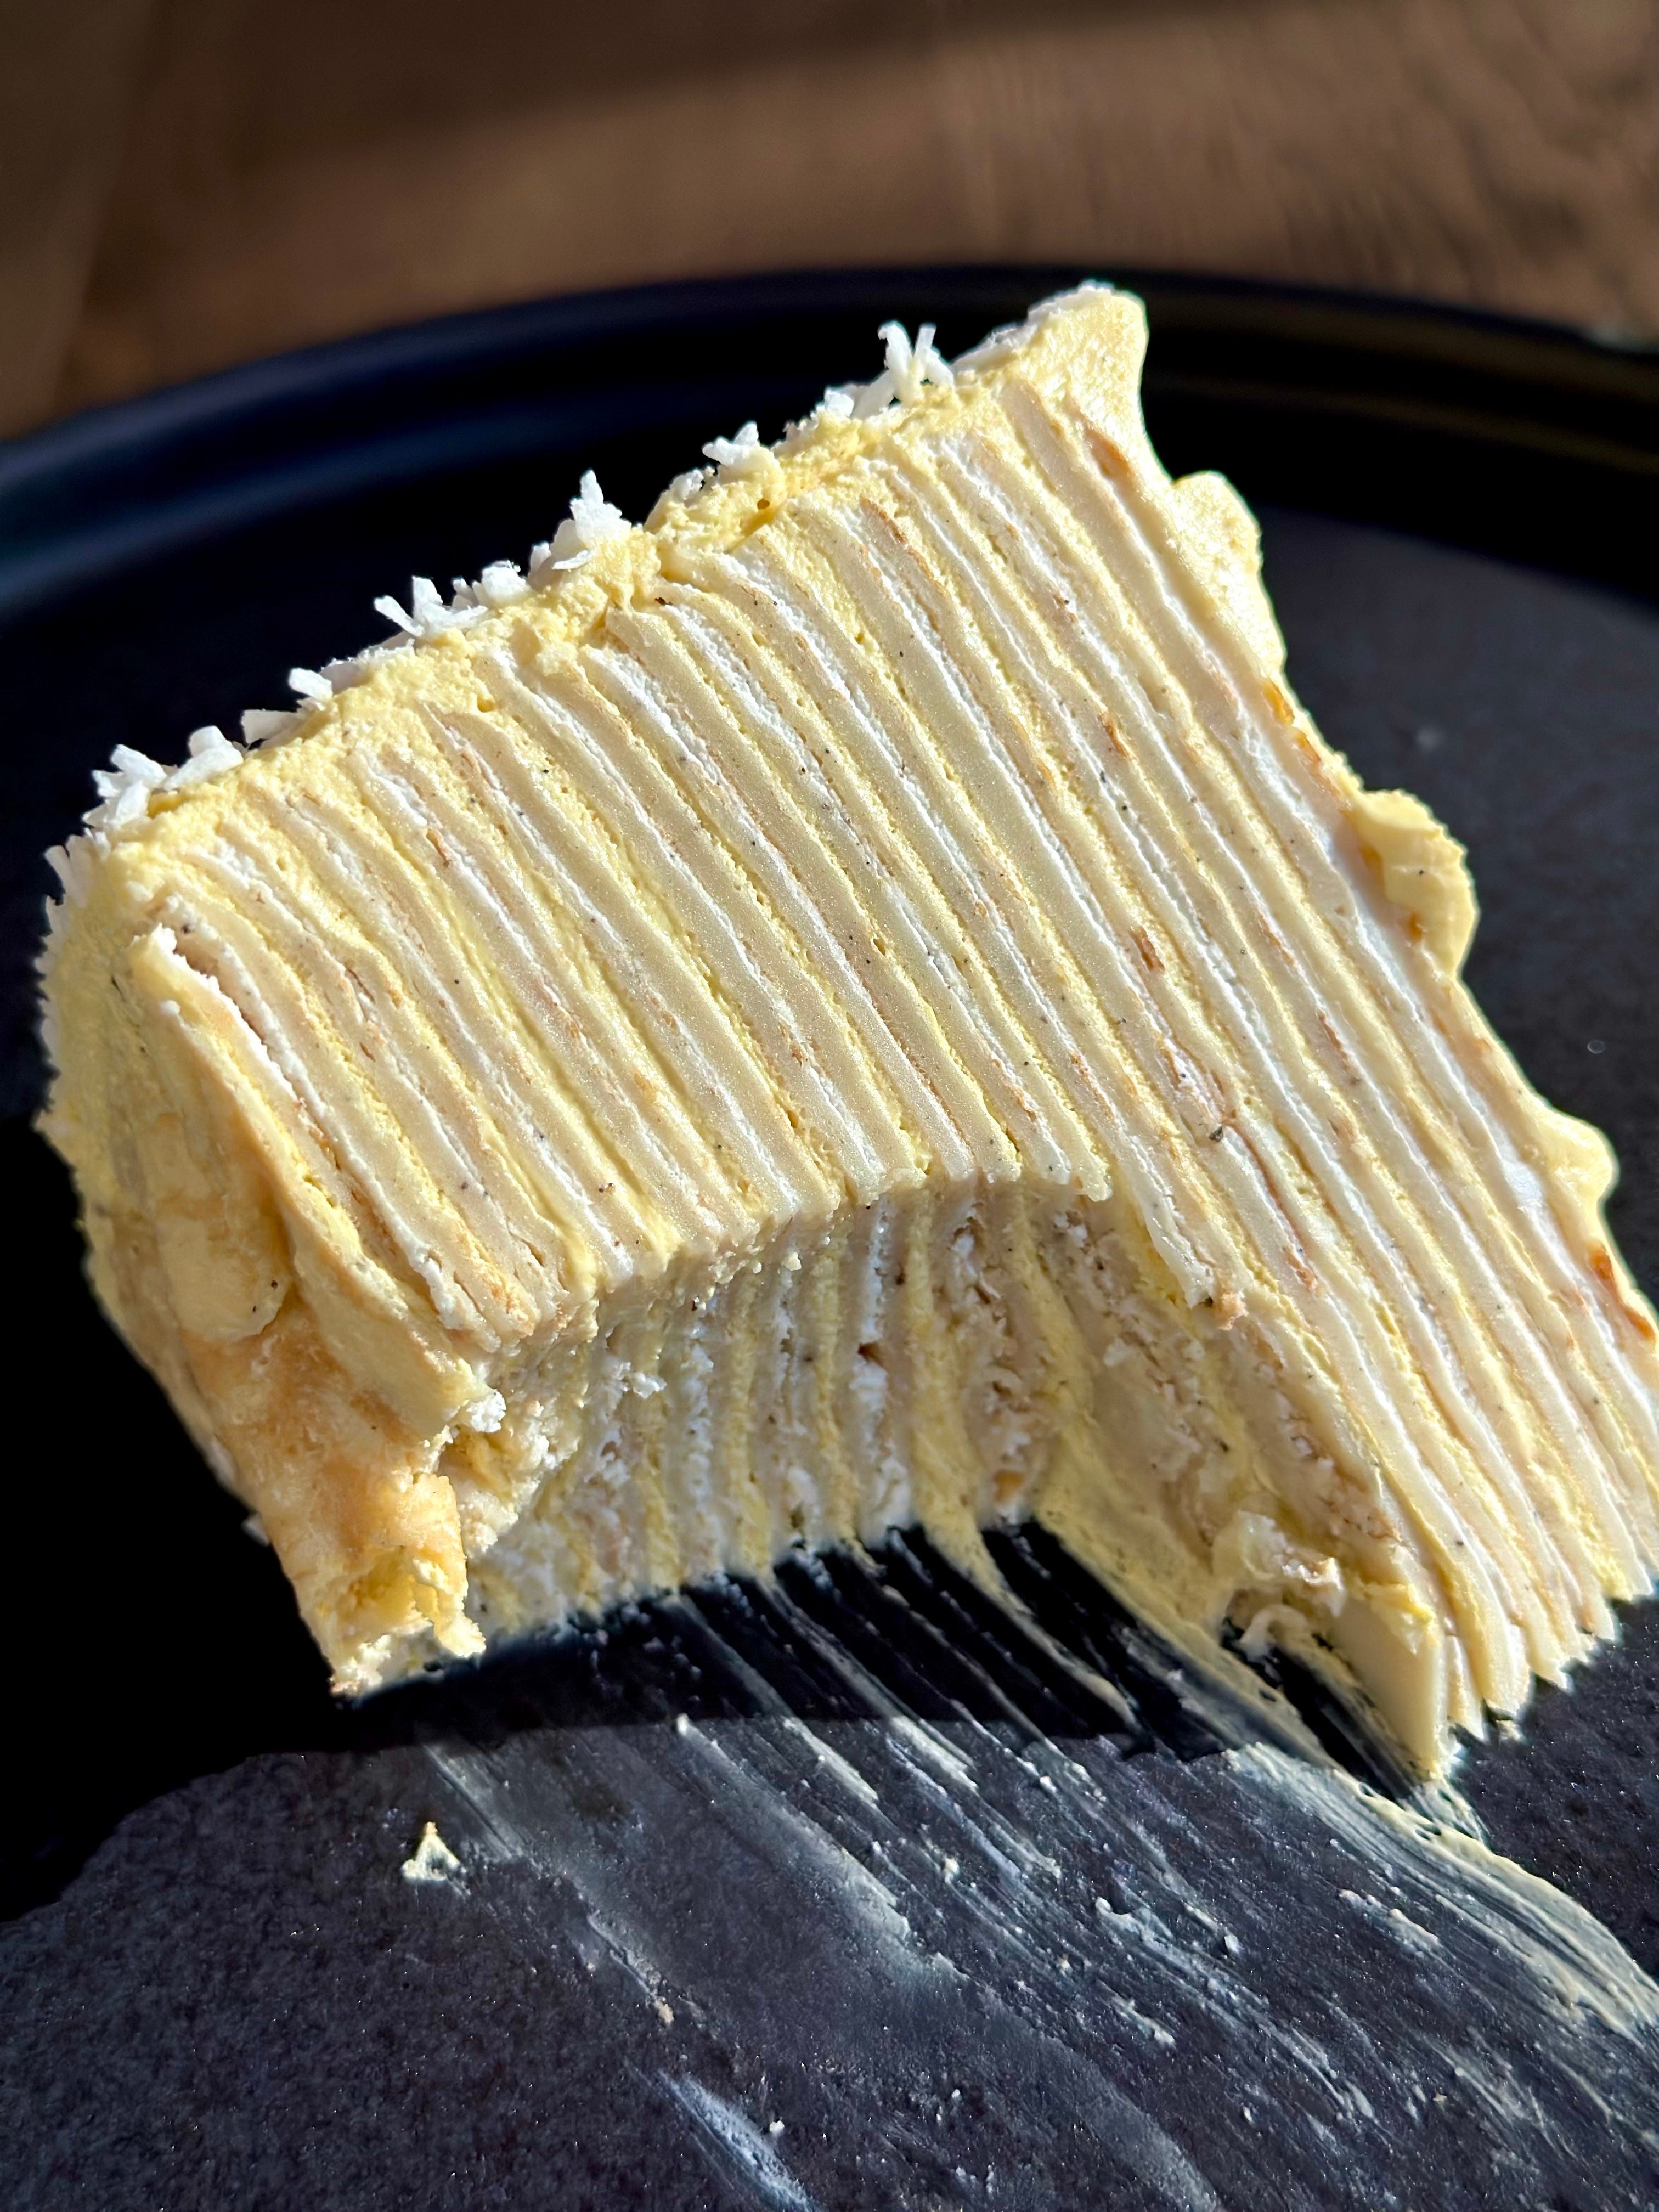
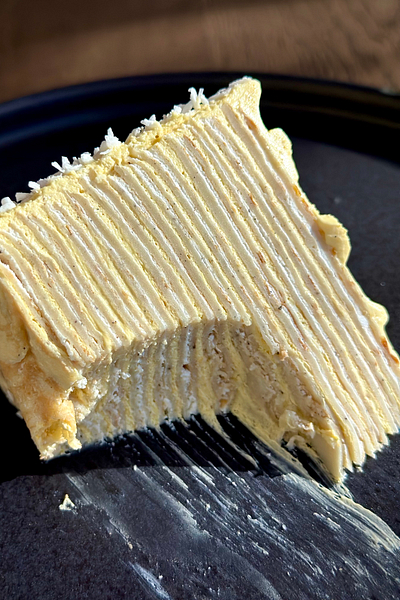
First up, we have my Coconut & Mango Gâteaux Mille Crêpe aka Crepe Cake. I knowwww pancake day has come and gone but keep this recipe in your back pocket for whenever you fancy whipping up a few crepes or 20. Super light, melt in the mouth crepes sandwiched between alternating layers of coconut and mango whipped mascarpone and finished off with a scattering of desiccated coconut. It’s a fair amount of effort but the layers once sliced are so worth it.
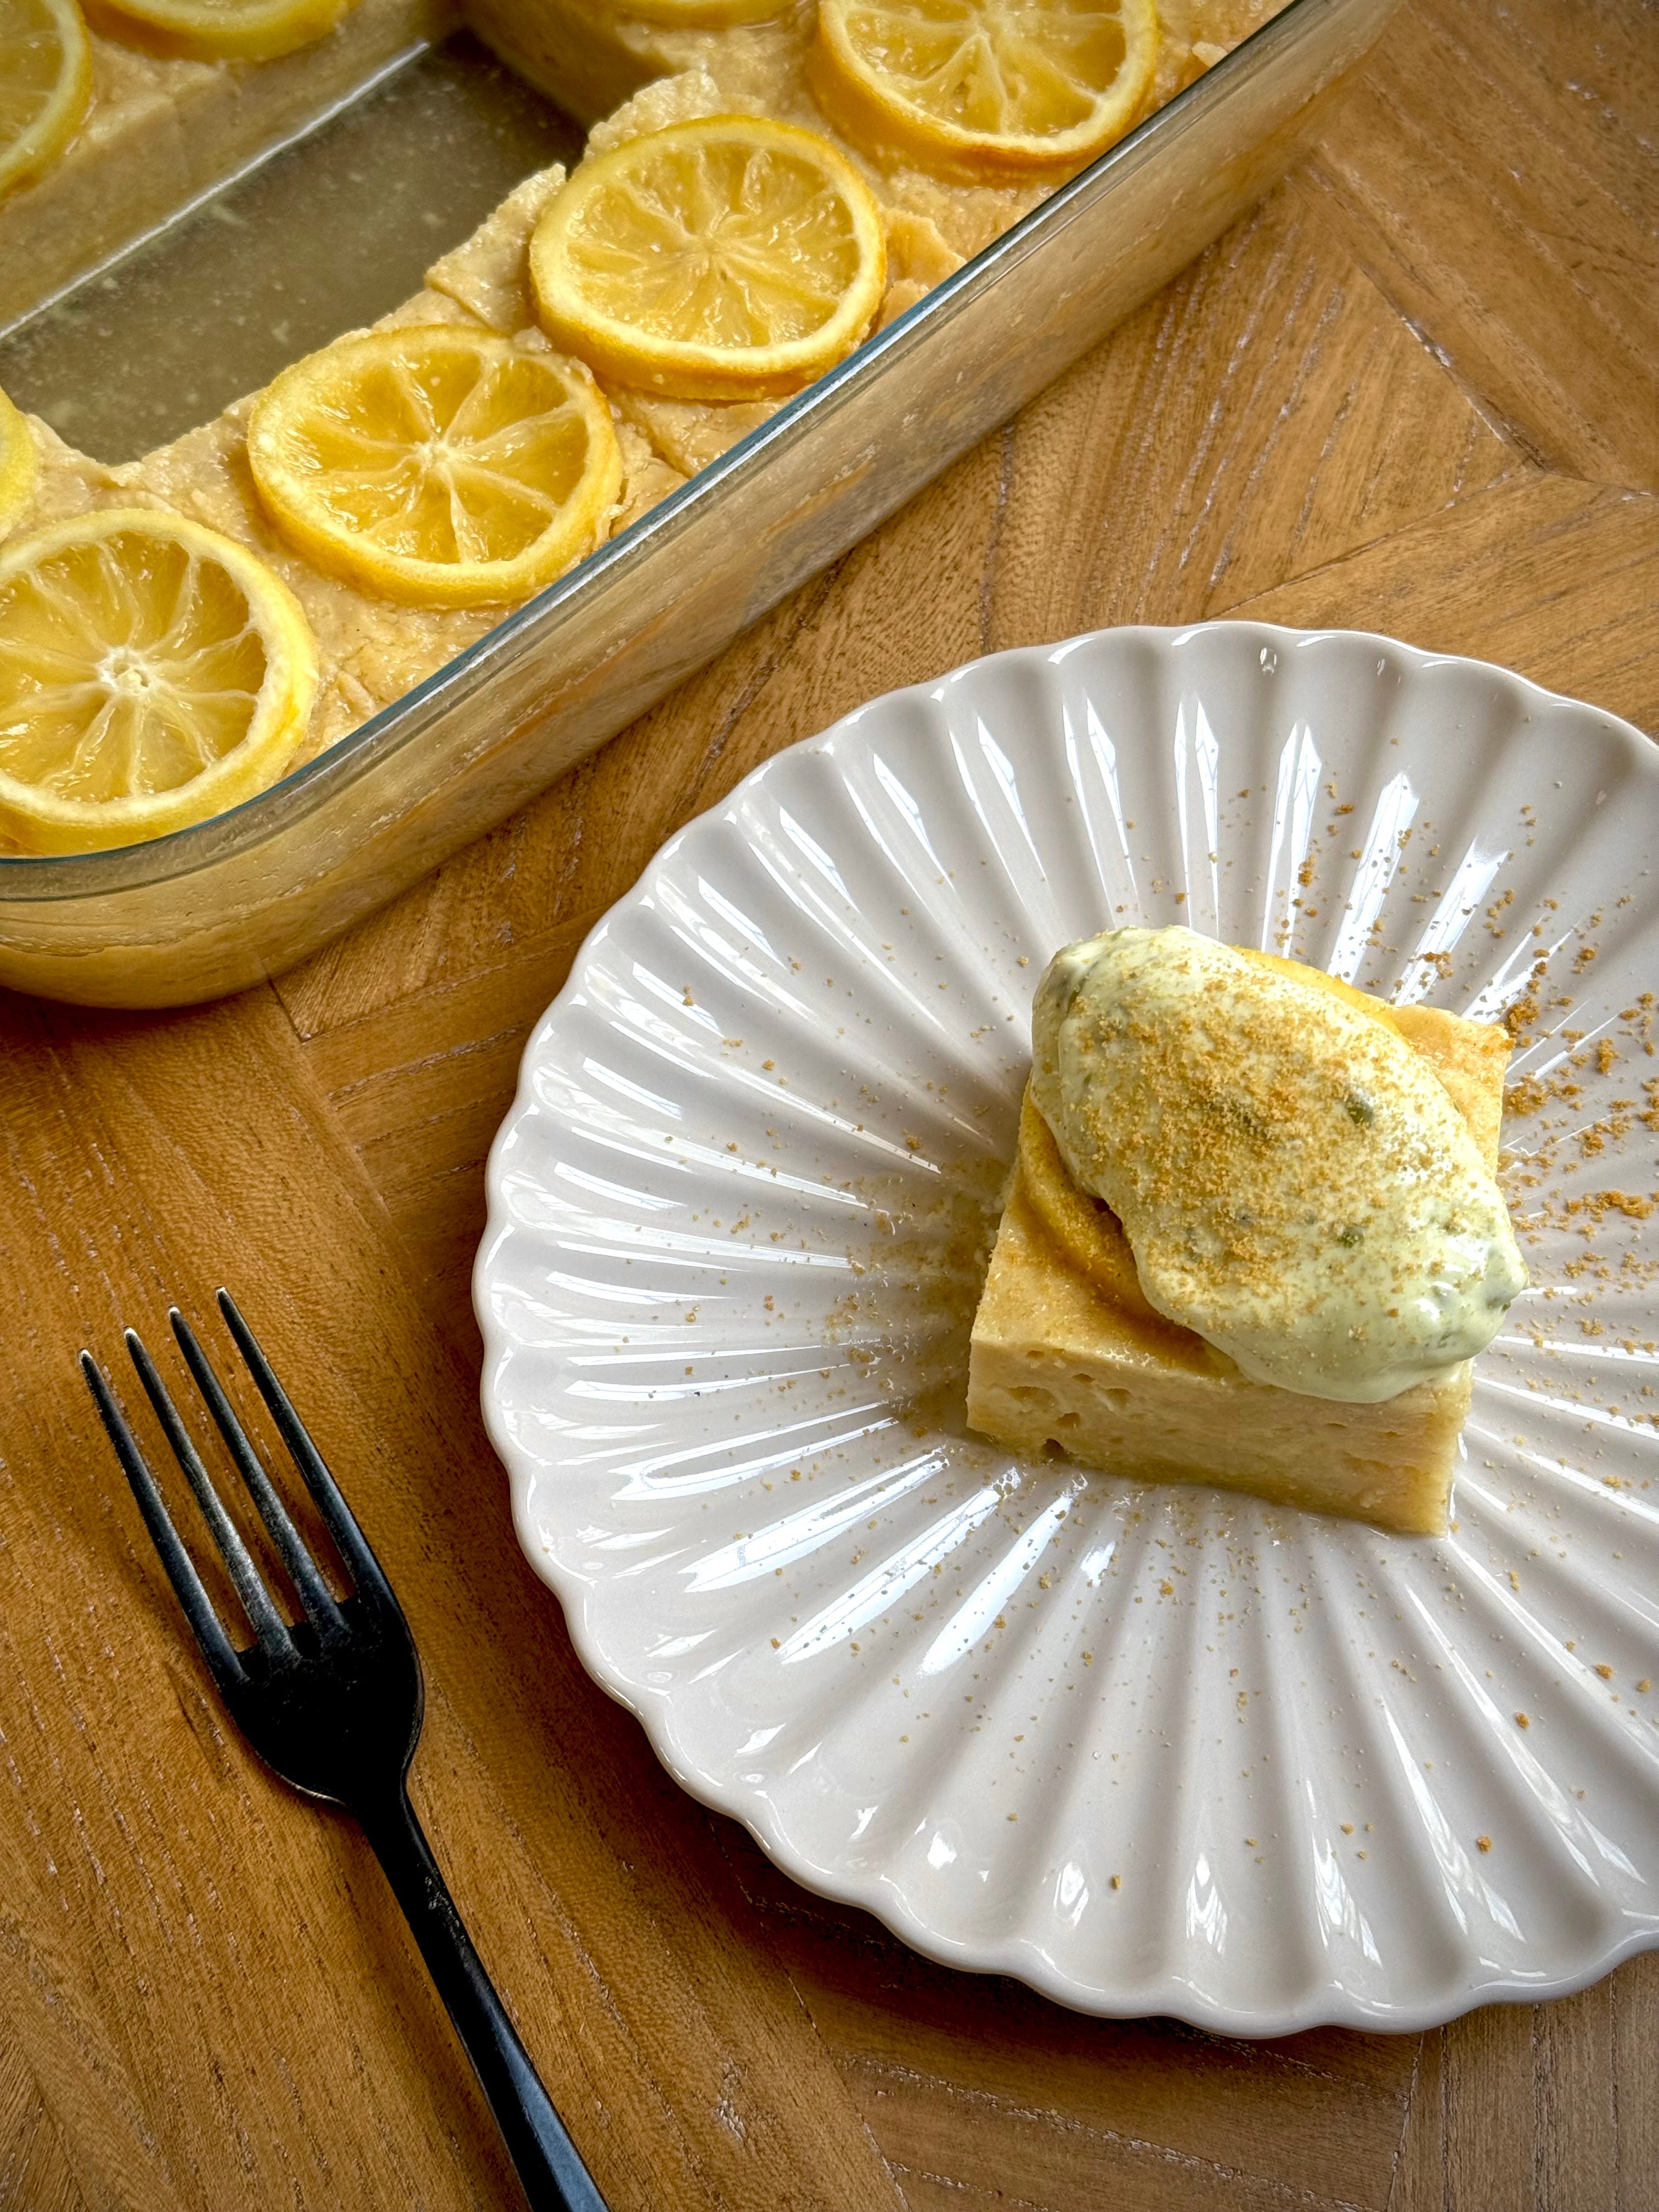
Next we have a bake I have been wanting to remake for a while, a Greek Portokalopita, also known as an Orange Cake but this time, we’ve switched out the oranges for Lemons for a perfect spring time, sumptuously zesty number. We use filo for the base of the cake, which results in the perfect sponge to soak up a zingy, punchy lemony syrup. Topped with a hefty portion of home-made Pistachio & White Chocolate no-churn Ice Cream, this Lemonopita is a great, easy beginner bake.


Finishing up the bakes this week is my Tonka Bean, Coconut Custard & Roasted Strawberry Rhubarb Tart. You know something’s good when you gotta make it twice. After becoming obsessed with the last tart I shared on here, I was eager to give it another go and level it up just a notch more. And don’t you worry friends, I’ve got plenty of pictures and videos in this week’s recipe to help you nail the bake - it is a lengthy one but I’ve not missed a single detail and covered every single crumb to make this easy to replicate.
After the weekend I’ll drop in once more with an additional cake recipe. I can’t tell you what it is yet mostly because I haven’t decided, not out of secrecy, but as I am making a birthday cake for my Dad this week and it’d be rude to not share the love with you all. If you have any ideas or are after a recipe for something specific, let me know below. Inspire me friends, tell me what to make!


Let’s get to it with the first recipe on the menu, a Coconut & Mango Gâteaux Mille Crêpe - a delicate and impressive looking number that is made up of a gazillion crepes (mine was 25) all layered between cream (I opted to alternate between Mango and Coconut cause duh), making it a lovely (and kinda high maintenance) no bake kinda cake.
This Gâteau Mille Crêpes comes at you with terrible timing. I am FULLY aware that this has dropped into your inboxes after Pancake Day but folks, the joy of being an adult (and lets be real, there aren’t many) is that ANY DAY can be Pancake Day if you so wish. Sure it’s not Shrove Tuesday but why be tied to the construct of time ya know? If you can’t tell I am scraping the barrel with justifying the late delivery of this recipe…but is it working??
Now, I am not suggesting you spend any of your valuable time making 25 crepes, 2 different creams, alternate, stack, crumb coat, decorate and chill all before slicing into it, eating it and wanting to mildly murder me for putting you through all that, I would say use 1/3 of the recipe below and place some of the cream into the middle, top with some fresh fruit before rolling and folding like a Hong Kong style pancake instead OR just dollop it all on top. Takes a fraction of the time, so it’s quicker in the tum, and all for the same amount of yum.
The below makes a solid number of crepes which include the obligatory dud first, second and third pancakes. Find your groove, get snuggled into that sweet spot of a well heated but not too hot pan and play around with the flavour combos if the ones I have suggested don’t tickle your pickle. How about raspberry and white chocolate? Pistachio and milk chocolate? Oooo, adding some crisp, buttery, flakey kataifi and mix with the pistachio for a take on that viral chocolate bar? Or how about something classic like vanilla and strawberry? Whichever way floats your boat, give yourself plenty of time. We’re in it for the long haul.


Recipe Makes: 22 to 25 Crepes (inc a few dud first tries)
Recipe Serves: 8
Y O U – W I L L – N E E D –
Crepe
300 g Plain Flour, sifted
Pinch of Salt
85 g Golden Caster Sugar
790 ml Whole Milk
4 Large Eggs
30 g Unsalted Butter, melted
1 tsp Vanilla Bean Paste or ½ tsp Vanilla Bean Powder
Mango Mascarpone
250 g Mascarpone
255 ml Mango Pulp, tinned
15 g Icing Sugar, sifted
½ tsp Vanilla Bean Paste
150 ml Double Cream
Coconut Cream Cheese
160 g Coconut Cream
25 g Icing Sugar, sifted
100 g Cream Cheese
½ tsp Vanilla Bean Paste
150 ml Double Cream
To Finish
Approx 30 g Desiccated Coconut
M E T H O D –
Grab two bowls. Into one bowl, add all the dry ingredients for your crepe batter and mix. Into the second bowl, add all the wet ingredients and mix.
Pour the wet ingredients into the dry and use a balloon whisk to thoroughly mix until no lumps remain. Alternatively, add all the ingredients into a blender and blitz until smooth.
Leave the batter to one side for at least 30 minutes.
Grab yourself a non-stick pan and place over a medium heat. Allow it to heat up before adding a touch of coconut oil or butter to the pan – you don’t want a lot, just enough to lightly season the pan.
Pour just enough batter into the pan and swirl for an even covering. NOTE: I used a 25 cm / 10 inch pan and a 60 ml / ¼ cup measurer for the batter.
Let the batter cook for a minute or so until the edges start to crisp. Warning, the first one or two will always be rubbish, it’s just the pancake rules so don’t stress.
Use a fish slice or offset palette knife to tease the edges away before flipping over and cooking for another 45 seconds to a minute until lightly golden. Remove and repeat for all the batter.
If you are pedantic like me, you can use a 7 or 8-inch cake tin base to lay on top of each crepe and cut around for nice, neat edges. Yes, that is very time consuming but if you want that super neat, aesthetic finish, do it.
Make the mango mascarpone by adding all the ingredients, bar double cream, to a bowl and use the whisk attachment to mix until smooth.
Pour in the double cream into the mango mix and mix again until you hit medium peak. You want this to be thick but spreadable.
Make the coconut cream by adding all the ingredients to a bowl, bar the double cream, and mix again until smooth. Go in with the double cream and again mix until thickened.
Place a crepe onto your serving plate. Use an ice cream scoop to scoop some of the mango cream on top and use a palette knife to spread to an even layer. Place another crepe on top and this time, scoop on some coconut cream. Repeat this layering process until all crepes are used.
Use the remaining mango cream to ‘crumb coat’ the sides and top for a nice even finish.
Pop the cake into the fridge to set for 1 hour before finishing off with some desiccated coconut on the sides.
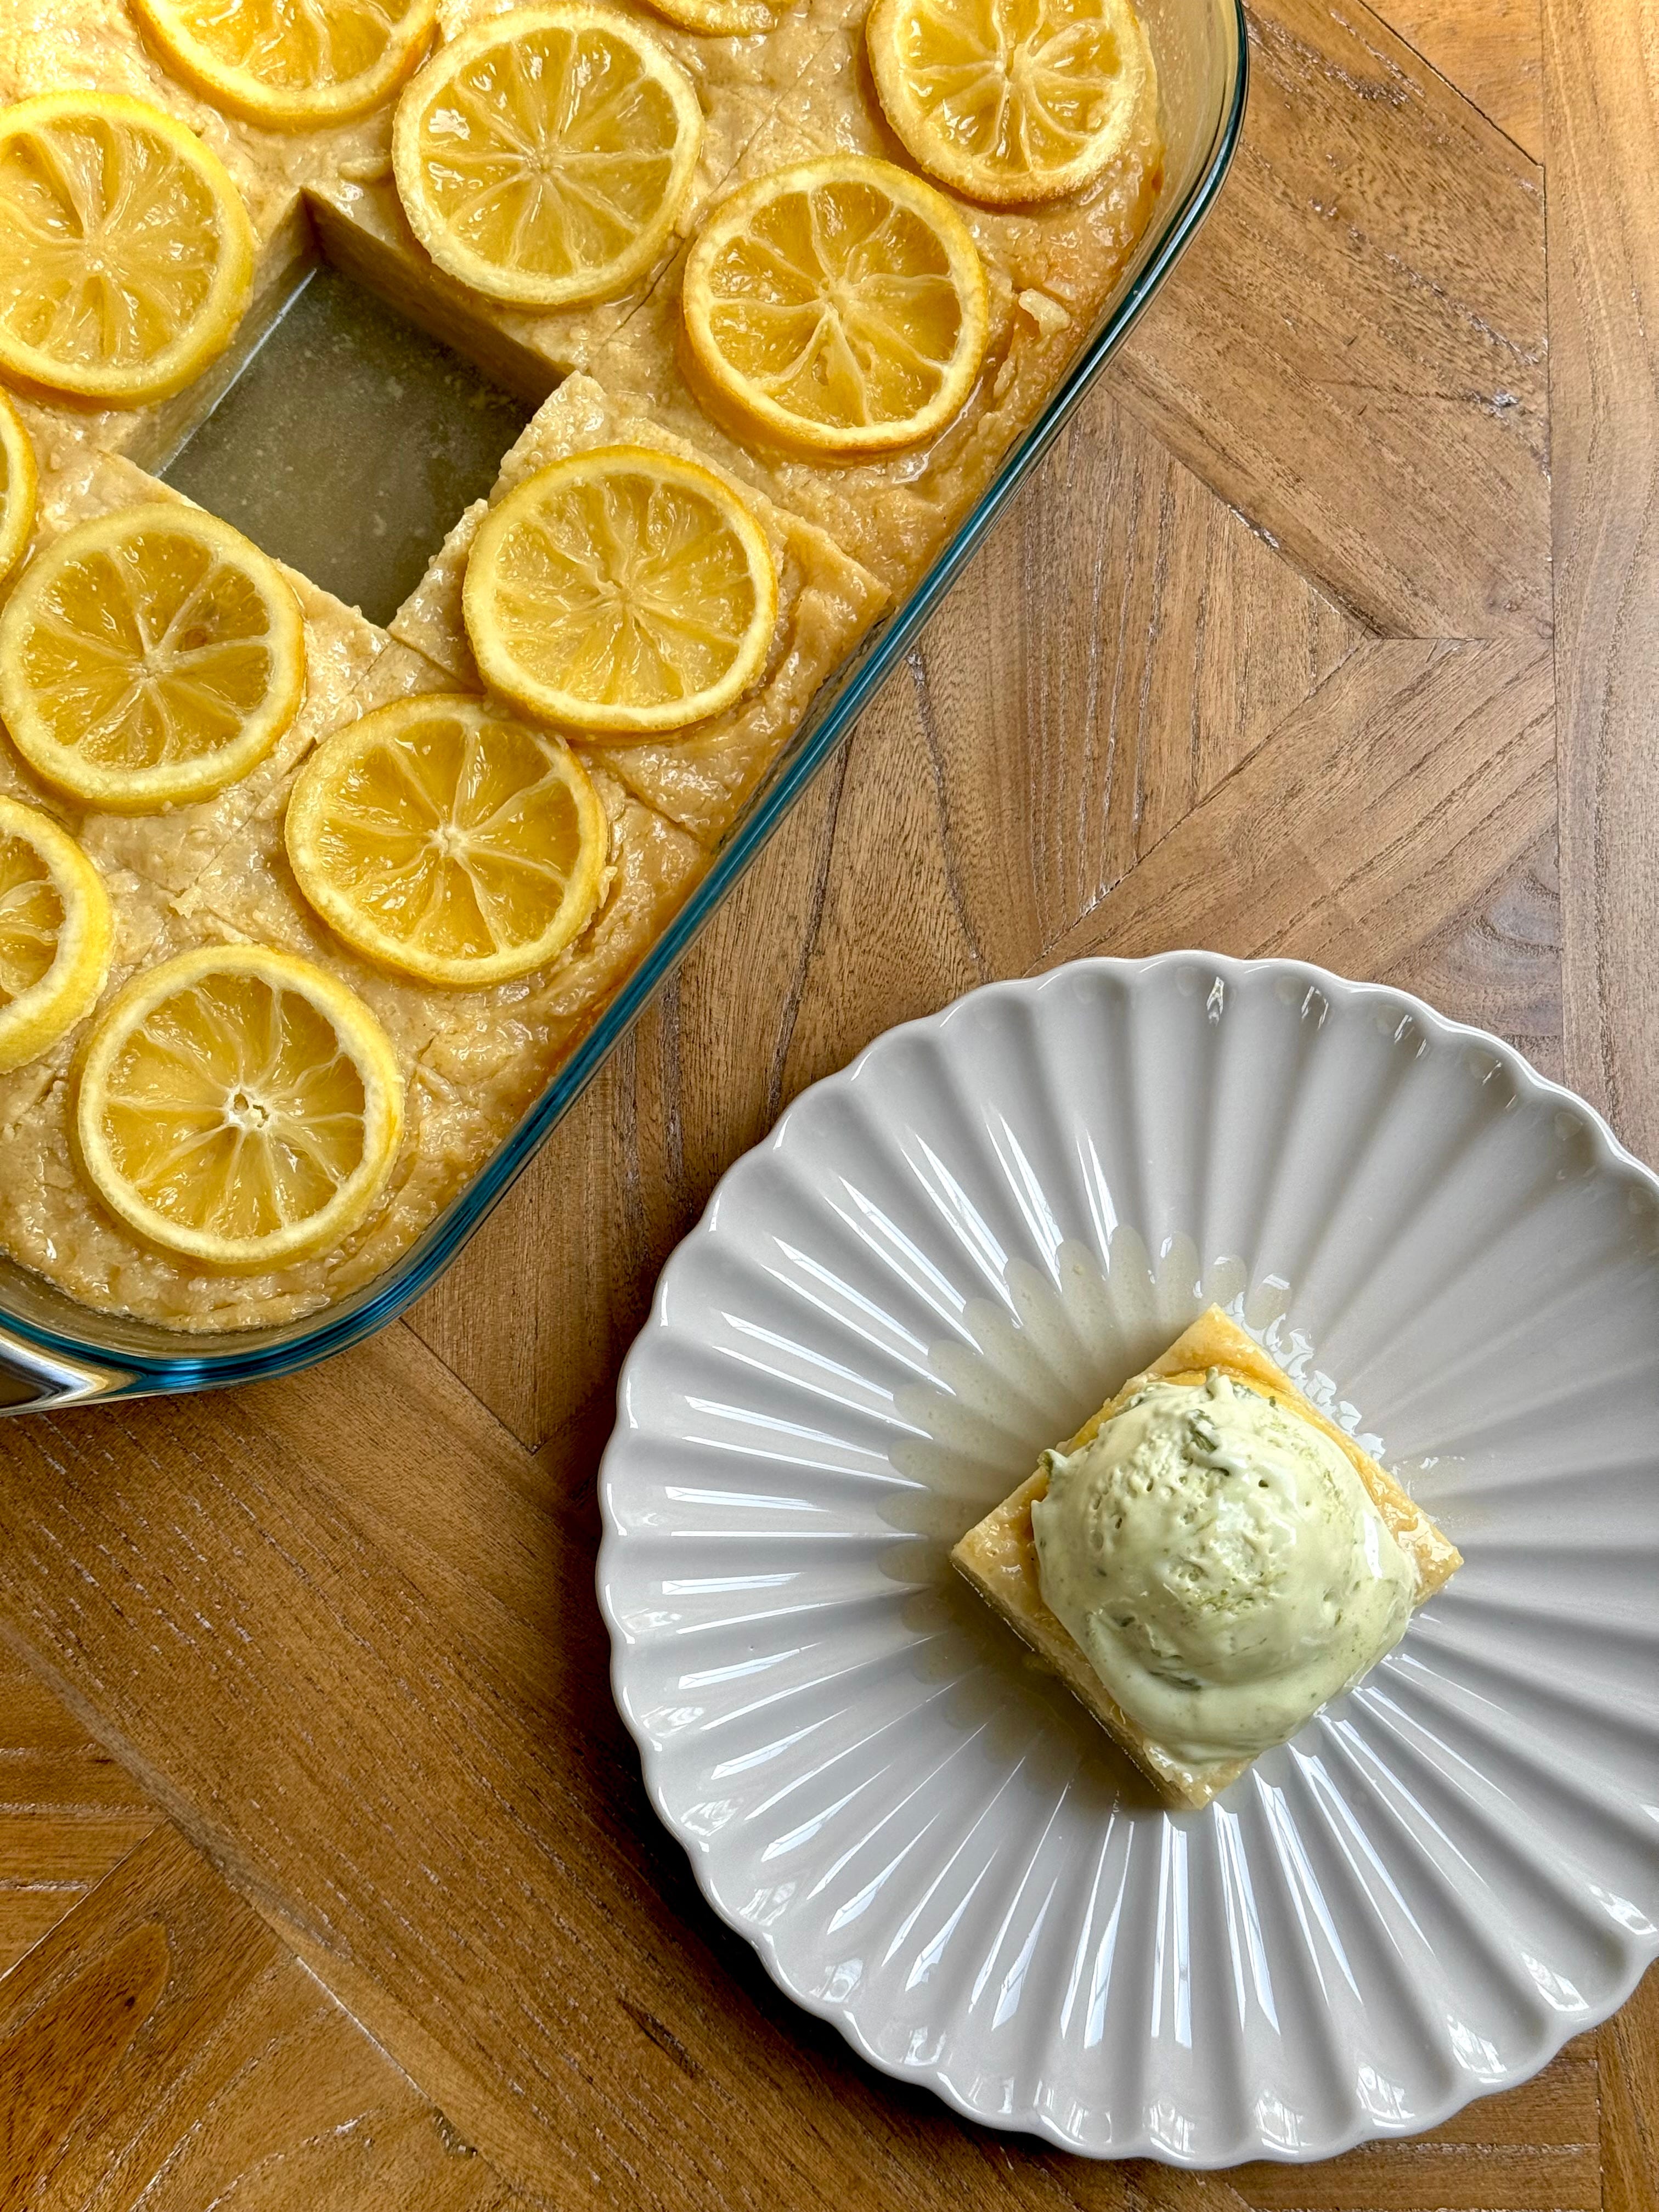
Next up, we have a twist on a Greek classic with my Lemonopita. Classically made with oranges, we have subbed them out in exchange for lemons to provide a punchier and zestier flavour. Now we are deep in citrus season, make the most of the wonderful produce on offer in the shops at the moment – I originally planned to make this with blood oranges but got swayed by the idea of making a lemon drizzle-eqsue sorta cake. Ya know the sort that makes the backs of your cheeks squeal in delight because it’s so sherbetty and tart? Exactly that.


To help balance out the flavours for that perfect bite, we are marrying the lemon with a cardamom syrup (shock, she’s using cardamom again) and topping each slice with a generous scoop of melty, buttery smooth, Pistachio and White Chocolate no-churn Ice Cream (you can find this recipe after the main bake below). Truly a springtime match made in heaven but it is also a sweet treat that’s perfect for any time of the year. I can see myself making this for a little summertime soiree, rounding off a BBQ bonanza and being washed down with a Raspberry & Basil Collins (did I tell in my past life when I lived in new York I worked as a bartender down Wall Street?? Young rubes was FUN).
But similarly, I’m looking forward to serving this up hot when autumn rolls around again, adding a touch more cardamom and a stick of cinnamon in the syrup for max cosy vibes, and drowning each slice in a vanilla bean custard.
She’s deliciously easy and is a great make ahead kinda bake. Low fuss, low effort, max taste, max rewards.
Recipe Makes: 1 x 20 by 30 cm / 8 by 12 inch deep tin
Recipe Serves: 12 to 16 slices

Y O U – W I L L – N E E D –
Syrup
400 g Caster Sugar
400 g Water
225 ml Lemon Juice (zest the lemons first for the base below and then use the juice)
6 Cardamom Pods, whole & crushed
Base
450 g Filo Sheets
7 Lemons, whole
4 Lemons, zest only
200 g Caster Sugar
250 g Vegetable Oil
250 ml Whole Milk
3 Large Eggs
1 tsp Baking Powder, sifted
1 tsp Bicarbonate of Soda, sifted
2 tsp Vanilla Bean Paste
Pinch of Salt
Handful of Demerara Sugar
To Serve
Pistachio & White Chocolate No-Churn Ice Cream (find below)
M E T H O D –
Begin with making the syrup by adding all the ingredients to a saucepan and placing over a medium heat. Bring to a boil, before reducing the heat slightly for 5 minutes and then leaving to cool.
Preheat your oven to 80C Fan/100C/210F/Gas Mark ¼ and grease and line a 20 by 30 cm / 8 inch by 12 inch deep baking tin. Pop the tin to one side.
For the base, grab your filo sheets and begin to crinkle them one by one. Begin by folding over an inch, flipping the filo over, folding over by another inch and repeat – it doesn’t matter which edge of the filo you start from. Repeat the process for all the filo sheets before placing them onto a large baking tray, with the folded edges facing up.
Pop into the oven and bake for 90 minutes – I would advise turning the filo over halfway through to ensure the bottom of the filo also cooks and crisps through.
Once baked, remove from the oven and increase the temperature to 140C Fan/160C/320F/Gas Mark 3.
Whilst the filo is baking, add 5 lemons to a saucepan, fill with water so they are completely covered, place the lid on top and pop over a medium heat. Boil the lemons for 80 minutes - you really want to boil these for as long as possible to remove any bitterness from the lemon pith.
After an hour, drain the water and leave to one side until they are cool to touch. Don’t handle these whilst hot because when I say the insides are hotter than lava, BELIEVE ME.
Once they are completely cool (be warned, even if cool on the outside, the inside may still be scorchio), grab a lemon and squeeze out any remaining juice. Remove any seeds, before adding the pulp and skin, along with the caster sugar to a blender and blitzing until smooth.
Once smooth, add the oil, milk, eggs, baking powder, bicarb, vanilla, lemon zest and salt. Mix again on high to blend until smooth. Transfer the mix into a large bowl.
Once the filo has baked, allow it to cool before using your hands to crush and crumble. You want the filo to be broken down into small pieces as this will act as our flour.
Add the crushed filo to the wet mix and use a rubber spatula to mix well.
Once all the filo has been added, transfer the mix into your greased baking tin. Use the back of a spoon or an offset palette knife to level out.
Thinly slice the remaining 2 lemons and place on top of the mix (this is optional but aesthetics ya know - would HIGHLY recommend you zest the lemons and remove as much as the white pith as you can with a knife as it is very bitter), sprinkle over a handful of demerara sugar on top and bake for 40 to 45 minutes.
Remove from the oven and use a ladle to immediately pour over the cooled syrup. It’ll look like there is a lot of syrup but give it some time and the base will soak it all up. You want to leave this to soak and set overnight to help intensify the flavours.
When ready to serve, slice into 12/15. Add to your serving plate before topping with a scoop of Pistachio & White Chocolate Ice-Cream (find below) and a scattering of lemon zest to finish.
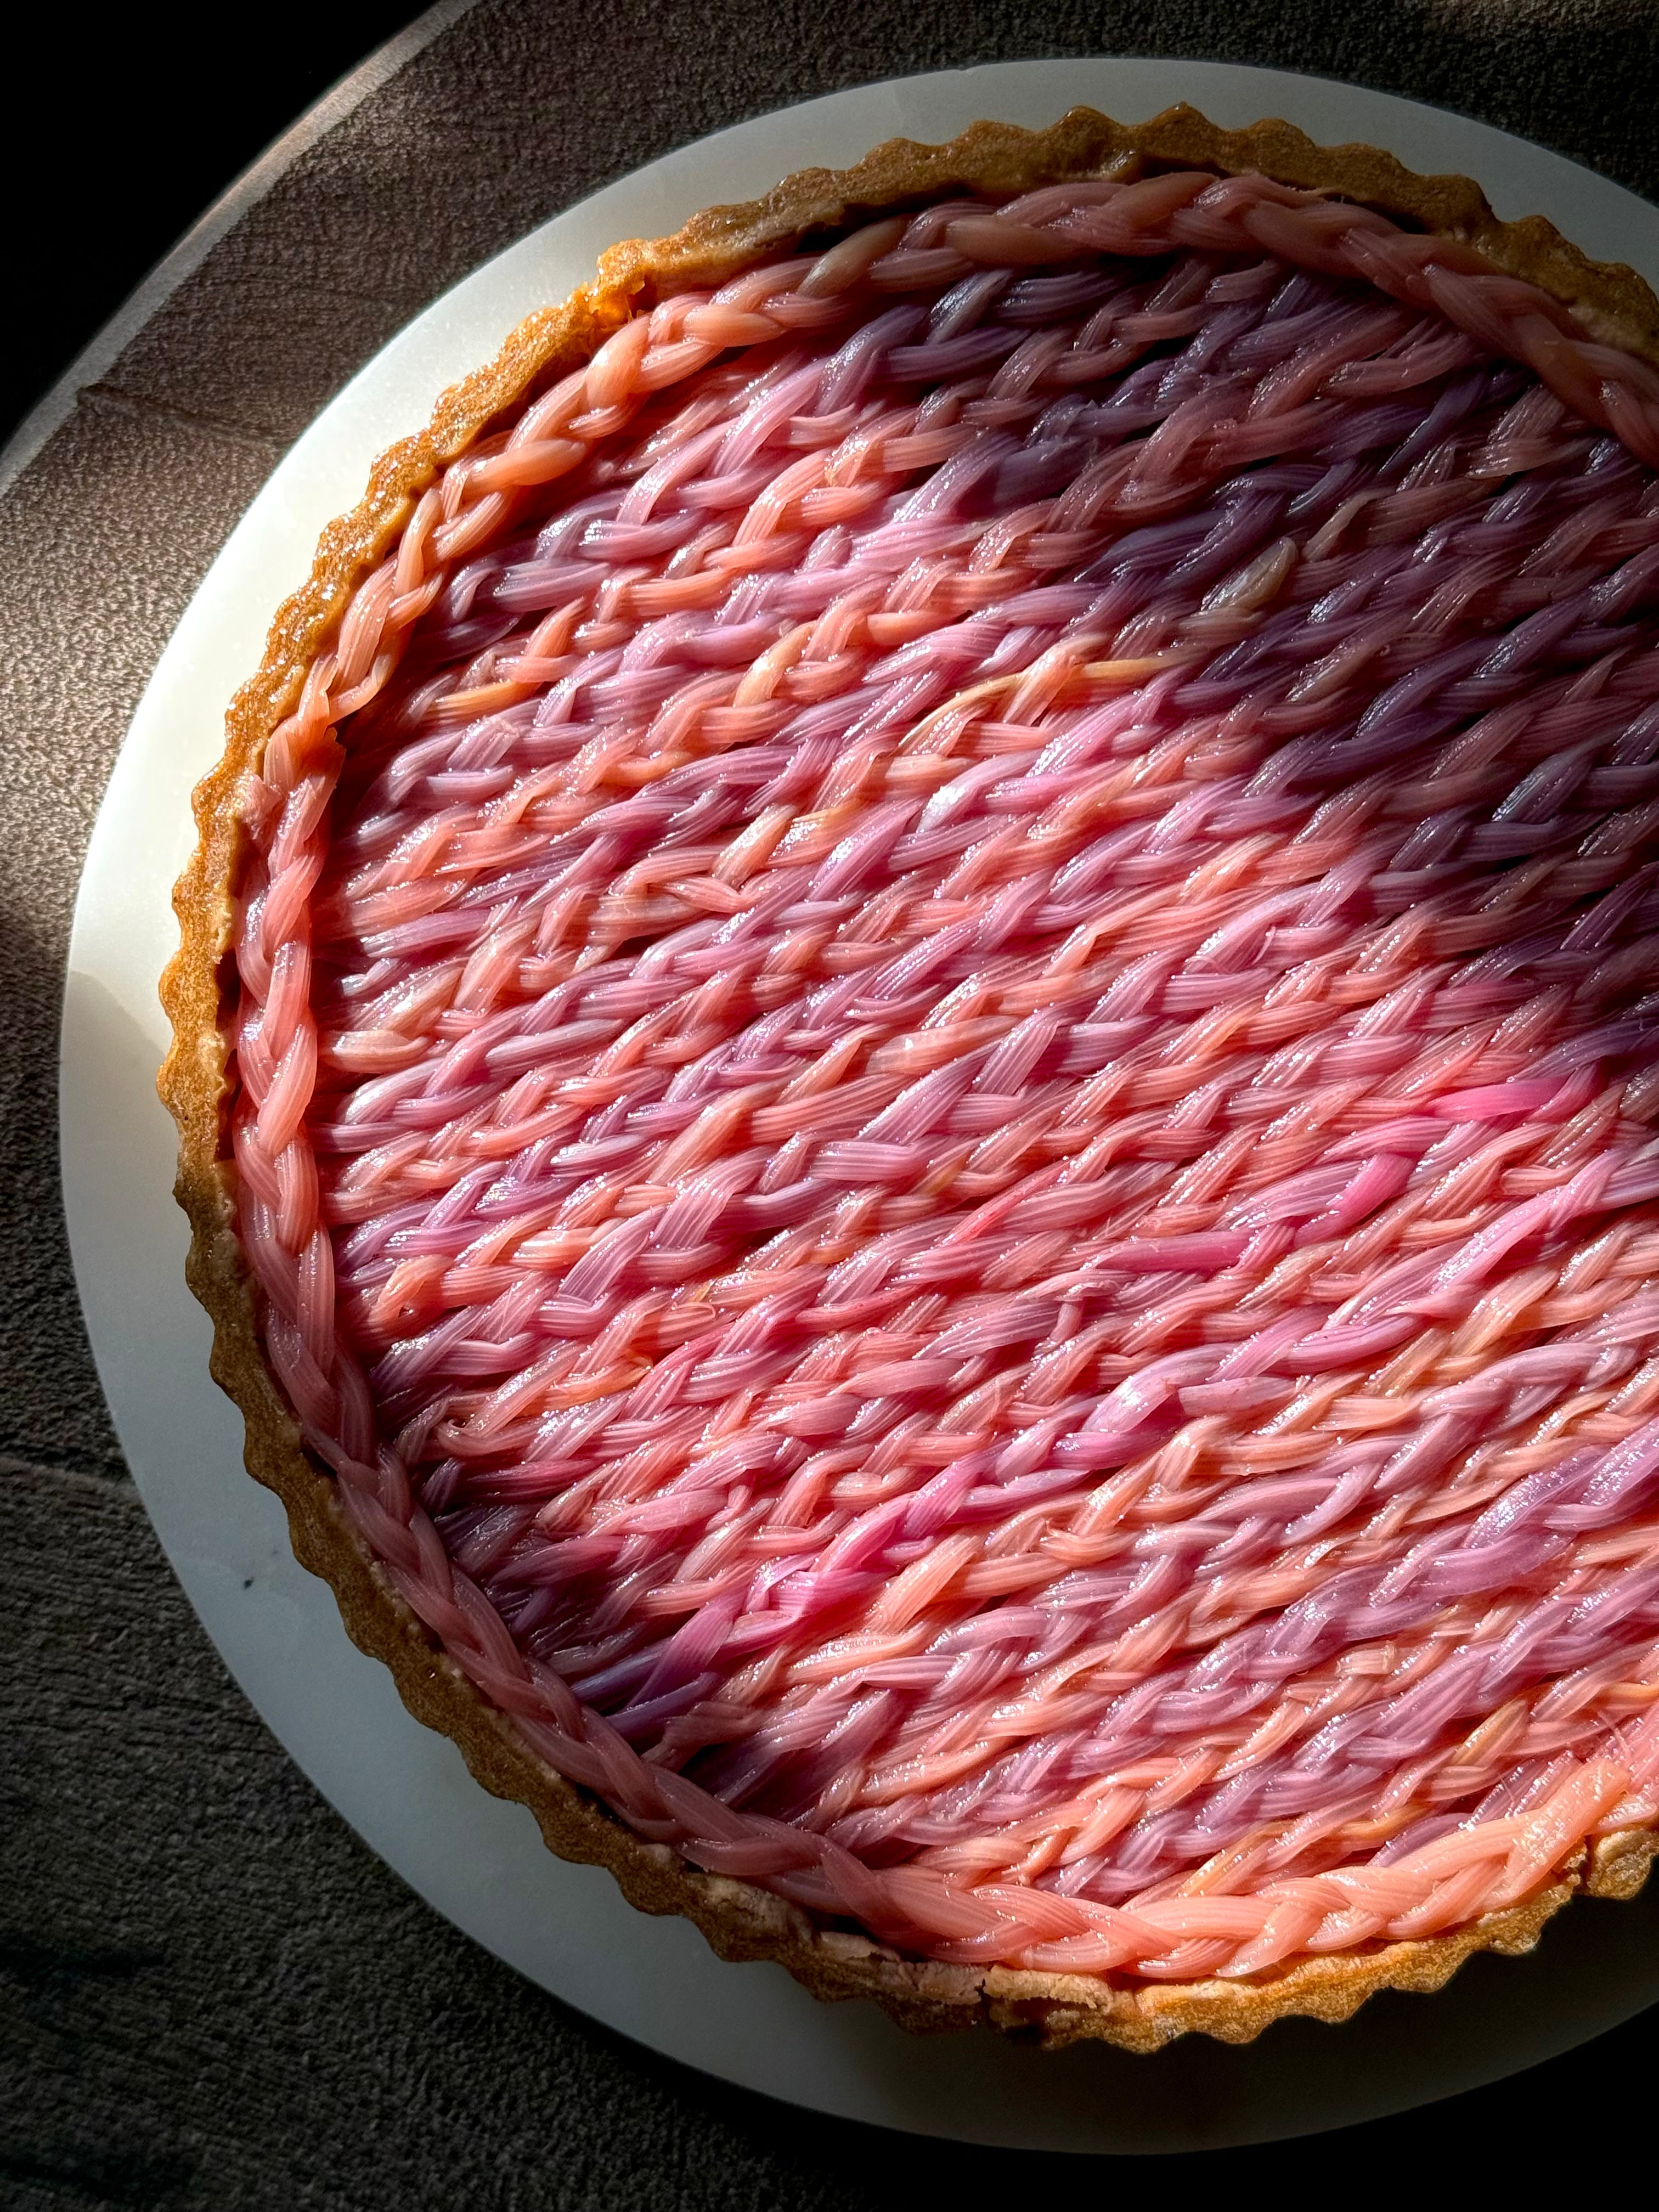
Moving onto the star of the show – we’re back at it with another rhubarb bake, this time it’s my Tonka Bean, Coconut Custard & Roasted Strawberry Rhubarb Tart. I know the last one was already mildly bonkers, and I know this one is taking the biscuit somewhat but folks, I just couldn’t resist. I’ll be honest with you; I still can’t resist. I have had to actively stop myself from purchasing a whole bundle more this week to try and outdo this current version. What is this unhealthy obsession and competition I seem to find myself in? Who am I even competing against? Why am I competing with past rubes? WHAT IS WRONG WITH ME?!
Existential crisis parked, this version features new flavours and a new way to play with forced rhubarb. Just a little reminder on what forced rhubarb is as I seem to have a tonne of messages asking how I have managed to get my hands on it so early in the year and this is where I kindly draw your attention to the word FORCED. This baby doesn’t want to grow this early in the year but like most children of immigrants born in the 70’s and 80’s, they have been forced to overachieve and boy, has that micro-parenting paid off (I say that with tender love and care – I now have two degrees which I now only apply whenever I am making gingerbread houses but shout out mum and dad).


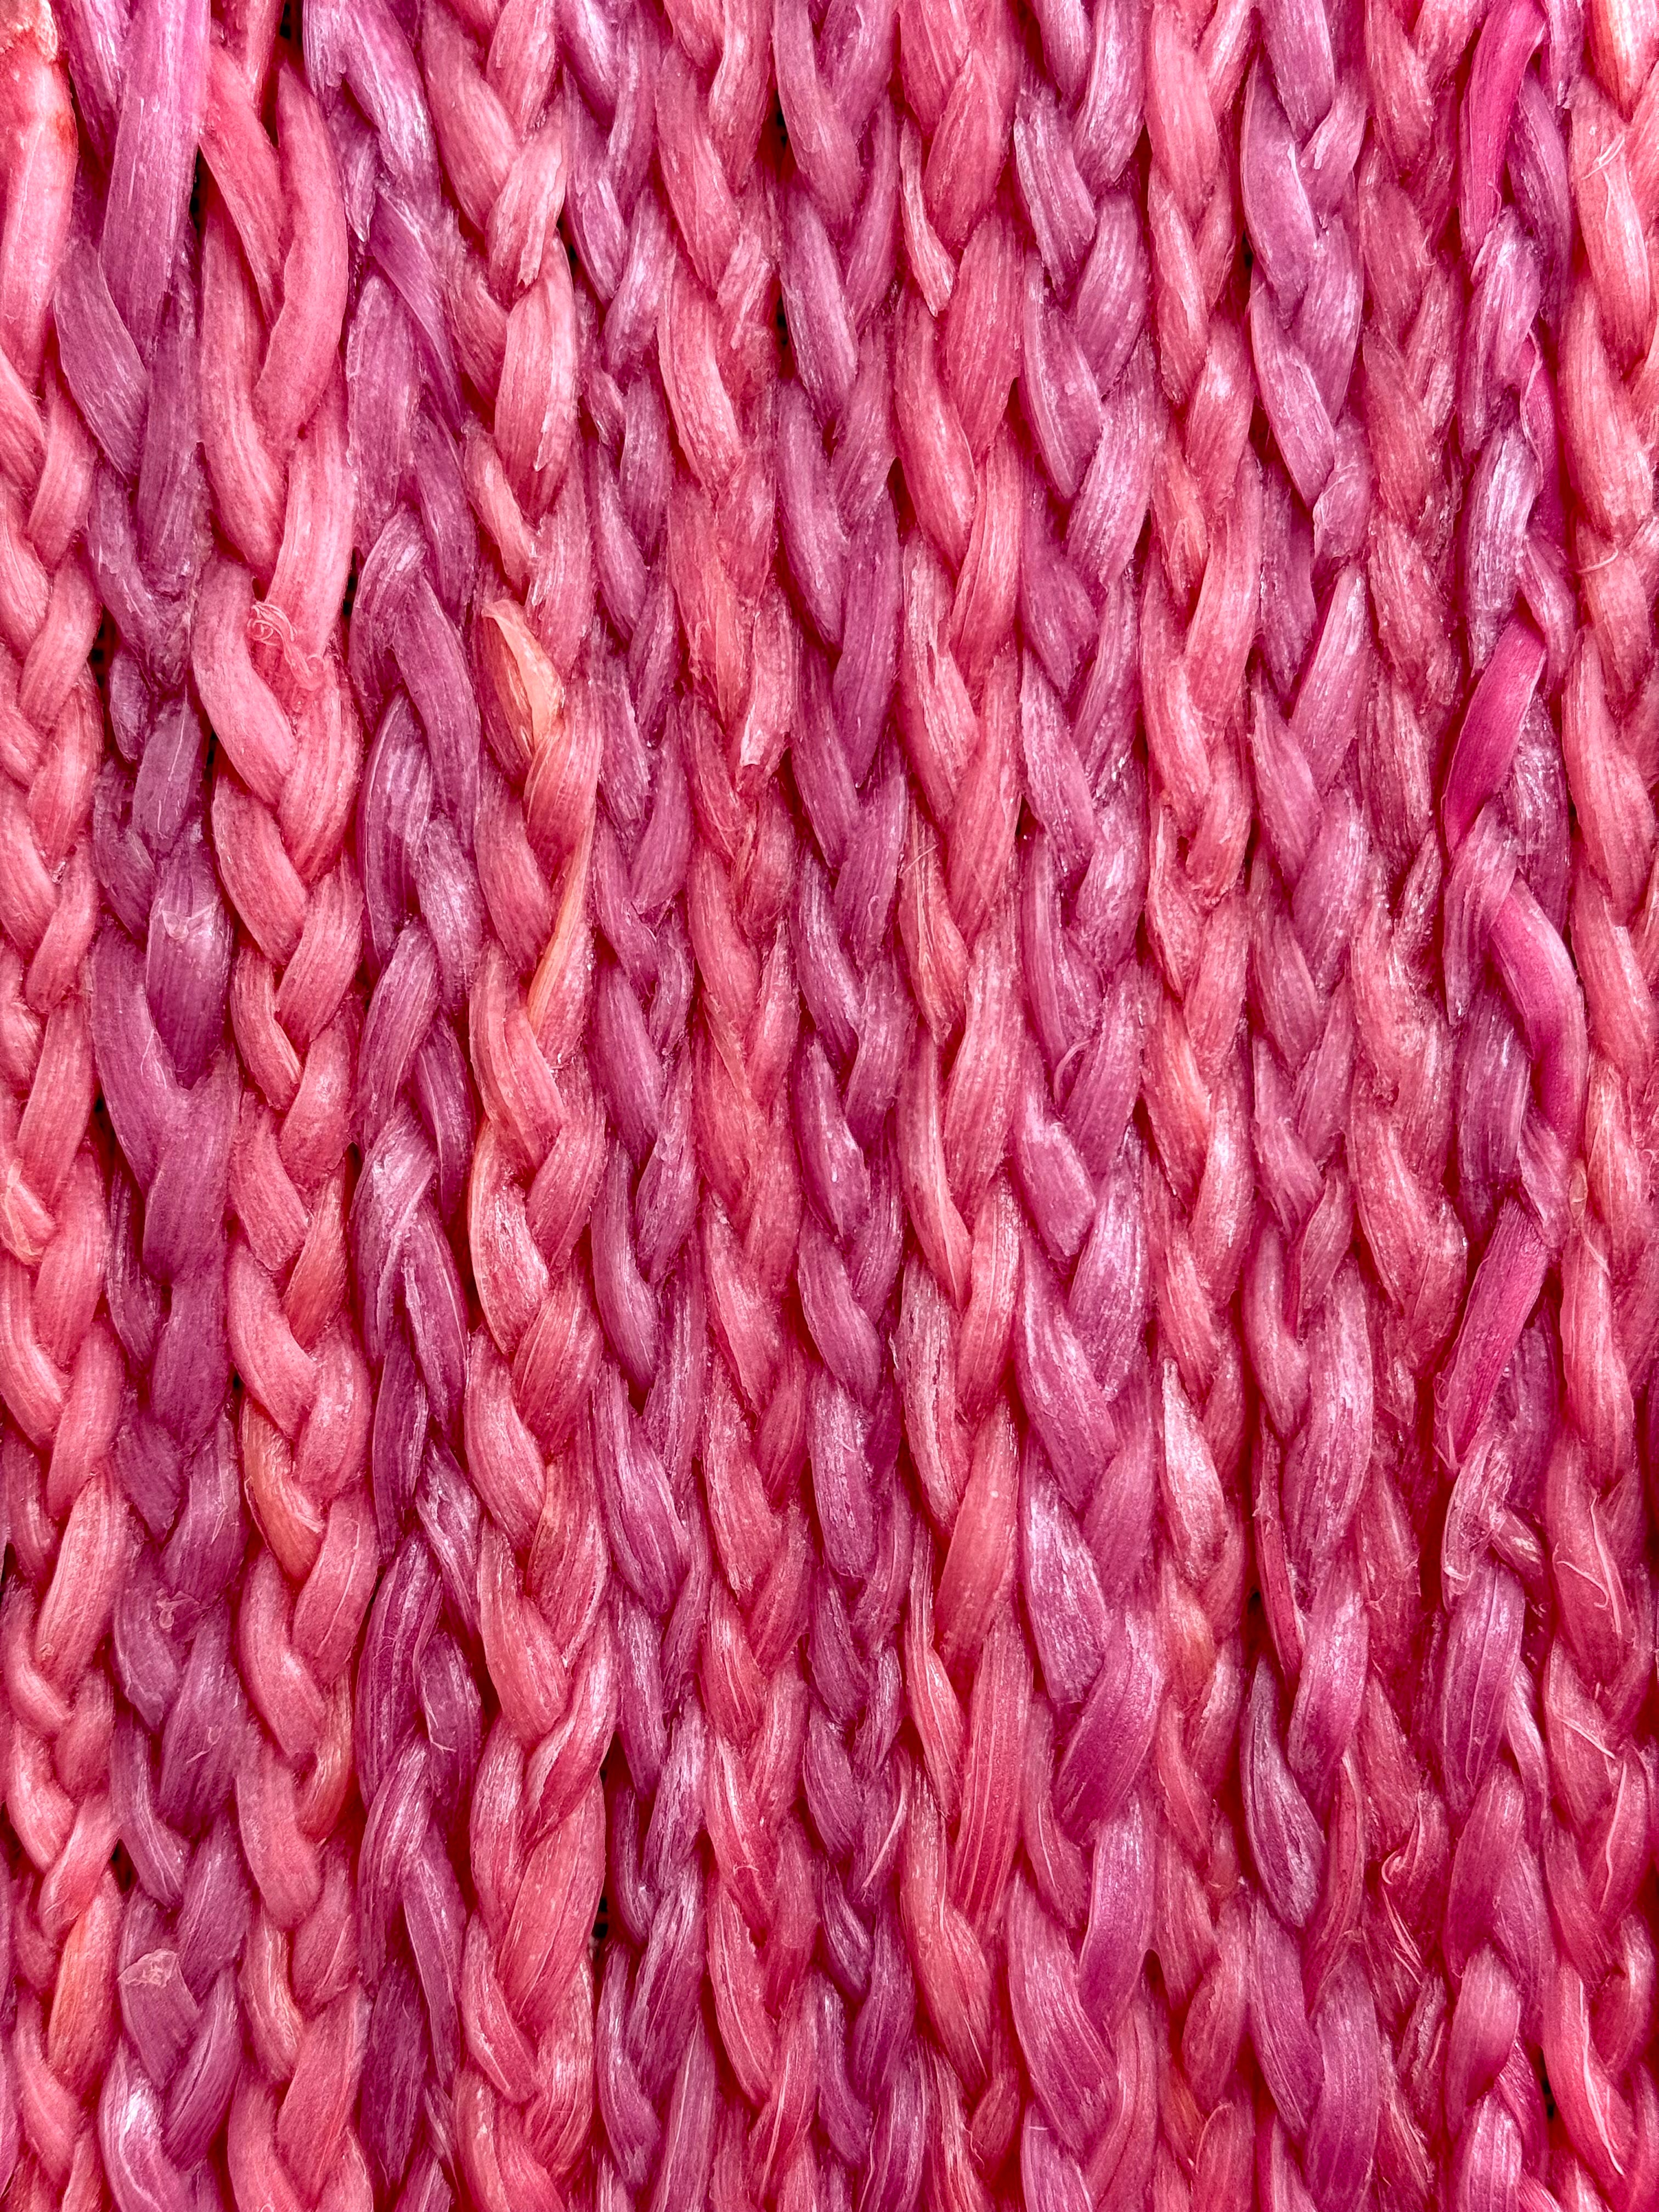
Forcing rhubarb has been a long game process, starting back in 1877. More delicately flavoured and sweeter than normal rhubarb, the forced variety is also much more tender with vivid pinky, cerise red stalks. Grown in dark, warm environments, often covered with pots and buckets for additional warmth, the plants grow quickly as the rhubarb searches for light. Growing forced rhubarb is a real labour of love – it’s harvested by candlelight to maintain the tenderness and to ensure the crowns are not exposed to too much light. If they are, they’ll stop growing, allowing photosynthesis to occur, producing a bitter end product.
Now you know a little bit of background on it, hopefully now you’ll understand my fascination and appreciation of it. Treating produce that has taken years to grow with care and love, to showcase its versatility and beauty is something I never want to stop doing. Food is a privilege and I count myself extraordinarily lucky to be able to enjoy and reap all its rewards. Last year we tessellated. This year we wove and plaited. I have no idea what the next follow-on step from that is but I am already so excited to do this all again next year.


This week’s version sees a tonka bean sweet pastry tart (if you can’t get your hands on tonka, I have a decent sub for you listed in the ingredients list below), encasing a velvety smooth, baked coconut custard, a layer of roasted strawberry jelly (we’re using frozen as these aren’t in season just yet), and finished with two tone plaited rhubarb for peak aesthetics. I’ve been too scared to post on socials after dropping this beaut on there because where do I go from here? Everything pales in comparison, so I fear it’s downhill from here on out. It’s been a fun ride folks.
I’ve beefed out the method this week with lots of pictures, videos and additional snippets of key info to help you nail this bake. The key ingredient to it all is patience. If you couldn’t give two hoots about plaiting, it’s still an incredibly solid bake in terms of flavours. Use the below as a guide but above all else, inspire yourself, push yourself and have fun with it. It’s only baking, after all.
Recipe Makes: 1 x 24 cm / 10 inch deep tart tin (approx. 2 inch deep to get a hefty layer of custard)
Recipe Serves: 8
