

Live, Laugh, Chocolate Tart.
It’s double servings of sweet treats with my Chocolate & Almond Brownie Tart and a Japanese Kasutera, plus a *BONUS* recipe for my Chana Masala – a great veggie, protein packed dinner.

Hey Friends!
I hope you are all well and have had a lovely week so far – mine has been filled with cake (shock), birthdays (my dad’s aka Big Bill), rain (walking Milo) and chocolate.
We have been keeping it filthy over here with the baking and by we, I mean my team consisting of me and my 6 other personalities: Snoozy, Snacky, Sassy, Silent, Sad (99.9% of the time over a failed bake) and Sweaty (post gym). I have been contemplating investing in myself and extending my current team as I am almost certain 5 of those personalities are secretly forming a Union ready to revolt at any moment but can someone PLEASE have a word because the minute I think about relinquishing any sort of control, I find myself hands and teeth clenched, dripping in fear. Do I have control issues? Absolutely but quality control is a necessity in the baking world.

I currently fulfil the roles of Writer, Baker, Recipe Developer, Content Creator, Photographer (an iPhone counts, okay??), Picture Editor, Videographer, Video Editor, Copywriter, Company Director, Personal Assistant (to Milo and myself), Receptionist and Team Organiser. So a number of roles with very little holiday allowance but my my, the perks are truly wonderful.
So far this year, staff have been treated to:
8 different cakes from around the world.
8 different bakes including sweet bread, meringue cakes, and drizzle loaves.
A number of random cakes, birthday cakes, everyday cakes and a just need a slither of something good sorta cake.
A very exciting announcement that has been kept (kinda) secret for a VERY long time (more on that next week EEK!).
A shit tonne of failed bakes which is all part of team building, staff motivation and personal development.
If you couldn’t tell, life is good over here at the Last Bite HQ. Lots in planning, lots in the making and lots of deliciousness in store for you each week. Some upcoming goodies include:
My Banana Tart Tatin with Cinnamon Rum Ice Cream
My ULTIMATE Cinnamon Rolls (I would sell these in a heartbeat, that is how good they are)
My Chocolate Alfajores
AND WEDDING PLANNING. I have yet to start planning but the minute I do, I will be sharing it all here because a) I do not have a clue and b) Indian weddings are incredibly fun so want to share as much of that with you all as I possibly can.
Am I going to make my own wedding cake??? That…is still tbc.

You are all gonna be thrilled to know that this week is FREE for EVERYONE. That’s right. Every recipe, every crumb, every bit of deliciousness is here for you all to hoover up and enjoy.

No one is missing out this week, not on my watch so on the menu, we have:
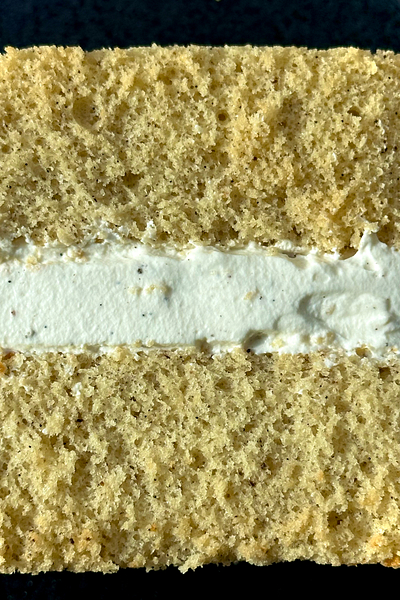
The latest ‘Around The World’ cake. This week we went to Japan to try the fluffiest, spongiest, bounciest cake known to mankind – a Kasutera (also known as a Castella). This cake is easier to make than it seems. Real OG’s will know I crumbled many times trying to make a Japanese Cheesecake some moons back so I went into this one with much anticipation but fear not, it’s easy peasy, sponge so squeazy.
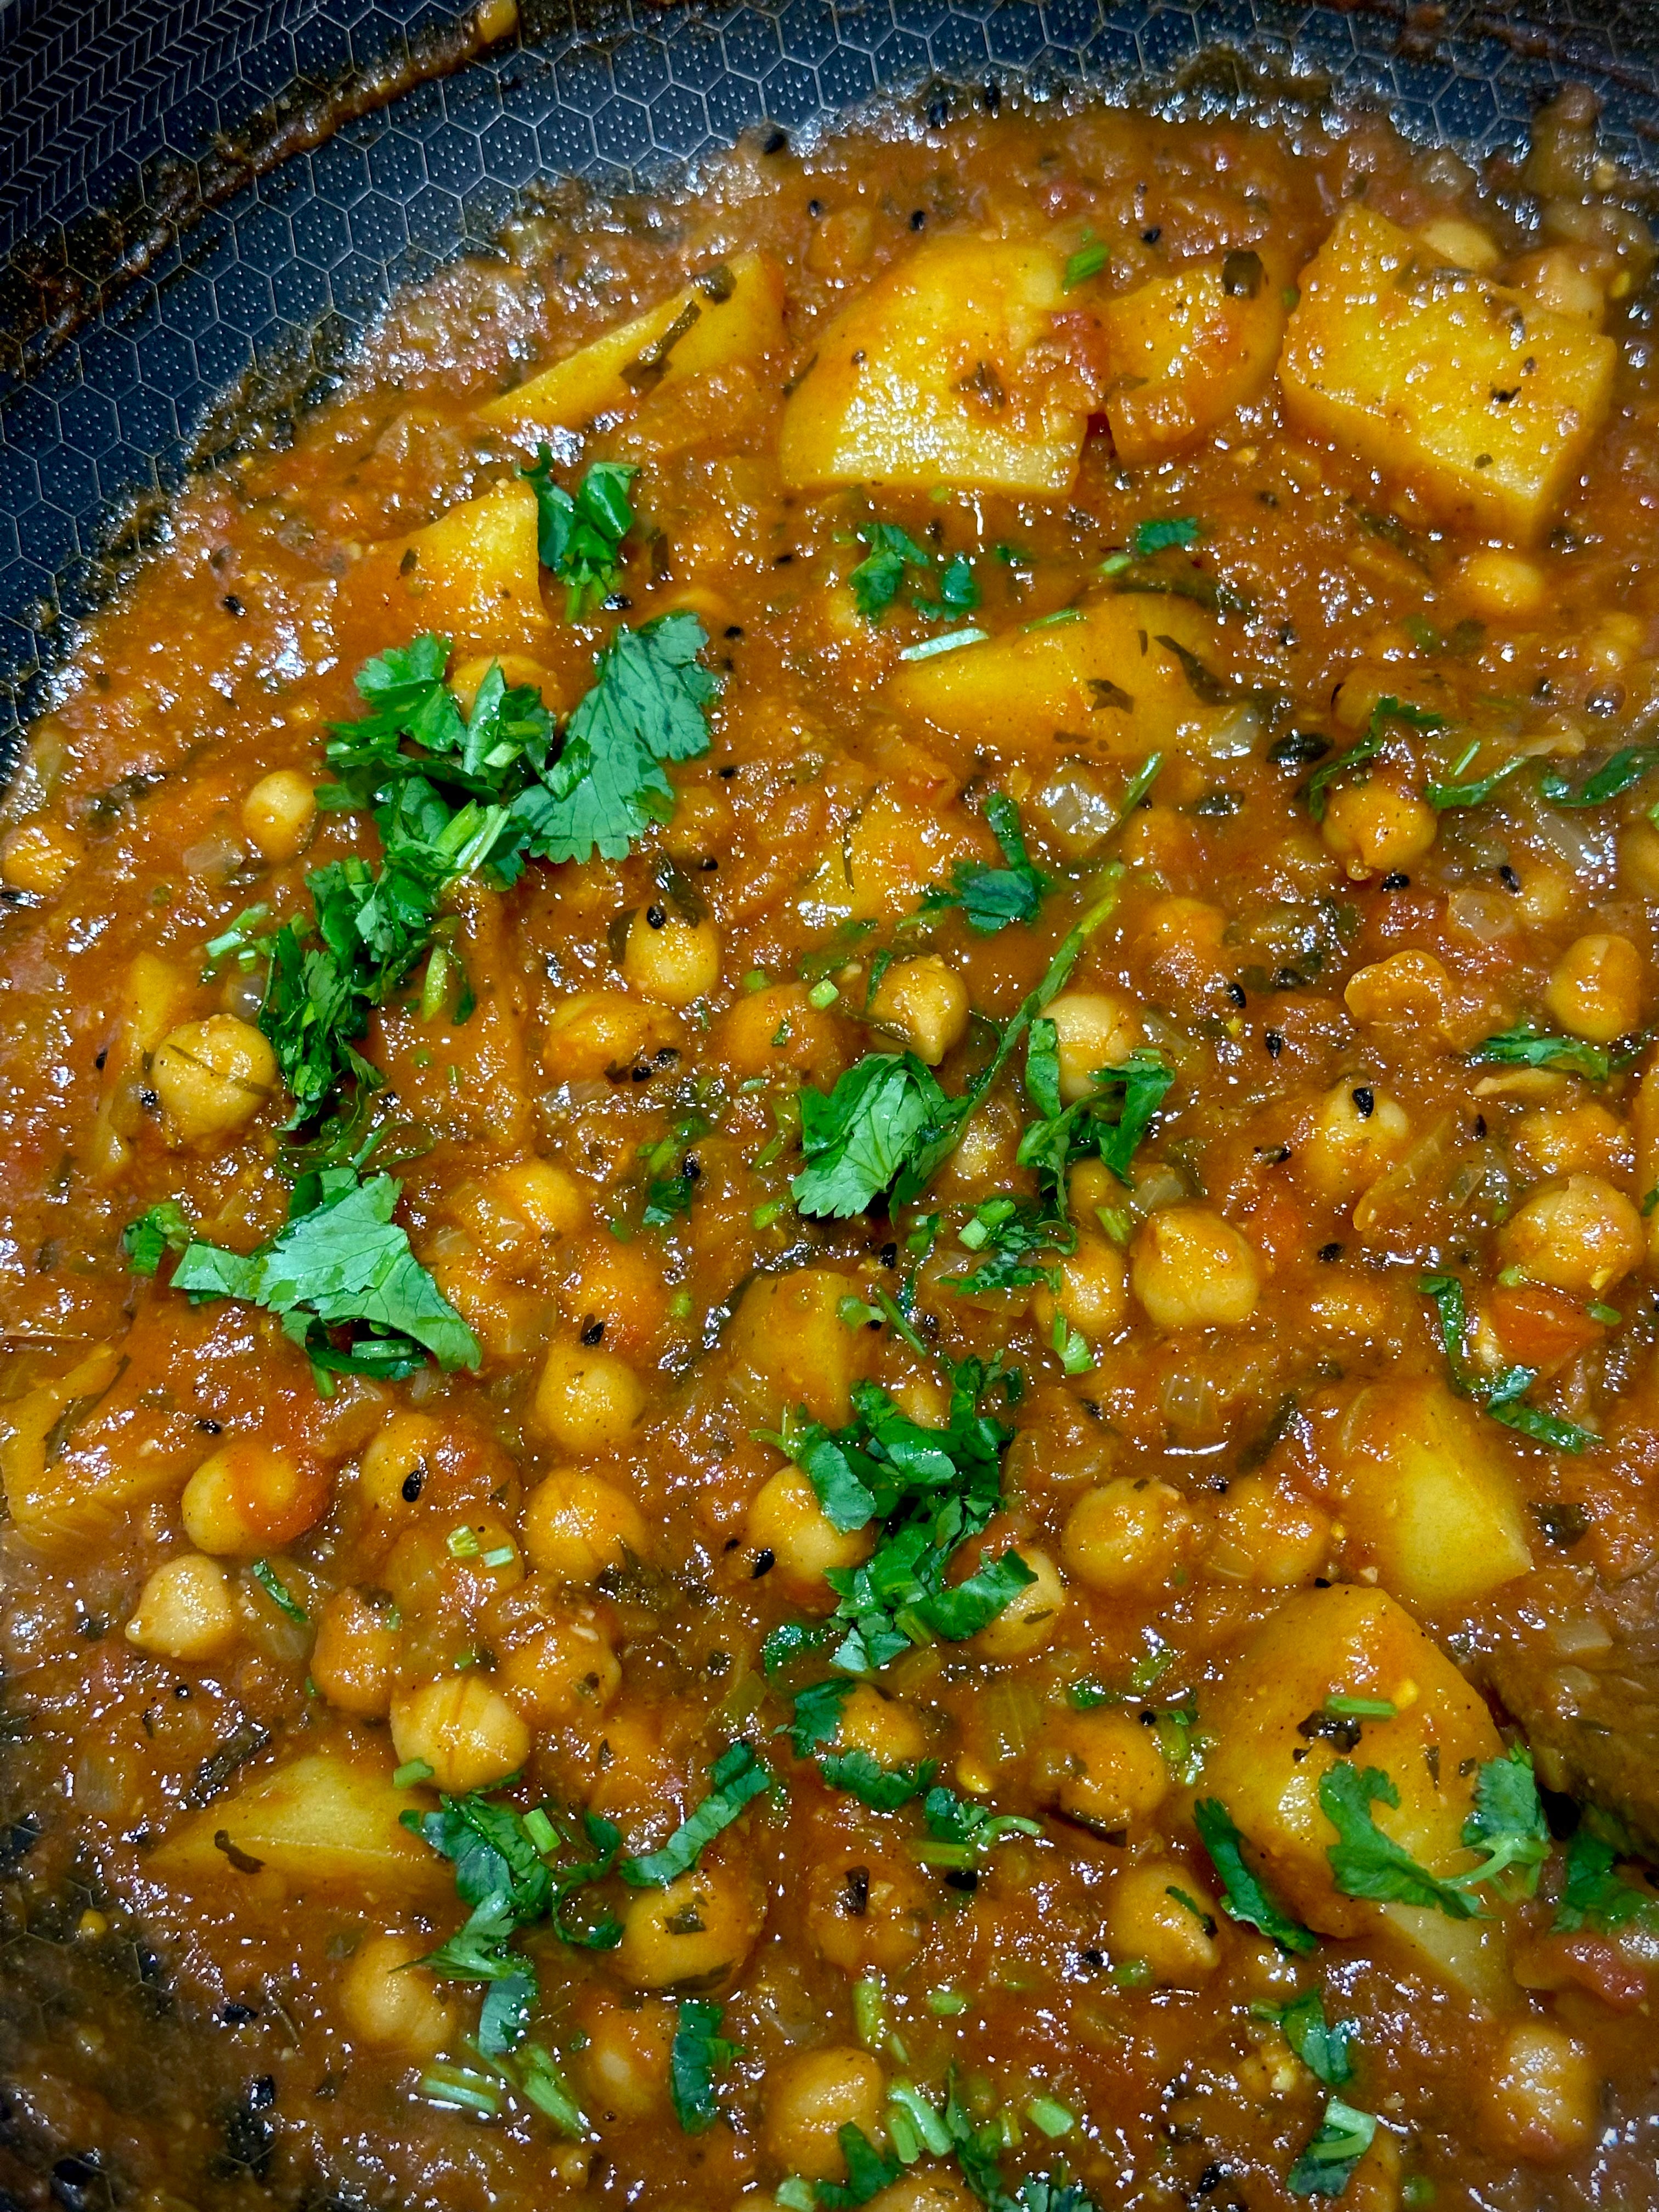
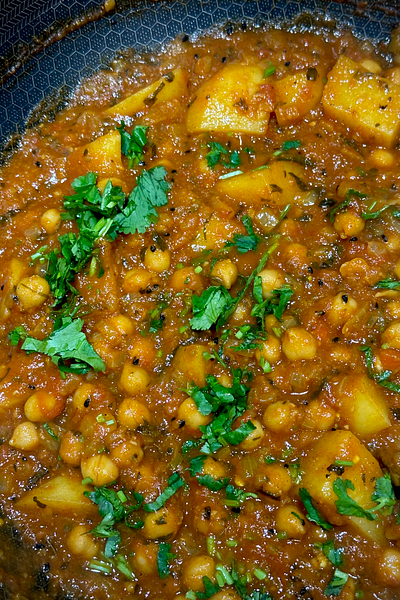
I made my Chana Masala this week, so thought it would be rude to not share it with you all too. Is this my Mum’s recipe? Yes. But have I also tweaked it to the point where it *may* be better than my Mum’s recipe? Also, yes (soz Mum if you are reading but I doubt you are because I know for a fact you have zero idea how to subscribe). This veggie curry is perfect for a midweek dinner option when you’re craving that bit of yummy, scrummy, oomph. It’s warming (a subtle way of saying it’s spicy), mildly tangy, and addictive. I normally serve mine up alongside freshly made garlic and butter naan and a raita but this week did it alongside some Onion & Jeera Rice. Whichever way tickles your pickle, you’re in for a good time.
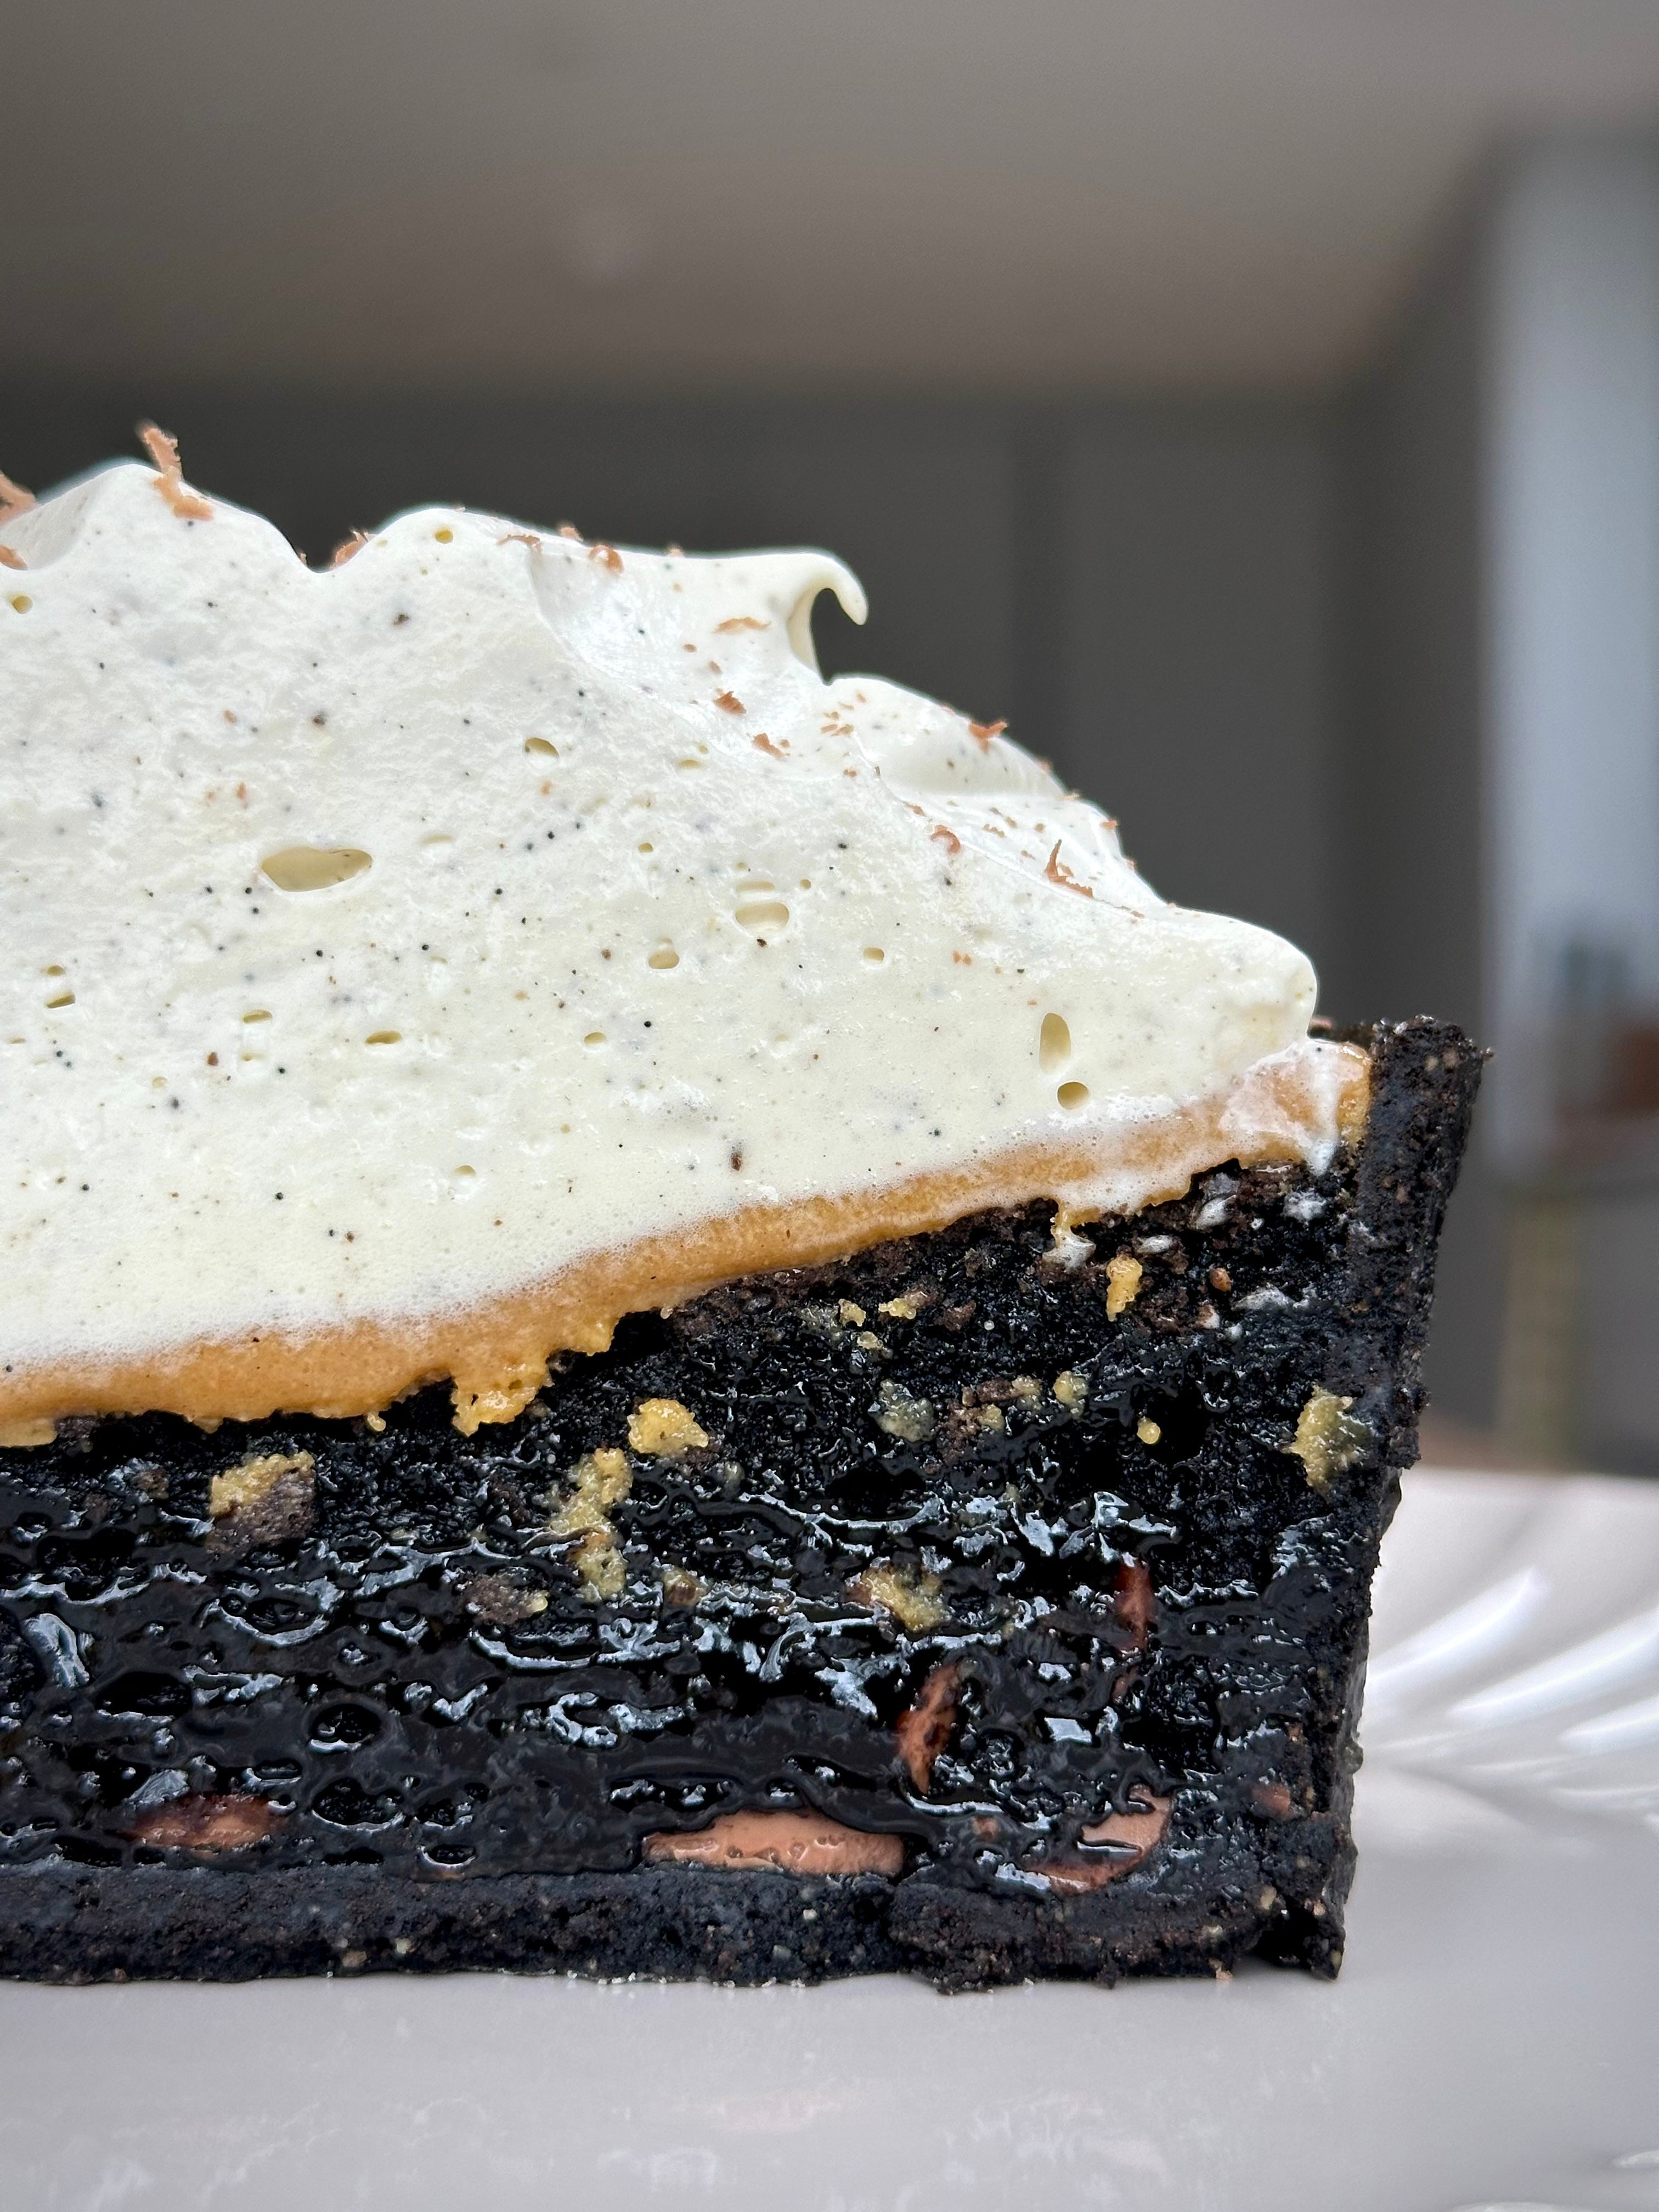
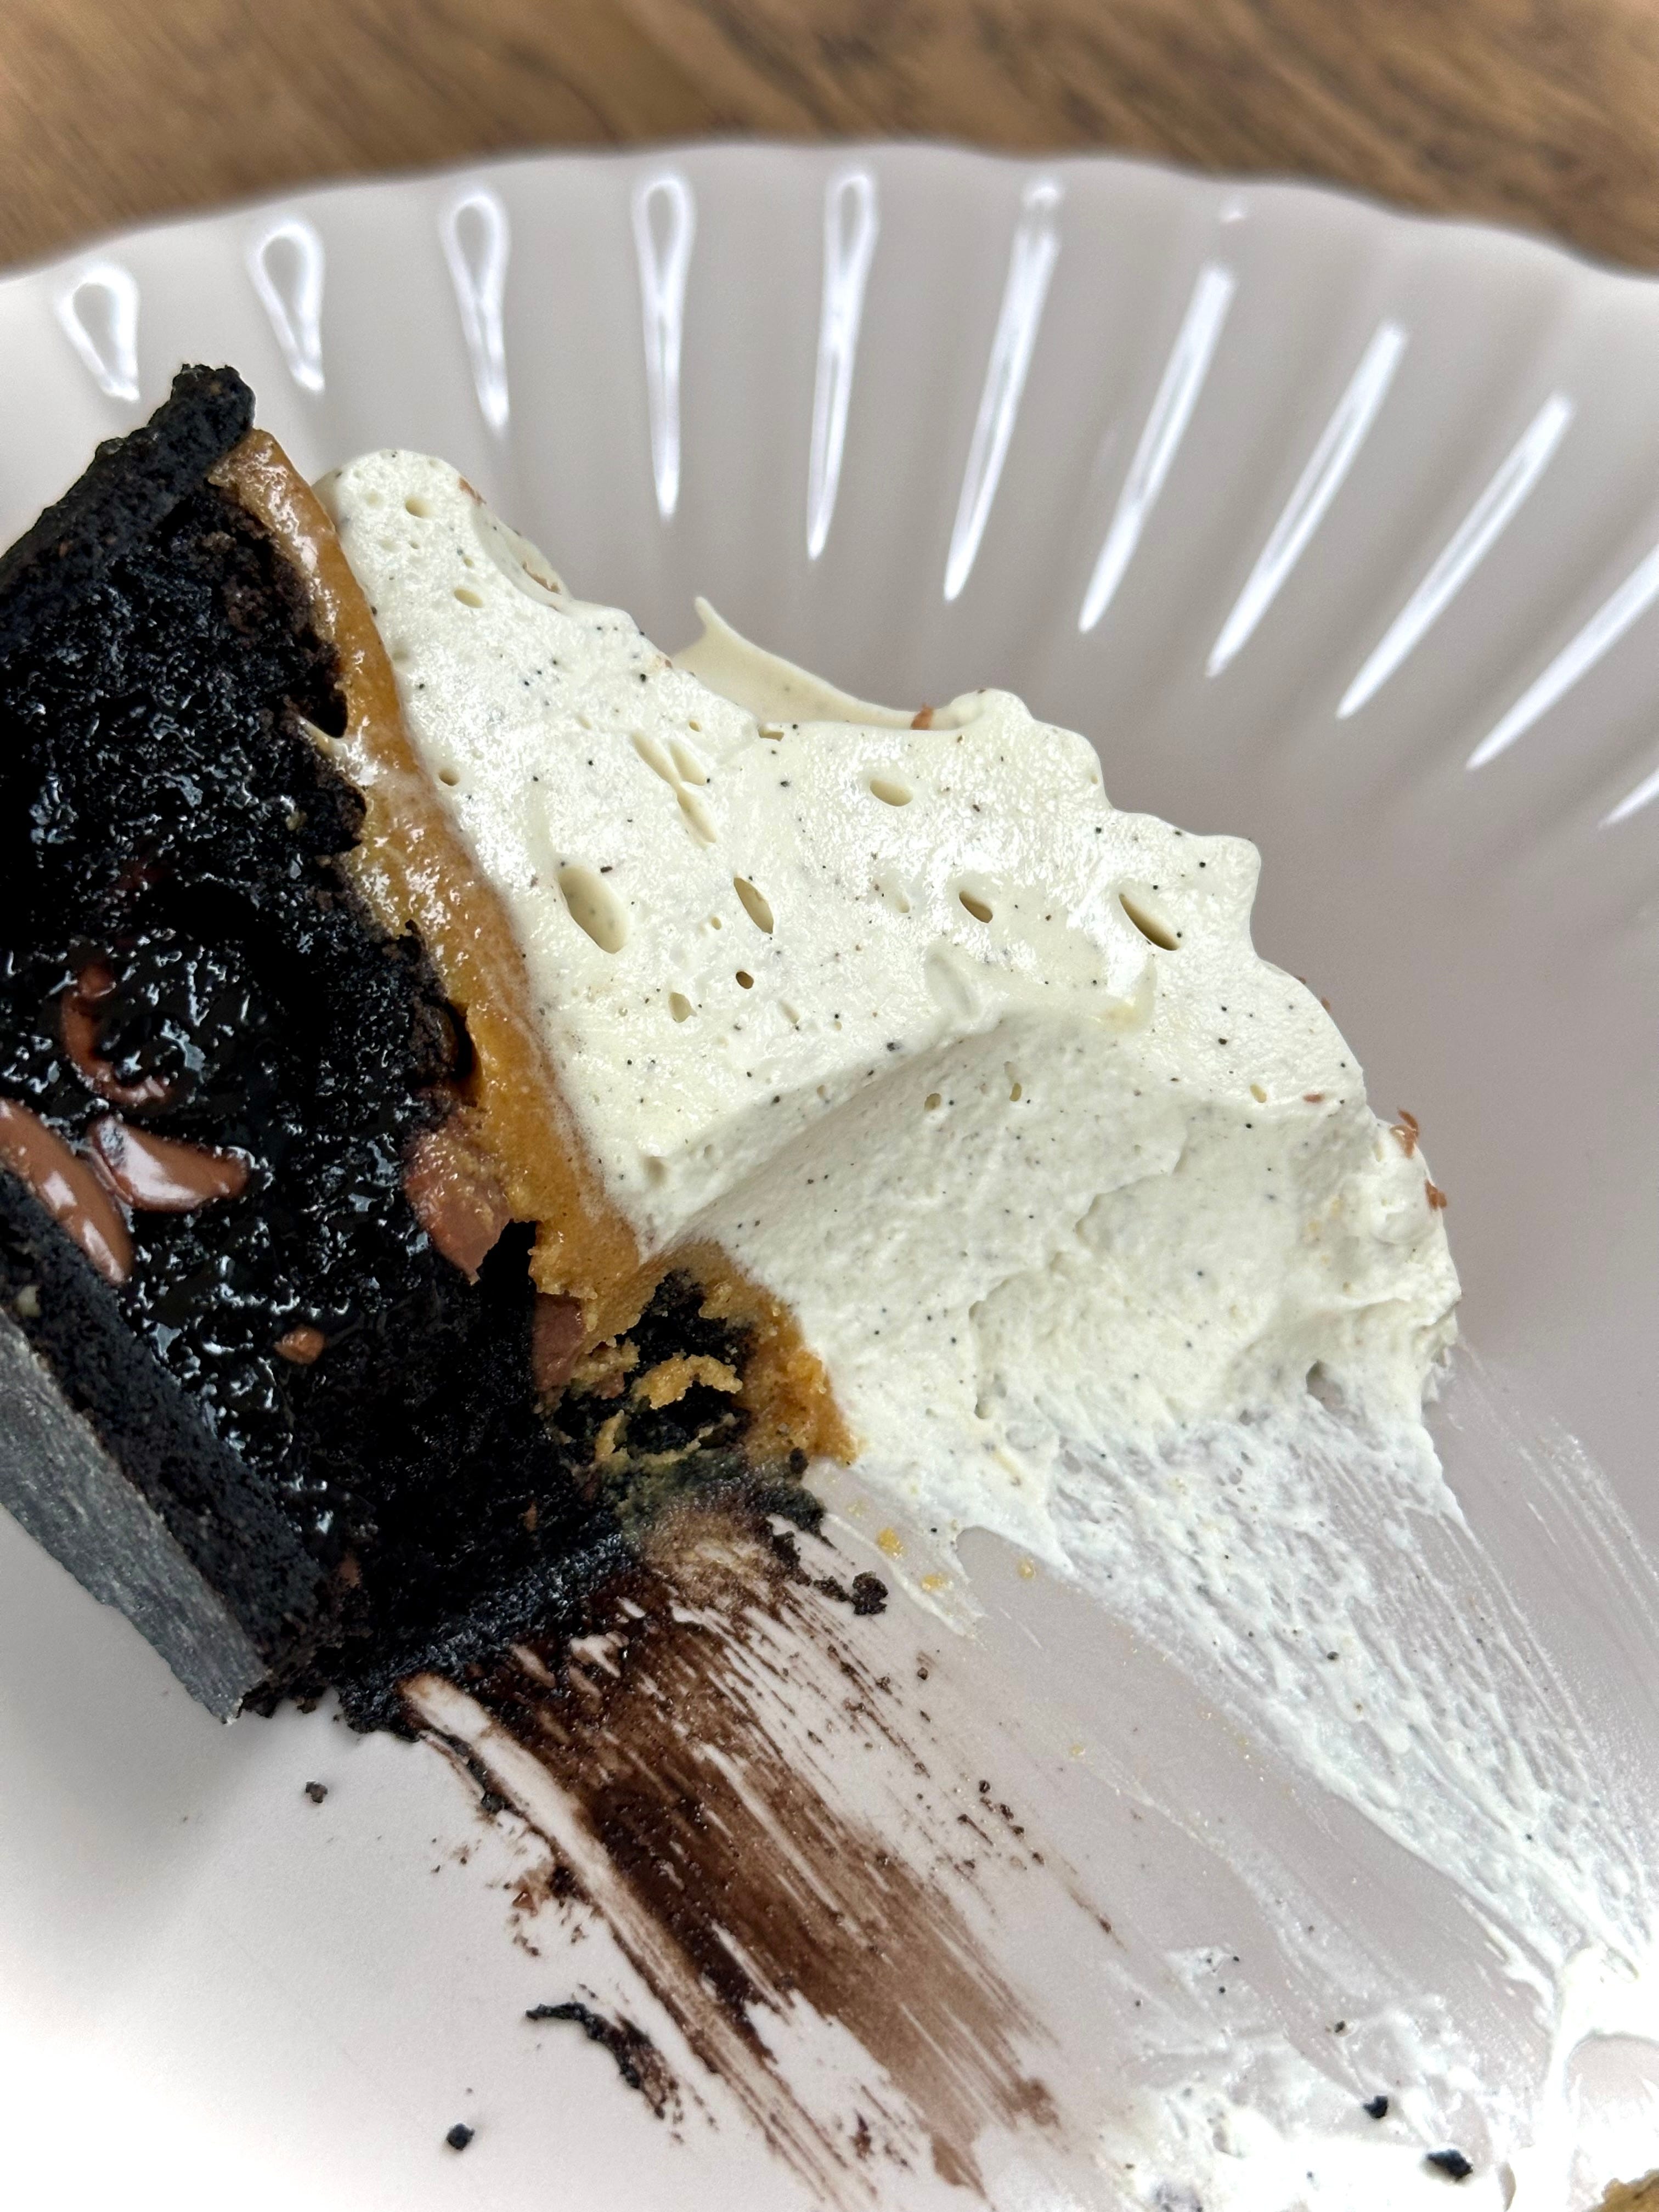
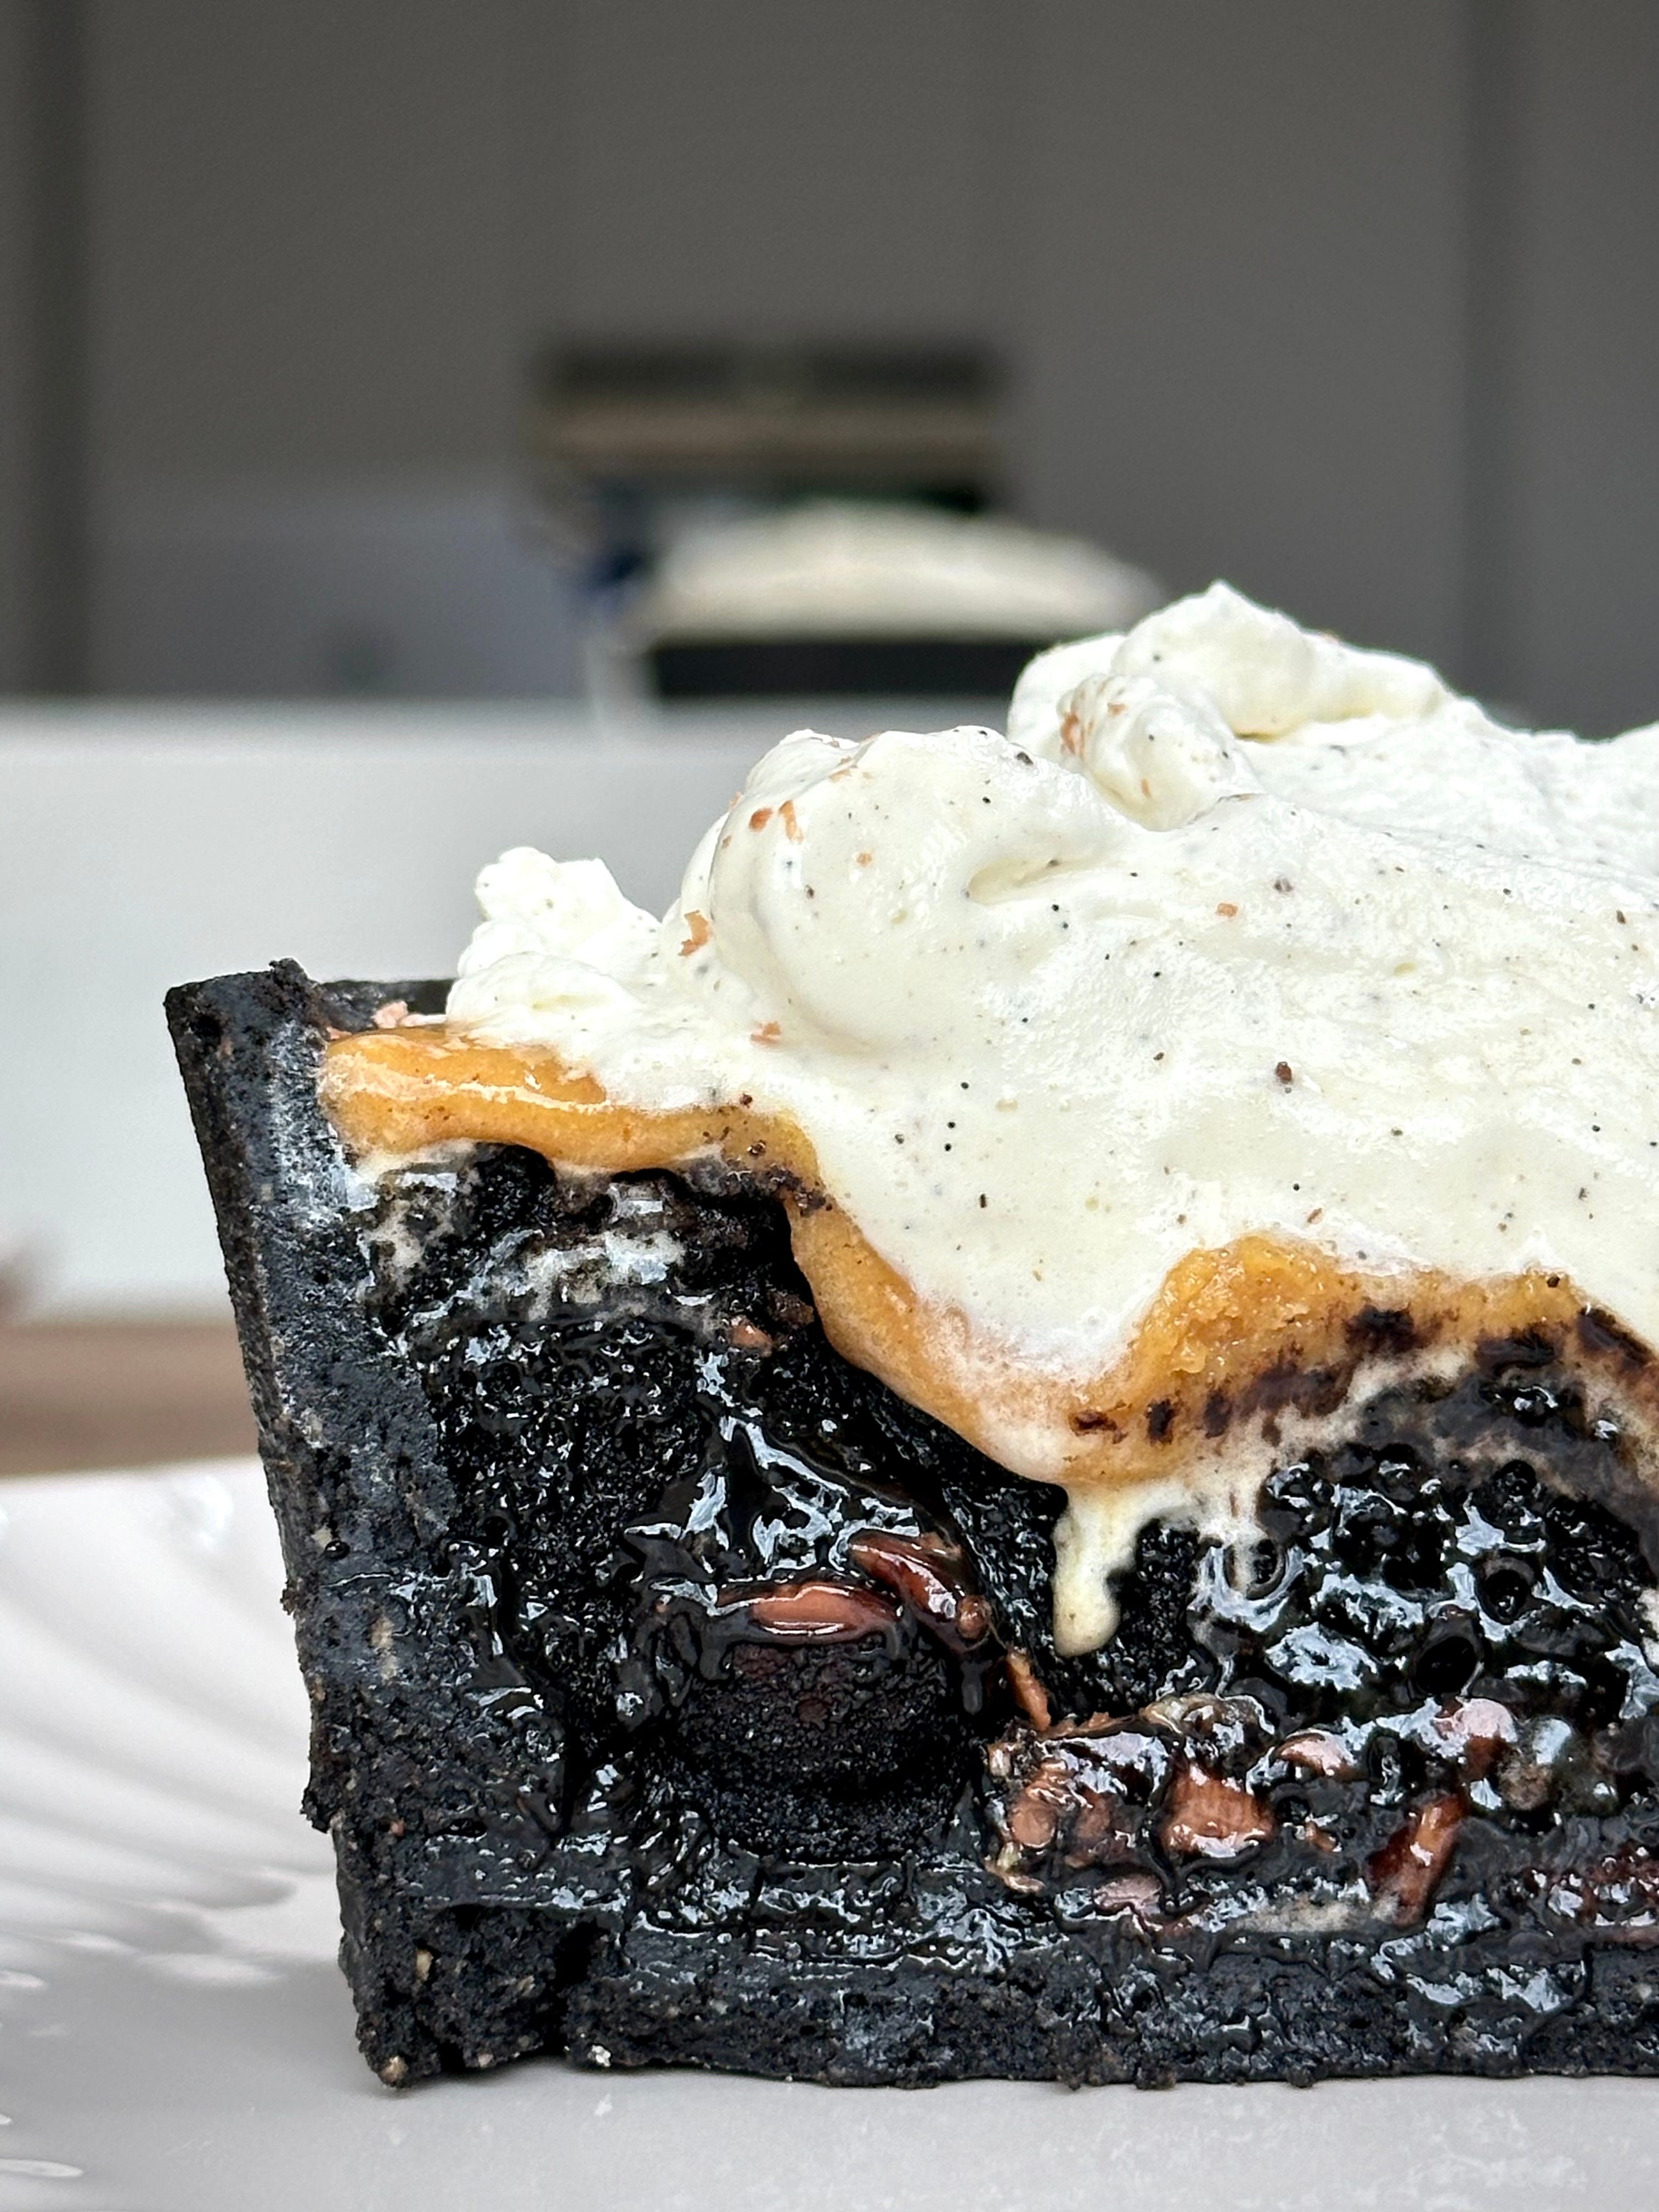
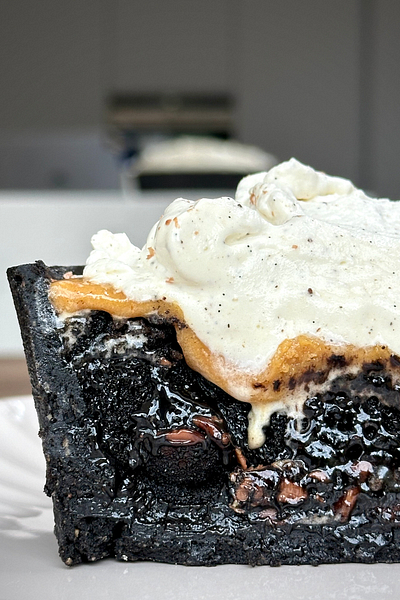
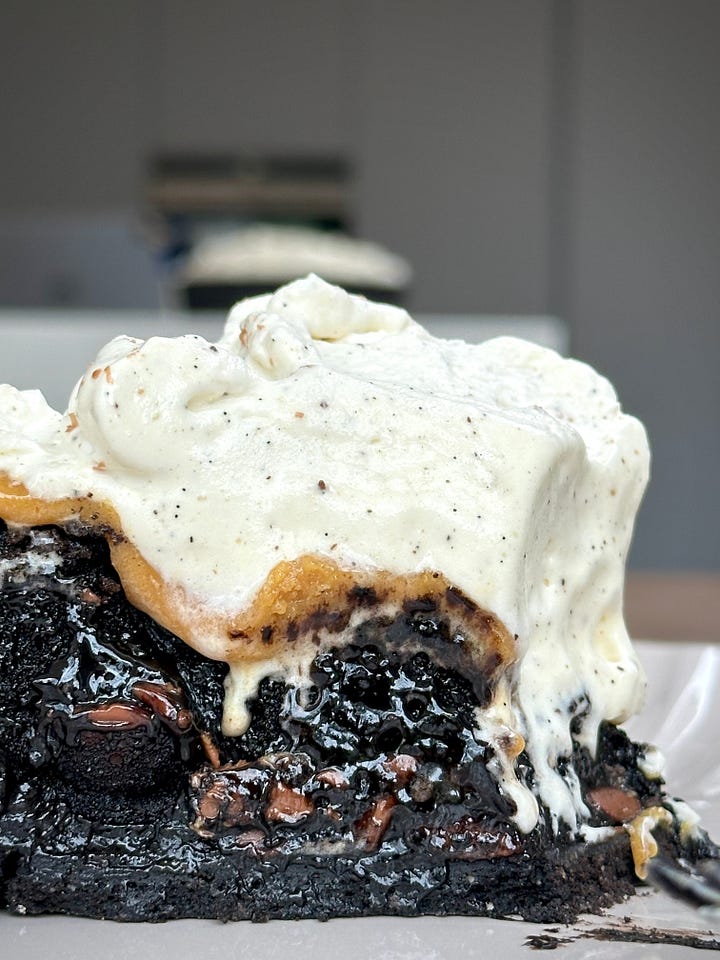
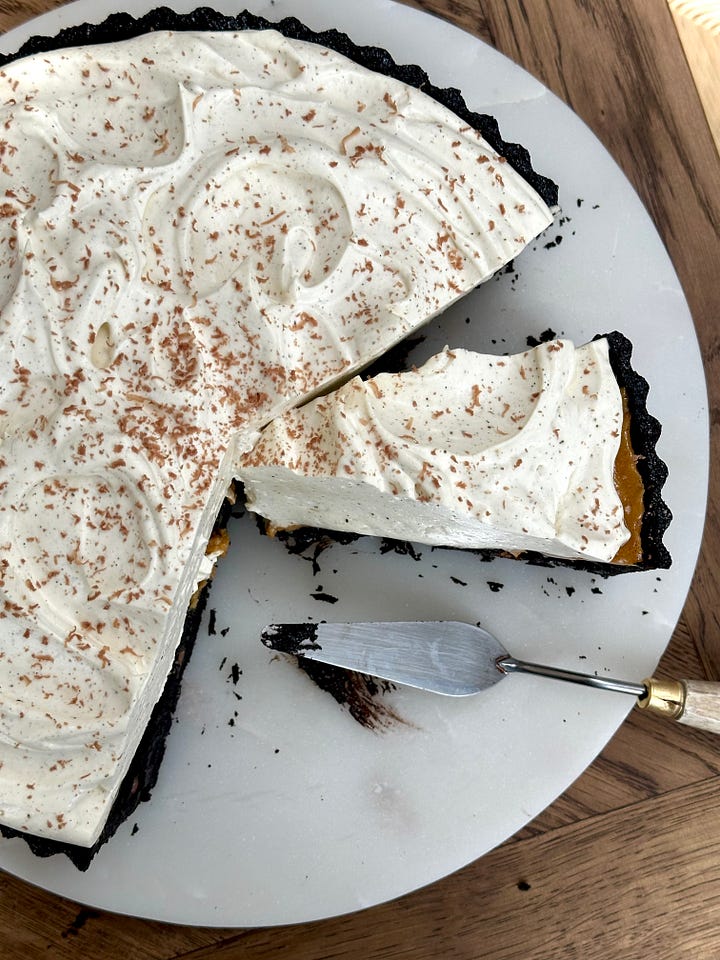
Rounding up the yums this week is the main bake, my Chocolate & Almond Brownie Tart with a Salted Hazelnut Praline. It tastes every bit as indulgent as it sounds but we are breaking down something that sounds super complex, into something that is easy to make at home. The velvety rich brownie filling sits on top of a crisp Chocolate & Almond Sweet Shortcrust Pastry and is topped with a Salted Hazelnut Praline and smothered with a cloud of Vanilla Bean Chantilly Cream. She may seem complex but I break down each process thoroughly and give you a baking schedule to follow in ‘Rubes Recommends’ to prevent any baking induced meltdowns.


If for some unknown reason, none of the above made you drool, tongue hanging out, desperate to lick your screen, then there is a tonne of yum hiding in the Last Bite Archives. You can check out all the previous newsletters and recipes HERE. For any newbies (hi!), make sure you go through them all ‘cause there has been some delicious little morsels over the last few weeks but also I don’t want you missing out on any recipe cards because why be a fool and miss out on some free goodness?
There has also been a TONNE and I mean a SH*T TONNE of incredible bakes for my Paid Subs in them all too. I have far too many to single out but some recent faves include last weeks Malt, Milk Chocolate & Butterscotch Cake, Chocolate & Cinnamon Babka Loaf with a Chocolate & Hazelnut Glazing Sauce and my White Chocolate, Strawberry & Mint Meringue Loaf.


For just £5 a month, you’ll get access to all that plus my weekly Tips & Tricks (we go IN DEPTH), plus future online bake-alongs and recipe videos coming your way soon AND a very exciting announcement with a very exciting discount code coming SOON SOON SOON.
Yay for cake. Yay for bakes. Yay for you and I.

First up this week, we are getting cracking with the latest bake from my series ‘Around The World In 80 Cakes’ – a Japanese Kasutera, also known as a Castella Cake.
I don’t know why it feels like I am flying through the cakes at the moment but next up on the list is one I have been itching to try. All I can say is I am so glad this wasn’t another Japanese cheesecake saga. I don’t know if anyone remembers that time but wow, I truly don’t think my ego could have handled another major L like that so thank goodness, I was in safe hands with the recipe from Emojoie. I only made a few minor tweaks (amended the flour ratio and inc potato starch OBV, added a tonne of vanilla bean and included additional topping).
It’s fluffy, spongy, boingy (it’s a word okay?) and bouncy LIKE YOU WOULDN’T BELIEVE. Yes it is a simple cake, yes it tastes pretty simple but it is simple done simply brilliantly. I know many like to eat this cake without any toppings or additions but the ever so slightly mild eggy undertone sends me sideways (DO NOT SCRIMP ON THE VANILLA!!) so decided to pair it with a velvety smooth chantilly spiked with plenty of vanilla bean and fresh fruit and my my, she is gorgeous.


Recipe Makes: 1 x 18 by 18 cm / 7 by 7 inch square tin
Recipe Serves: 6
Y O U – W I L L – N E E D –
Sponge
100 ml Whole Milk
100 g Unsalted Butter
80 g Plain Flour, sifted
20 g Potato Starch, sifted
0.5 tsp Vanilla Bean Powder OR 1 tsp Vanilla Bean Paste
6 Large Eggs, yolks and whites separated
100 g Caster Sugar
To Serve (optional)
150 ml Double Cream
15 g Icing Sugar, sifted
¼ tsp Vanilla Bean Paste
Fresh Fruit (Strawberries, Blueberries, Mango etc)
M E T H O D –
Preheat the oven to 150C/300F/Gas Mark 2 and overline your 18 by 18 cm / 7 by 7 inch square tin with greaseproof paper – make sure the paper extends by about 2 inches over the tin edge.
Add the butter and milk to a saucepan and place over a gentle heat. Allow the butter to melt before removing off the heat. NOTE: You are looking for a temperature of about 50C/120F – anything hotter will cook the flour too much before going into the oven.
Add the flour and potato starch to a bowl and mix to combine.
Pour in the milky butter and use a balloon whisk to mix until smooth.
Once smooth, add the vanilla bean paste and yolks and again mix until smooth. Leave to one side.
Add the egg whites and sugar to a bowl.
Whisk until the whites reach soft peaks (it holds a peak but the top flops over ya know?) – anything firmer will cause your cake top to crack when baking.
Boil your kettle before pouring the whisked flour mix into the egg white bowl. Use a balloon whisk to gently fold through. Run a rubber spatula around the edge and base of the bowl to ensure the two are thoroughly combined.
Transfer the batter into your lined tin and place the tin into a larger, deep, baking tray. Fill the tray with boiled water to make a water bath.
Place the tray into the oven and bake for 1 hour.
Remove the cake from the oven once the top is golden brown and spongy. Carefully remove the sponge from the tin and peel back the greaseproof paper.
Use a serrated knife to cut – the cake will slightly deflate as you do this so don’t stress if it does.
Serve warm or leave to cool before popping into Tupperware and leaving overnight in the fridge (it somehow gets moister and softer the next day?).
I served mine alongside some whipped cream and fruit. To make the cream, whisk the double cream, icing sugar and vanilla until you reach soft to medium peak. You want this to be silky smooth. Dollop on top of a slice, add some fresh fruit, and enjoy.
Next up, we have a delicious mid-week treat – my Chana Masala. This is a dish we grew up with and is something that reminds me of home. It’s good mood food for the soul and not only does it taste incredible, its nourishing, full of protein and a great veggie dish to serve up as a main meal or as a side serving to a whole feast. I love mopping this up with a hot buttery, garlic naan and dunking it into a mildly spiced raita and honestly – life feels great in that exact moment.

This is the perfect meal to whip up when you have guests come over with varying dietary requirements (and by guests I mean my sister who swings from being vegetarian to pescatarian to vegan to back to occasional meat on the weekly). Chana Masala is a staple in most Indian households and for good reason – it is packed full of flavour and is so easily made. The tomatoey base is the perfect foundation for the myriad of spices and whilst Indian food can seem daunting to take on, I promise you, I have made it super simple for you. ESPECIALLY WITH THE RICE. For the love of sweet, sweet God, please no more draining your cooked rice through a sieve. Follow my recipe to a T and you’ll be left with perfectly soft, fluffy rice.
I know the measurements sound a bit strange by using a drinking glass or mug to measure your rice but this is how Mama Bhogal does it and it has never failed me so far. As a general note so you aren’t making rice that could feed the 5000, 2 mugs are good for about 8 people (depending on your rice consumption).
Recipe Serves: 4 generously…6 as a side.
Y O U – W I L L – N E E D –
Base
1 tbsp Veg Oil
200 g White Onion, diced (approx. 1 large onion)
3 Garlic Cloves, grated
1.5 tbsp Ginger, grated (approx. 15g)
2-3 Green Finger Chillies, finely chopped (go for more if you can handle the heat)
1 tsp Sea Salt, plus a pinch extra
0.75 tsp Turmeric
1.5 tsp Garam Masala
1 Bay Leaf
1 tsp Dried Fenugreek Leaves
5 g Coriander, chopped
1 x 400 g tin Plum Tomatoes
Filling
1 x 400 g tin Chickpeas
250 g White Potato, peeled & quartered
0.5 tsp Onion Seeds
125 - 150 ml Water
1 tsp Tamarind Sauce
Good Handful of Coriander, chopped
Rice
1 glass Basmati Rice (use a normal drinking glass/mug as your measuring cup)
1.75 glass Water
0.5 (small) White Onion, sliced
10 g Salted Butter
0.75 tsp Cumin Seeds
M E T H O D -
Into a large pan, add the oil and allow to sit for 1-2 mins on a medium heat.
Start with the base by adding in the diced onions, a pinch of salt and sweat for approx. 5-7 mins. We want the onions to be caramelized before we move on so ensure they are translucent whilst taking on a lovely golden brown colour.
Add in the garlic and ginger and cook for a few minutes before adding the chopped chillies, sea salt, turmeric, bay leaf, garam masala and fenugreek. Give it a good mix, allowing it to cook for a few mins.
Add in the plum tomatoes, break them down with a wooden spoon and stir. We need this base to really reduce so it is thick in consistency, which will take about 20 mins. Make sure you stir often but let it do its thing.
Once it has thickened and all liquid has evaporated, add in the coriander, and give it a good stir.
Next in is the tinned chickpeas (water included), onion seeds, tamarind sauce and the potatoes (make sure the potatoes are reasonably small. If you are using jumbo potatoes, quarter down again to ensure they cook through). Stir well.
Pour in ¾ of the water and mix – we are after a thickened gravy consistency so judge the amount of water and go in sparingly to begin. The amount of water you will need will be dependent on how reduced down your base was.
The potatoes are going to cook in the curry, so reduce the heat down, place the lid on top and allow it to gently simmer for approx. 30-35 mins. In between this time, constantly check and stir. You will know when the curry is done once the potatoes are cooked through but still holding their shape.
Whilst the curry is simmering, get started on the rice. In another saucepan add the chopped onions and gently heat in butter. Once melted, add in cumin, continue to sizzle for 2 mins. Stir well and pour in the water.
Whilst the water is heating up, wash the rice thoroughly by placing it in a fine sieve. Rinse in cold water to remove starch until the water runs clear. Drain and add it to the saucepan. NOTE: DON’T skip the rice wash – this bit is key for fluffy rice. If you don’t, you’ll end up with sticky rice, which sure is great but not great for this recipe.
Stir well, bring to the boil, and then lower the heat to a low simmer and place on the lid. Continue cooking the rice over a low heat for approx. 15mins until the water has cooked out. NOTE: Be patient here and do not stir whilst the rice is cooking. You’ll know if the water has cooked out by listening to it – sounds weird I know BUT remove the pan from the heat, lift the lid and if you can no longer hear water bubbling, you should be good. Remove from heat.
Scatter on top the chopped coriander onto the chickpea curry, give it a good stir and taste. Adjust any seasoning to your preference (salt) before serving up hot alongside your rice, some raita and a green salad.
Moving onto the main bake of the week, my Chocolate & Almond Brownie Tart with a Hazelnut Praline.
I really wanted to make something this week for you all that had a little something everyone could enjoy. I wanted a bake that you could dissect and make your own, a little something that if you didn’t like one component, you could enjoy another and perhaps teach you a new skill or help you master something you’ve never tried. I wanted something that essentially left you thinking, ah yeah, I could definitely make that! I know I go a bit extra with the bakes on here and occasionally throw everything including the kitchen sink at one ‘simple’ bake but this one truly centres around one part: a brownie.
I’ve made a few different variations on brownies over the years and yes, I will eat them if they are sat in front of my face, but they aren’t the bake that gets those happy feels in my tummy going. You know when you internally drool a little and have to compose yourself and think of anything, but the bake sat in front of you that no one is serving up and you’re like, serve it up. JUST SERVE IT THE HELL UP ALREADY.
Yeah, a brownie is never going to get that reaction from me. But I know they are crowd pleasers and here at the Last Bite, I aim to please.


So, whilst you could completely sack off the entire bake and just bake the brownies, we are using that deliciously, rich, fudgy filth to fill a chocolate and almond pastry case and top it with a hazelnut praline and a cloud of lightly whipped, vanilla laden Chantilly cream. It’s indulgent, it’s naughty, it’s salty, sweet, sumptuous and divine.
It’s one hell of a sexy slice and a glorious little treat. I reserved some of the surplus brownie mix to make some muffins and wow – my sister has never hoovered up something so quick. I blinked and all 6 muffin bites had gone and her response was “no regrets”. Love that energy from her.


If you were tempted to lick your screen there, I don’t blame you cause same.
Recipe Makes: 1 x 25 cm / 10 inch tart
Recipe Serves: 8
Y O U – W I L L – N E E D –
Chocolate & Almond Pate Sucree
125 g Salted Butter, room temp
100 g Icing Sugar, sifted
1 Eggs, whole
150 g ‘00’/Plain/AP Flour, sifted
60 g Ground Almonds
35 g Black Dutched Cocoa Powder, sifted
Marmalade or Apricot Jam, to glaze.
Filling: Chocolate Brownie
200 g Dark Chocolate, melted
240 g Unsalted Butter, melted
1 tsp Vanilla Bean Paste
320 g Light Brown Sugar
75 g Ground Almonds
70 g Cocoa Powder, sifted
1 tsp Baking Powder, sifted
4 Large eggs
150 g Milk Chocolate, chips/chunks
Handful Milk Chocolate to top, chips/chunks (optional)
Filling: Salted Hazelnut Praline
90 g Roasted Hazelnuts, chopped
40 g Blanched Almonds
200 g Caster Sugar
Pinch of Sea Salt
Vanilla Bean Chantilly
600 ml Double Cream
40 g Icing Sugar, sifted
1.5 tsp Vanilla Bean Paste
M E T H O D -
First up, let’s get the pastry made by adding the butter and sugar to a bowl and creaming together until light – don’t over aerate at this point so stop as soon as they have combined and the butter is smooth.
Add in the egg and mix until everything is fully emulsified. This will be a bit of a process where it will go from being separated to looking curdled to finally smooth – if it takes over 5 minutes, don’t stress, you are doing it right.
Add the flour, ground almonds and cocoa to a separate bowl and mix until all the ingredients have combined to avoid you overmixing the pastry in the next step.
Pour in the flour mix to the main bowl and mix until everything has just come together. It will look like it is too wet and needs more flour – DO NOT ADD MORE FLOUR. Trust me, okay? Lay out some clingfilm on your worktop, dust with flour and scoop out the dough.
Press down and shape the dough into a rough disc and flatten with your hands before wrapping tightly in clingfilm and popping in your fridge to sit for about an hour. Don’t skip this step of waiting as it will make your pastry a helluva lot easier to roll out once it has chilled.
Once the dough has chilled, lay down a silicon mat on your worktop and dust liberally with plain flour.
Roll out the pastry to approx. 3mm thick, cut out a circle about 1 cm bigger than your 25 cm / 10 inch tart tin and carefully transfer to your tin. Gently nestle in and use a scrap bit of pastry dusted in flour to help you press into the nooks and crannies (don’t use your fingertips as the pressure will be too much and your nails will inevitably catch on the pastry).
Trim any excess pastry off the sides, use a fork to lightly prick the base and place the lined tin into the freezer for at least 2 hours. NOTE: This is super important this is frozen through before baking to minimize pastry shrinkage.
Preheat your oven to 180°C Fan/200°C/390°F/Gas Mark 6.
Once frozen, scrumple up some baking paper and sit in your frozen tart case. You want to ensure the baking paper covers all bottom and sides. Pour in your baking beans (or dried rice/pasta) and place in the oven for 24 minutes. NOTE: placing your tart tin onto a large single baking sheet will help you place in and transfer from the oven easier throughout the entire bake.
Remove from the oven and carefully remove the baking beans and baking paper. Place back in the oven for another 6 to 8 minutes to evenly bake.
Once baked, allow the pastry to sit in the tart tin and completely cool down. Once cool, use a pastry brush and brush some marmalade or apricot jam over the base and insides of the tart.
Make the brownie mixture by preheating the oven to 160°C Fan/180°C/360°F/Gas Mark 4.
In a bowl, add the chocolate and butter. Add the bowl to a saucepan filled with water to gently melt. Alternatively place in the microwave and cook in short bursts to melt both butter and chocolate. Mix until smooth and glossy. Leave to one side to cool.
Add the eggs and sugar to a stand mixer bowl. Mix using the paddle attachment on a high speed for at least 5 mins - we are looking for the mixture to be doubled in volume and it has reached the ribbon stage (ie leaves a trail of batter).
Once the melted chocolate has cooled slightly, gently pour down the side into the stand mixer bowl whilst the mixer is running on the slowest speed. Allow it to mix for a further minute once everything is added.
Add the ground almonds, cocoa powder and baking powder to a separate bowl and mix together using a balloon whisk or fork. NOTE: Getting them mixed before they go into the main bowl will prevent you from overmixing. Bye bye sad brownies.
Add the combined ground almonds and cocoa powder to the stand mixer bowl and fold in gently using a spatula or metal spoon - trying to keep as much air as possible in the mixture. NOTE: remember to scrape down the sides and base of the bowl to ensure there are no hidden flour pockets.
Once the batter has just combined, transfer the batter to your jam lined cooked pastry tart. Use the back of a spoon to spread out evenly.
Scatter on top some more chocolate chips (optional) before popping into the oven to bake for 26 to 28 minutes.
Remove from the oven and DO NOT WORRY IF IT IS WOBBLY. This is the key ingredient to good brownies – a good wobble. Now the hard bit, leave it to cool and set.
Move onto making the hazelnut praline. Add the caster sugar to a large frying pan and place over a medium heat.
Allow the sugar to gently melt into a caramel before pouring in the nuts. Use a rubber spatula to mix and coat the nuts. Be careful to not overcook the caramel as we want the sweetness, not the bitterness so take it off the heat once it reaches a dark amber colour.


Transfer the sticky mix to greaseproof paper or a silicon mat and leave to harden.
Once the caramel has set (won’t take long – about 20 mins max), pop into a blender and blitz to a fine crumb. NOTE: depending on what blender you have, will depend on how long this will take you. I have a Thermomix which is like a blender on steroids so have some patience on allowing it to break down.
Use a rubber spatula to scrape down the sides and base and blend again until the crumb goes from sandy to a smooth, thickened paste. Transfer the paste to a piping bag.
Once the brownie filling has cooled to the touch and is lukewarm, pipe the praline on top of the brownie and use the back of a spoon or an offset palette knife to smooth for an even layer. Leave overnight to completely set. YES OVERNIGHT. DON’T DOUBT ME.
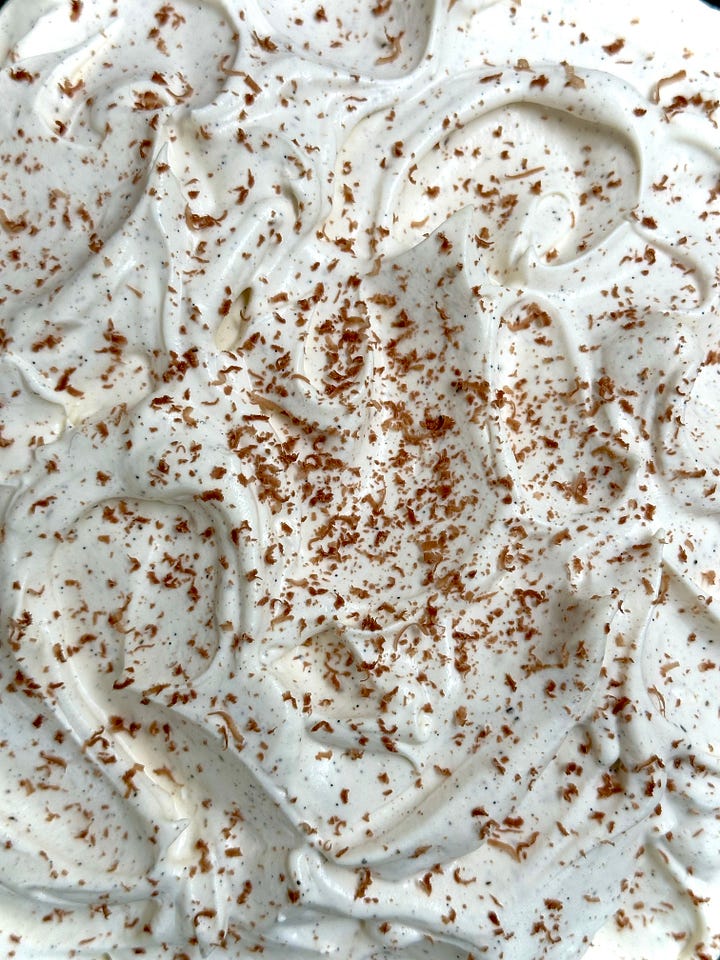
Before serving, make the Chantilly by adding all the ingredients to a bowl and whisking until you reach a soft to medium peak. NOTE: Definitely go on the lesser side because the cream will continue to firm as you scoop it out and work it on top of your tart.
Either pipe the cream on top of the set tart or use a spoon to scoop and use the back to swirl for a rustic vibe. We want a big, pillowy mound of cream sitting on top.
If you’re feeling extra jazzy, add some chocolate scrapings on top before using a hot knife to slice a perfect slither of filth.


My Extra Bite besties will know what this section is about but for everyone else, this is where I drop my tips and tricks to ensure you nail each recipe included in the recipe. You’ll find more detail, pictures, and key points (imo) highlighting any tripping points and how to work through them. Think of this part as offering the assurance you need and if there is STILL somehow some ground I haven’t covered, you can drop me a message and I’ll offer up some more advice if you need it.
In today’s ‘RR’, you’ll find A LOT of images to help you through key parts of the main bak. I hit upon Indian Curries and perfecting the tharka base, how to get perfect brownies, and how you can switch up the main bake into something a little easier and a bit more relaxed – cause who doesn’t want brownie muffins, filled with praline??
Time to roll them sleeves up, let’s get into it.
First up, let’s get started with the Japanese Kasutera
