


Cherry On Top
It’s chocolate & cherry three ways this week with my version of a Black Forest Gateau, a Chocolate & Cherry No Churn Ice-Cream and the cheats version of my Chocolate & Honeycomb Mousse Cake.


My publisher told me I had to remind you again…sorry.
Look, I get it. You’re probs sick of seeing the newsletter start with this reminder but I went in to see my Publishers the other day for a little catch up over cake (the BFG featuring in this week’s Good Stuff) and saw the wonderful marketing lady working on my book who told me to blame her for having to remind you again because…
WE ARE OFFICIALLY 20 DAYS UNTIL PUBLICATION DAY IN THE UK. Which makes me feel all sorts of weird, anxiety, nervousness, excitement, and mild nausea to round it all off. Whilst my stomach is a total washing machine of emotions, I must say I am incredibly proud of my first beautiful literary baby. The next two are going to be absolute worldies (is it weird to be looking forward to a third book that the publisher doesn’t even know they are publishing yet when the second hasn’t even been commissioned and the first is still yet to be released??) but this first one? She will always be my pride and joy.


For my UK friends, we’ve got you a £6 discount via the Waterstones website – it is live up until midnight on the 22nd and a gentle reminder that you do not pay for anything until the book ships. So order it now and no money is taken from your account until the 22nd. A little present for future you? I think so.
And for my US friends, Amazon is currently running 10% off on all pre-orders. The book will be out for publication over in America and beyond on the 30th of July and I am SO hoping I get to come over to the States in time for publication. A group Last Bite Cake Party???? Wouldn’t that be a carb laden, sugar drowned dream??
This is the perfect book for anyone who loves to bake for themselves, for others, for family, for friends, colleagues, neighbours, cats and dogs. I am a total feeder and I dread the thought of not being able to bake for everyone. This book is a saviour for that – it doesn’t matter if you eat dairy but someone you know are plant based/dairy intolerant or perhaps you are plant-based but just after some really bloody good recipes. This book offers up the best of both worlds. 100 recipes: 50 dairy with 50 PB counterparts = a whole lotta yum for everyone’s tum.
One of my fave parts of the book is the very end where there is a This for That section. I break down PB baking and offer up alternatives that aren’t packed full of additives or require you to buy some rogue ingredient off the shelf. Similarly, we go through options of when you may not have buttermilk knocking around, or perhaps you would like to convert plain flour into self-raising flour. We got all sorts of baking math’s hidden in the back with the aim of making your life a whole lot easier.
I’ve made ALL the mistakes, so you don’t have to.
On top of all that, it is also just insanely beautiful. Pictures and imagery you will drool over, words we will hopefully bond over and new recipes waiting to become your new favourite. I am so so excited for you to all get your hands on it.
Thank you SO MUCH for your support, I am here because you are here. So, this is for us, truly. x

Rather typically of recent times, I am running horrendously late on the newsletter. Work is a whirlwind of chaos with the book coming out soon and in amongst that all, I have my cousins hen and wedding to throw into the mix (plus a cake I gotta make for the big day). My brain is truly a swamp right now, so I apologise PROFUSELY for my tardiness with the delivery of weekly yum. I promise that I will always get you something…even if it is late (very typical of rubes).
So, with that in mind and before I end up spiralling into another tumble dryer full of madness and despair, let’s get to it.
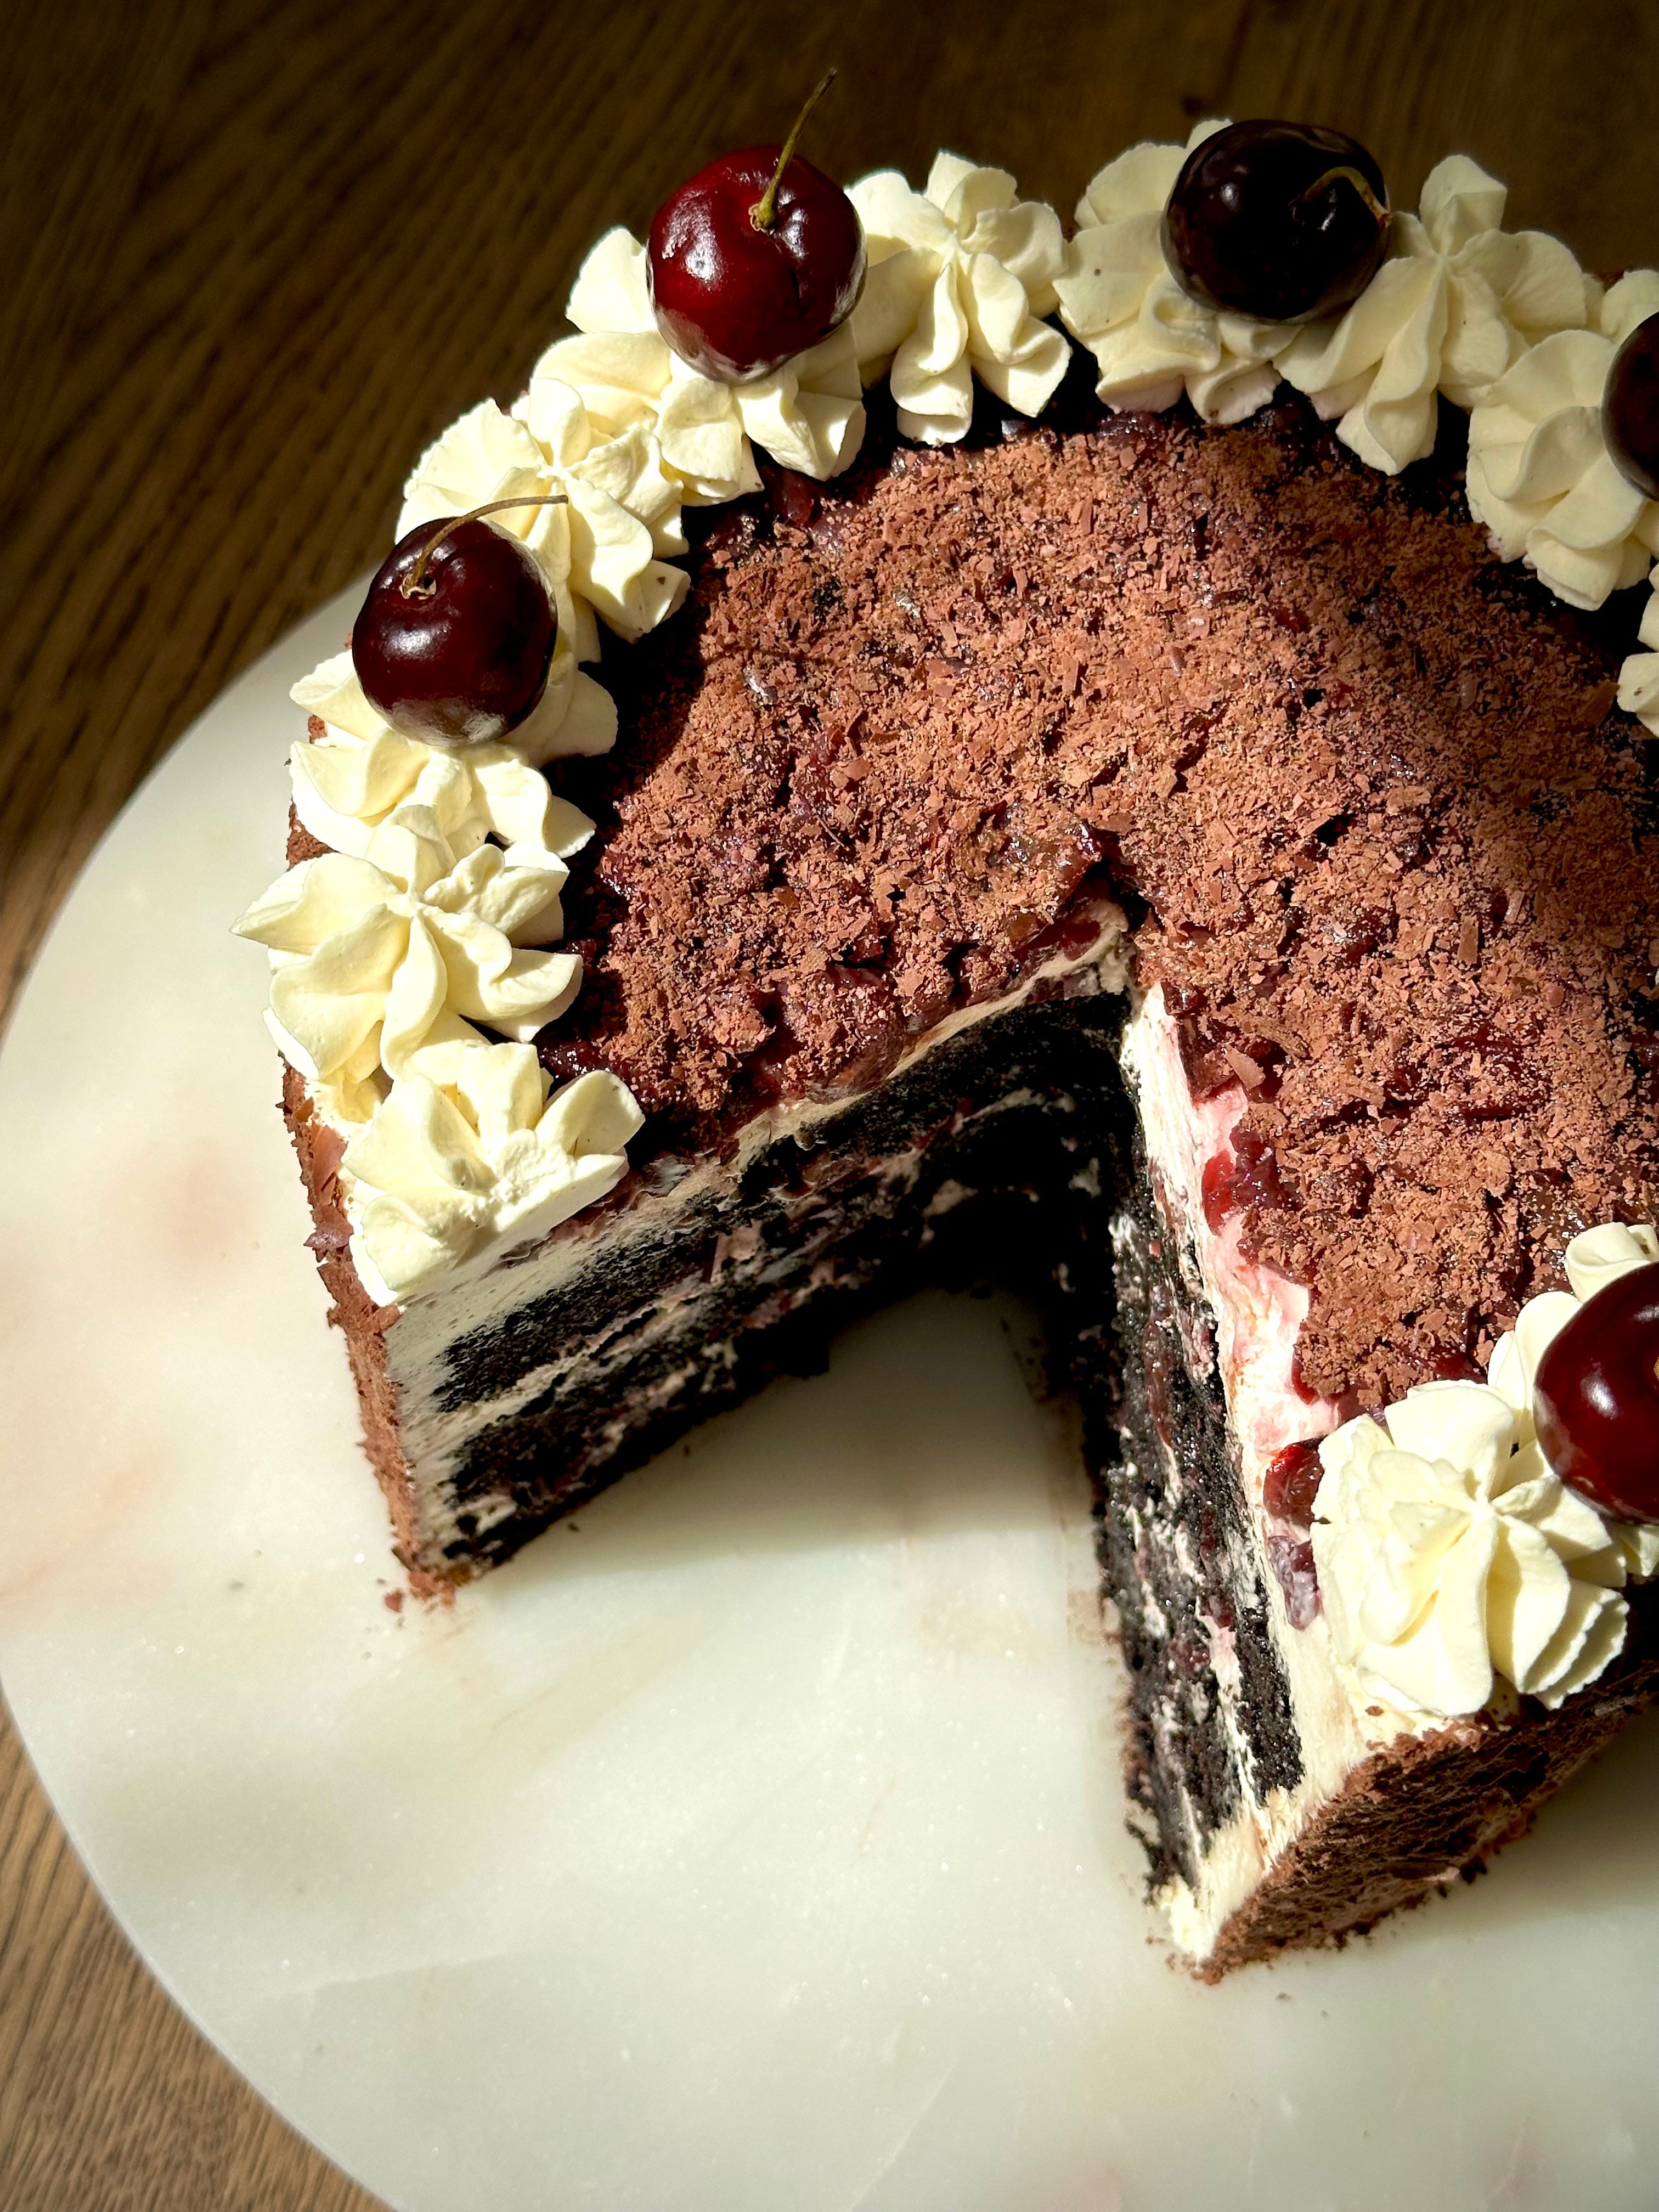
First up, we are diving into the latest ‘Around the World’ bake – a German Black Forest Cake, also known as a Schwarzwälder Kirschtorte (a v fun word to say).


When I say that I have been IMPATIENTLY waiting in the wings for this naughty number to finally make its grand entrance, I am not lying. Slightly miffed that this cake only hits the halfway mark (!!) as how there are 40 more cakes better than this, I have no idea. I am very much looking forward to the incoming delights and hopefully have my tiny pea brain blown on the weekly (does that sound weird? It’s not supposed to be) as we hit new heights of deliciousness.
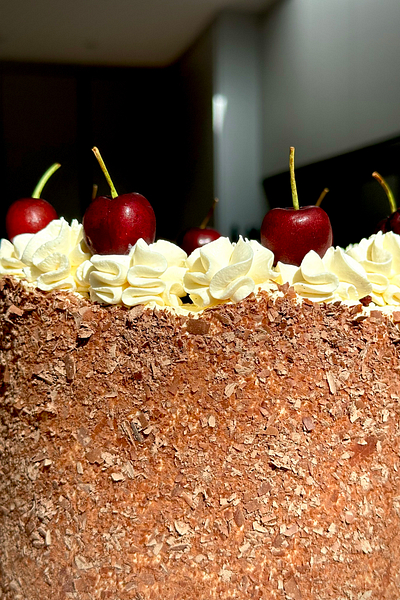
This cake for me screams frozen gateaux that we would eat at Christmas when we were younger. Not sure if it is the nostalgia I love about this cake or the actual flavour combination that I love more. You know me, I adore a good filthy cake, and this is exactly that. We’ve got a deliciously moist chocolate sponge (this one is a slightly tweaked version from my Brooklyn Blackout one) soaked in a kirsch syrup, sandwiching cherries (I went for a medley of tinned, kirsch soaked and fresh) and vanilla bean whipped cream and finished with a generous coating of shaved dark chocolate and topped with fresh cherries.

The flavour combo of chocolate and cherries is truly elite – a match made in spongey, cakey heaven and one I adore so much I had to actively remove repeated recipes from my new book because I know I LOVE cherries and choccy but do you??
If you do, then you’re going to adore my Cherry and Chocolate Maritozzi in One Bake Two Ways. Little pillowy clouds of soft brioche dough, encasing cherries soaked in an almond syrup and a whipped mascarpone cream. A truly special recipe but one you cannot keep digging into.
Apologies for the minor digress but if you couldn’t tell, I am a BIG fan. Germany really are out here smashing out some hitters on this list (will never forget the bee-sting cake) and have a tonne more featured a little later on. Would I recommend you making this recipe? Absolutely. A real crowd pleasing bake (you can keep it booze free if you wish and just opt for the light syrup which comes in the tin) and one that just gets better the longer it sits making it perfect for a post dinner celebration, a pre bedtime sneaky snack, a sly slither at breakfast the next day, elevensies, brunch, lunch and a little something to nibble on anytime you open the fridge.
The recipe below makes 4 x 18 cm / 7 inch sponges and the method will tell you to only use 3. Why? Because if you are making good chocolate sponge, why not make more? I’ll always bake an extra sponge when making choccy cake so my emergency cake stash in the freezer is always well stocked. Take a scroll a little further down to see how else you can use up the spare chocolate sponge, the leftover sponge tops and surplus cherry juice to make a Chocolate & Raspberry Ripple No Churn Ice-Cream and a cheats version of my Chocolate & Honeycomb Mousse Cake.
Recipe Makes: 4 x 18 cm / 7 inch sponges
Recipe Serves: 12
Y O U – W I L L – N E E D –
Sponge
330 g ‘00’/Plain/AP Flour, sifted
15 g Baking Powder, sifted
170 g Black Dutch Processed Cocoa Powder, sifted
660 g Light Muscovado (this is not an error)
Pinch of Sea Salt
3 Large Eggs
1.5 tsp Vanilla Bean Paste
300 g Yoghurt/Buttermilk
150ml Vegetable Oil
330ml Freshly Brewed Coffee (I used 3 tsp instant coffee w 330 hot water)
Cherry Filling
400 g Cherries (I used a mix of kirsch soaked, tinned & fresh)
25 ml Kirsch Syrup (I used the juice from the cherry jar)
Whipped Cream
750 ml Double/Whipping Cream
1 tbsp Kirsch Liquer, optional
40 g Icing Sugar, sifted
1.5 tsp Vanilla Bean Paste
To Finish
125 g Dark Chocolate, grated/shaved
12 Cherries, fresh & whole
M E T H O D -
First up, preheat the oven to 150°C Fan/170C/Gas Mark 3 and grease and line 4 x 7 inch / 18 cm cake tins.
For the sponge, add all the dry ingredients to a bowl and use a balloon whisk to mix until well combined.
In a separate bowl, add all the wet ingredients and again, use a balloon whisk to mix until everything has emulsified (aka come together and is one smooth liquid).
Pour the wet mix into the dry and use the balloon whisk to begin mixing. Switch out to a rubber spatula and use to clean the sides and bottom of the bowl to make sure there are no flour pockets. When there are no visible streaks of flour left, evenly distribute the batter between the four tins.
Pop in the oven and bake for 30 to 32 minutes.
Remove from the oven and allow the sponges to sit in the tins cooling for 10 minutes before turning out onto individual sheets of clingfilm/saran wrap. Before wrapping the sponges, allow them to sit for 5 minutes to air their bottoms (sounds weird but trust me on it) and allow any excess moisture to dry off. Wrap the sponges (not too tightly, let them breathe a little) and leave to completely cool.
Whilst your sponges are cooling, drain your cherries (if you are using tinned but keep the reserved syrup) and finely chop up (this is preference but i prefer a neat slice and you’ll get a neat slice with finer chopped cherries, as opposed to whole/halved).
Once your sponges have cooled, trim any domed tops off using a serrated knife (storing the surplus in Tupperware and use for your ice-cream later). Use a pastry brush to liberally brush the tops of the sponges with the cherry syrup/kirsch (again, reserve any leftover syrup for the ice-cream, do not waste that goodness!).
Make the whipped cream by adding all the ingredients into a stand mixer bowl. Using the whisk attachment, mix on a low to medium speed until you just hit medium peak. You don’t want to mix any further otherwise your cream will be too stiff and run the risk of splitting. You want this to be silky smooth whilst having a bit of body to it.
Place your first soaked sponge onto your serving plate. Add ¼ of the cream onto the first layer and use an offset palette knife or back of a spoon to spread into an even layer.
Add 1/3 of your chopped cherries into the middle, leaving a 1cm gap from the outer edge. Gently press the cherries in before placing your second sponge on top.
Repeat the cream and cherry process.
Add the final sponge on top and use the remaining ½ cream to crumb coat and final coat – make sure you reserve a small amount at the end to pipe your rosettes on top. Place the cream coated cake into the fridge to set for 30 minutes.
Grab your bar of chocolate, use the flat side to scrape a sharp knife across (be careful) to shave.
Gently press the shavings into the side of the cake and top the cake with the remaining chopped cherries, again leaving a 1cm gap around the edge.
Transfer any remaining cream into a piping bag with a nozzle of your choice fitted and pipe around the outer edge, framing the chopped cherries.
Nestle the fresh cherries (stems on cause #aesthetics) into the cream and place in the fridge until serving.
Slice with a hot knife and enjoy.


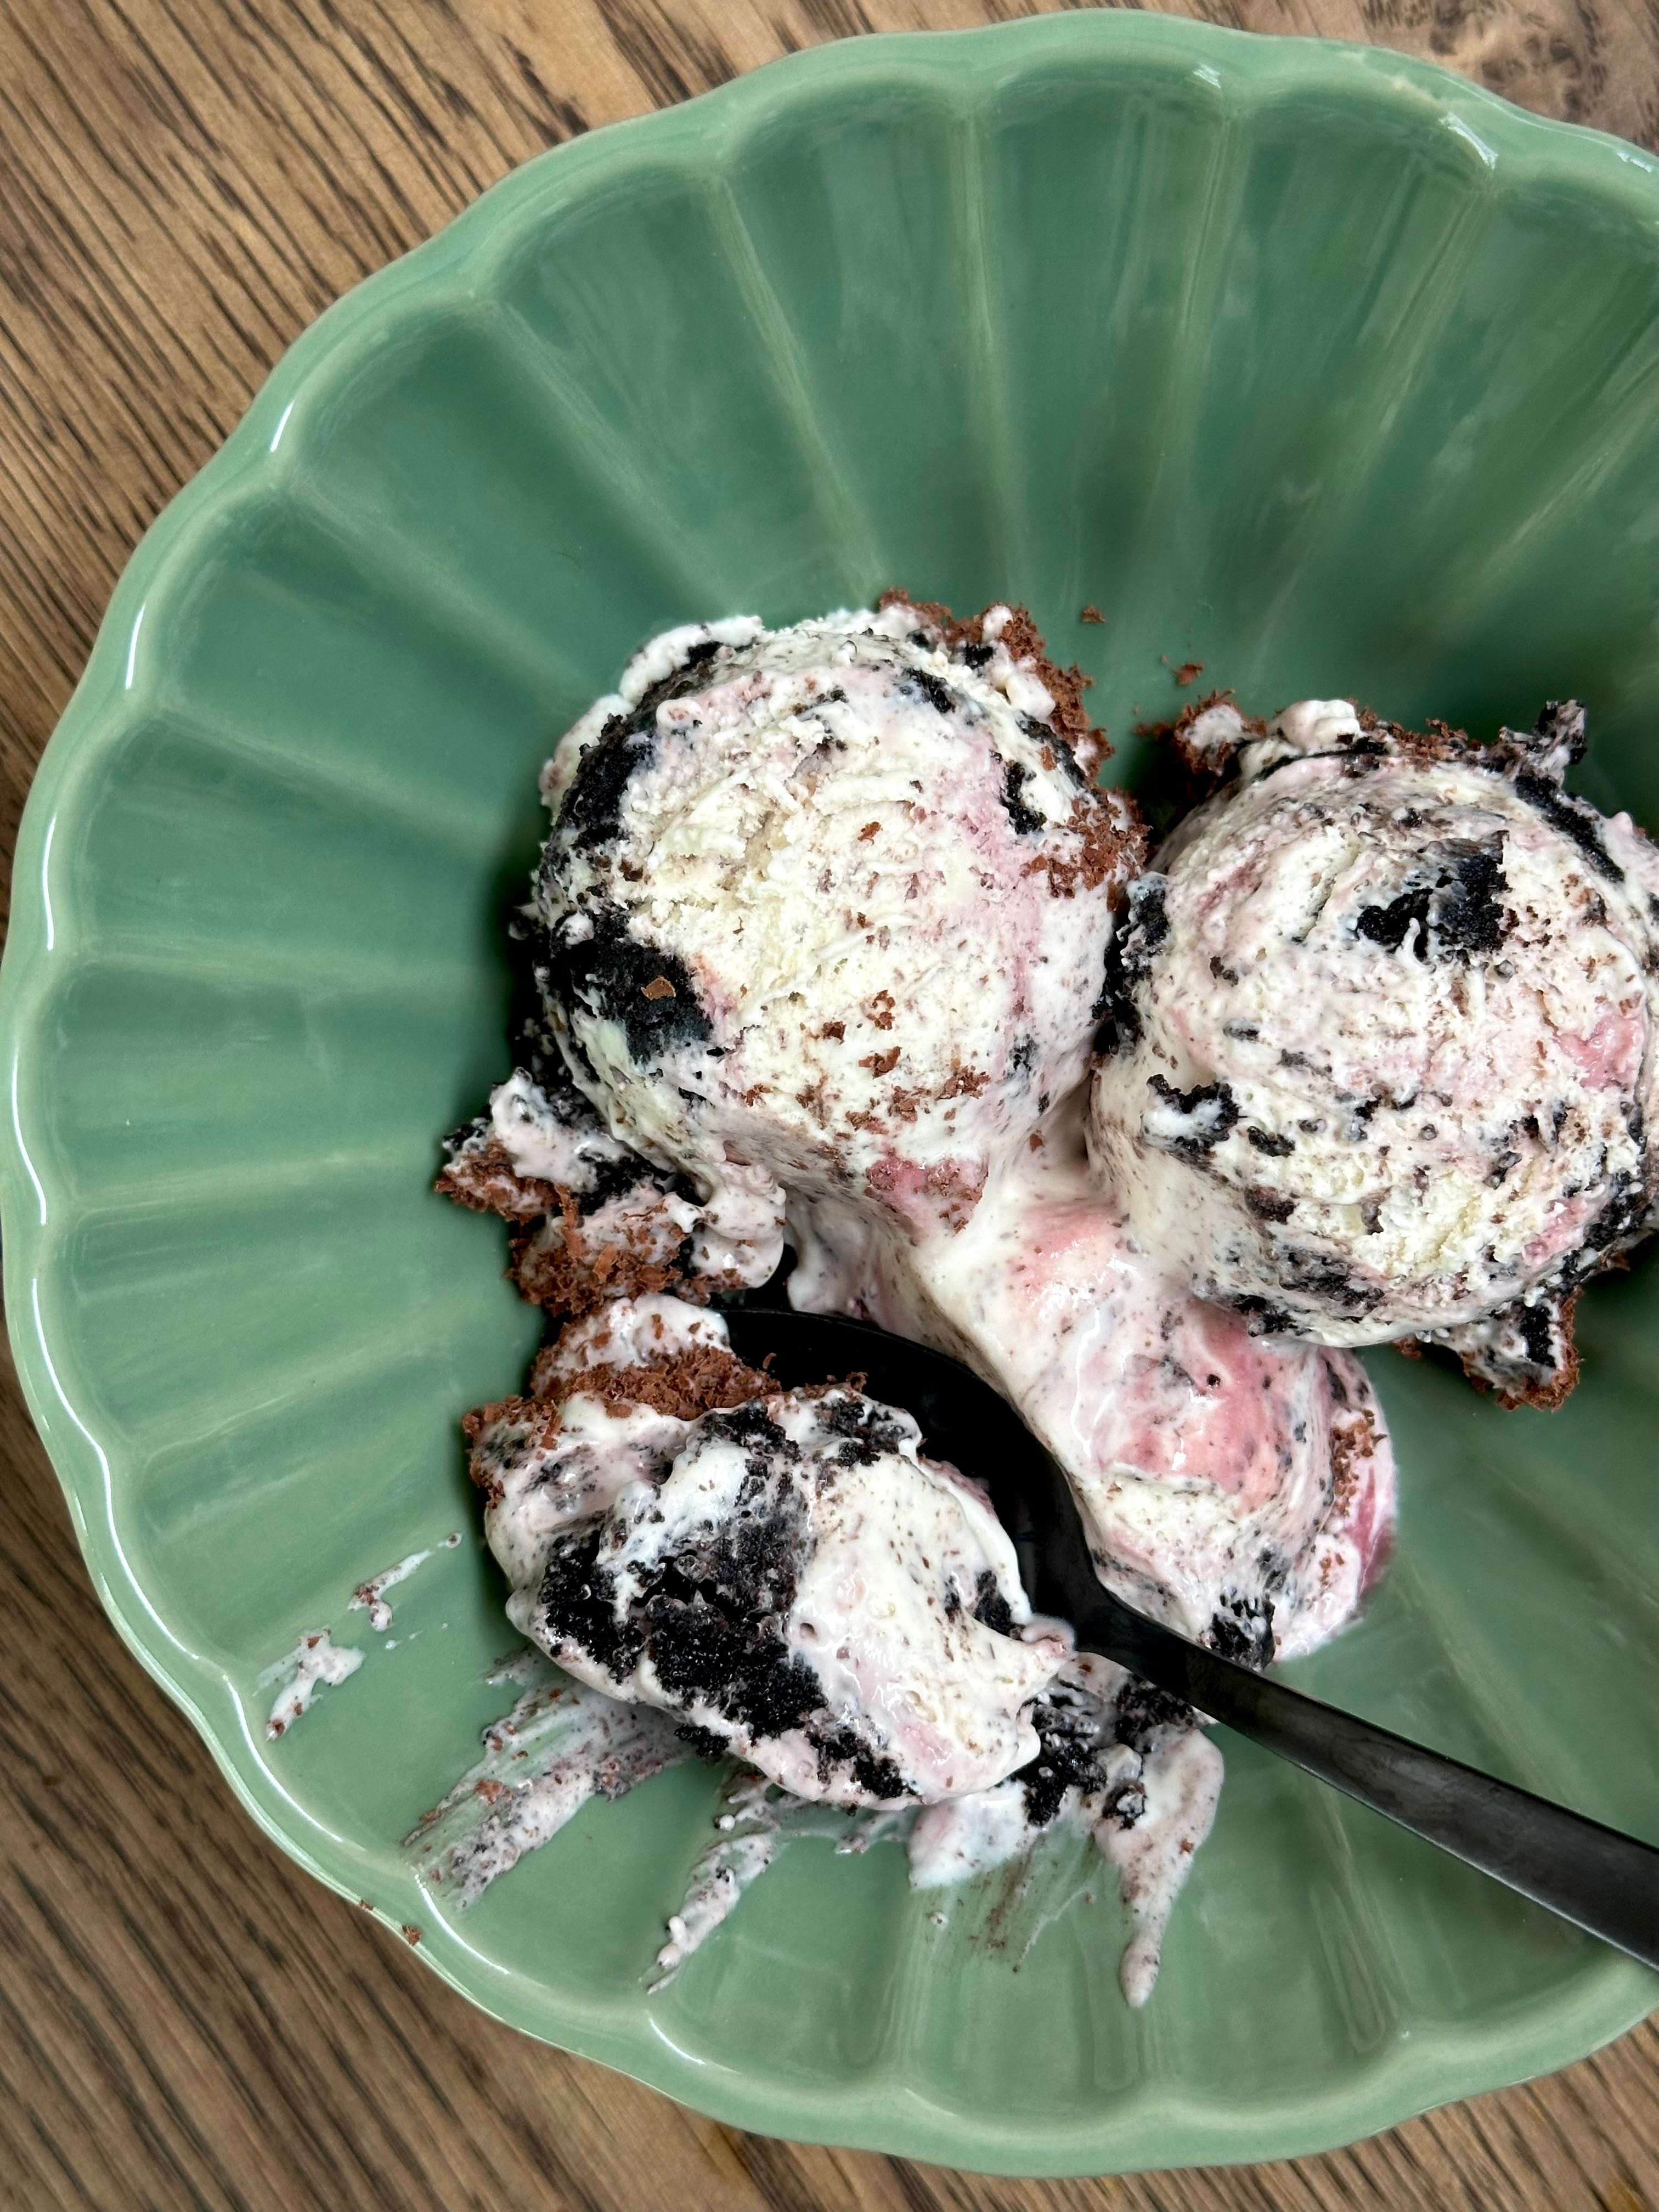
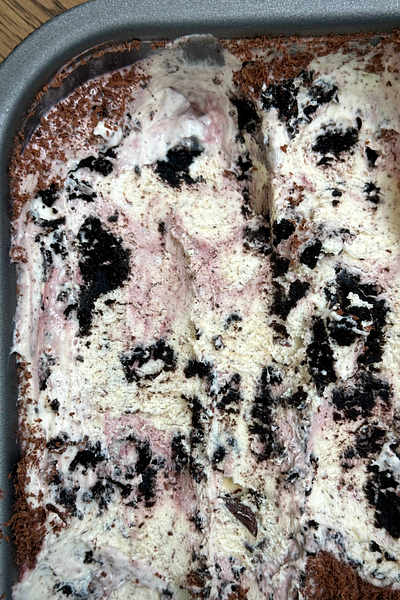
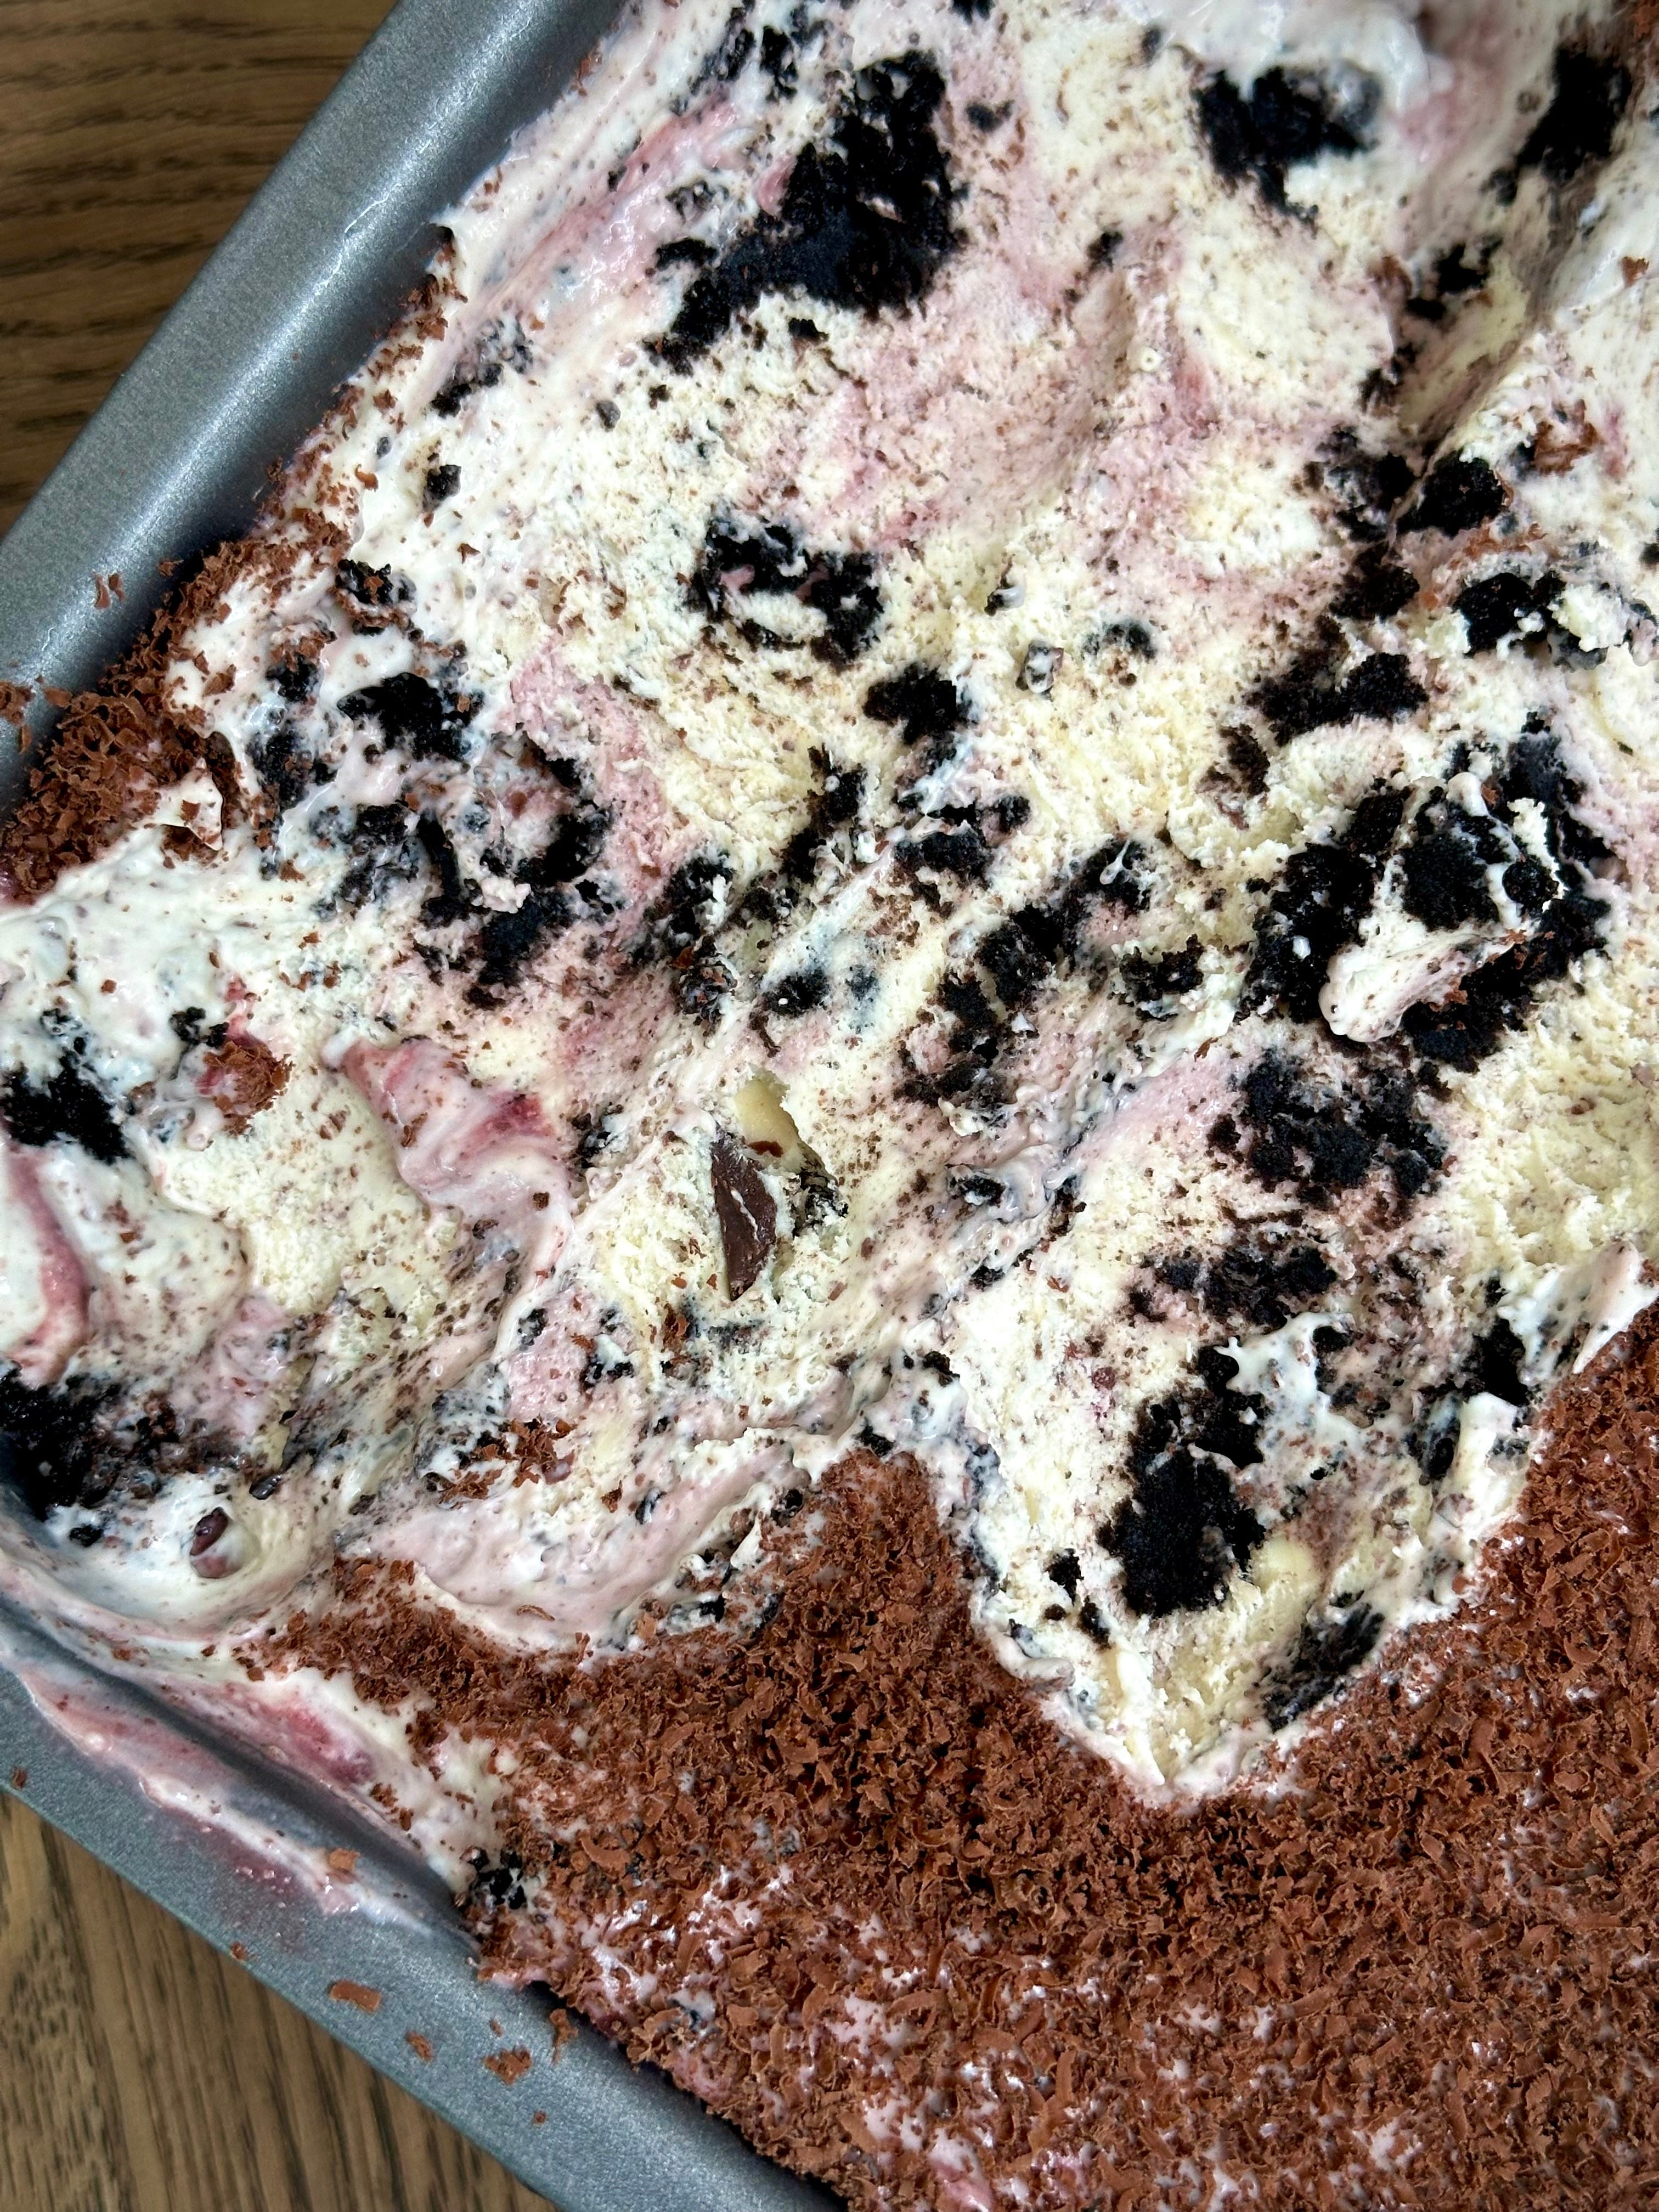
Next, we are moving onto one of the simplest and quite honestly, tastiest things I have made in a while. I LOVE making a no-churn ice cream because it tastes phenomenal (gelato-ey when you’ve left it to sit out for a little bit) and can take on a lot of flavour easily. The below recipe is super adaptable so if you don’t want to use my additions, I won’t take any offence. Just use the base and go to town on the rest. Here we are using up the scraps of sponge from the tops you cut off in the last recipe. Please do not use the sponge scraps to make something like cake pops – this sponge is TOO delicious to be demoted to that and also there is something about cake pops that just makes my soul hurt a little.
This is my Cherry & Chocolate No-Churn Ice-Cream and honestly, doesn’t it look DELICIOUSLY GOOD??
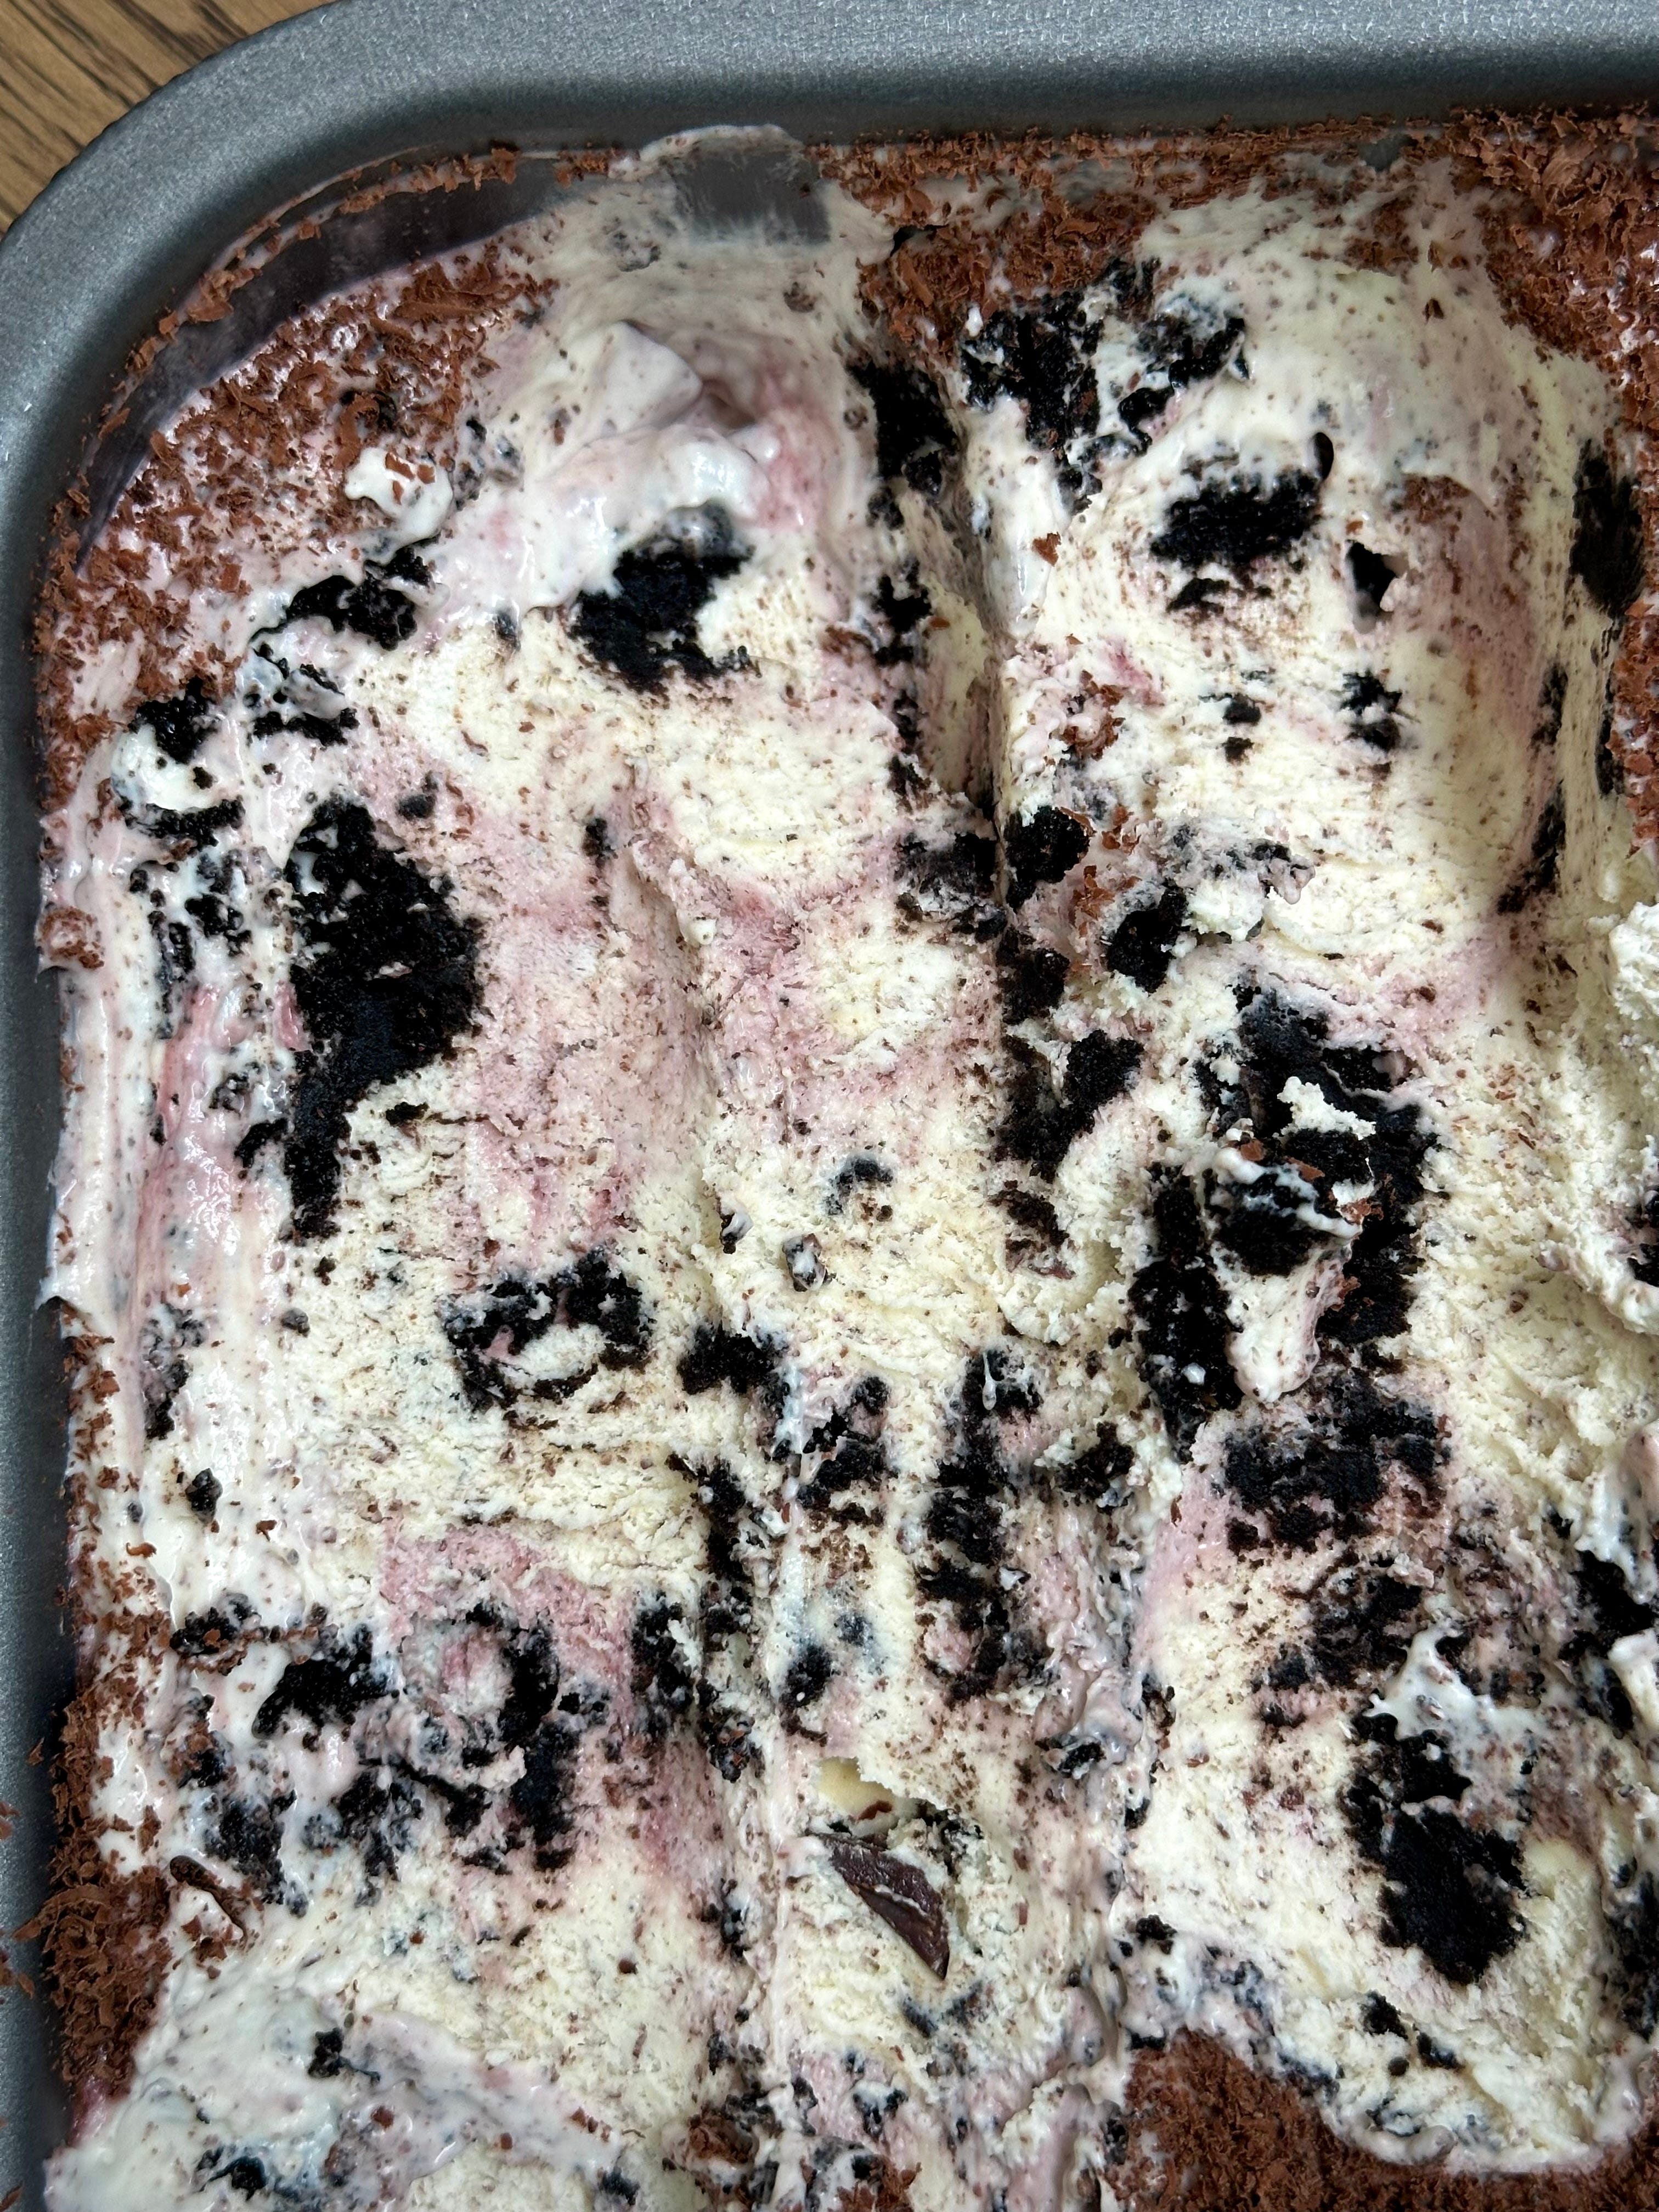
I am all for transparency over here and would like to say this is what I went to town on last night when I got in after an awards ceremony and was starving at midnight. A hot spoon, a cold tub of this and there was quite frankly no stopping me. The chunks of the sponge interspersed throughout the ice-cream is dreamy. It’s like finding a little nugget of gold. Because the sponge quality is SO GOOD you are going to surprise yourself with how something so simple can taste so marvellous.
This ice-cream will stay good for up to a month but if it manages to last that long in your freezer, I bow down to your self-restraint. Creamy, velvety smooth ice-cream encasing nuggets of chocolate gold, swirls of cherry syrup and gratings of dark chocolate. Holy moly, I’ve just sold it to myself so well that I am off go tuck in part 2.
See you at the next recipe.
Recipe Serves: TBC, honestly I will probably eat this solo over the course of the weekend
Recipe Makes: I used a 7 by 7 inch brownie tin but you could use Tupperware to secure
Y O U – W I L L – N E E D -
1 x 397 g tin Condensed Milk
550 ml Double Cream, fridge temp
25 g Caster Sugar
1 tsp Vanilla Bean Paste
25 g Dark Chocolate, grated
Leftover Cherry Syrup/Juice (quant doesn’t matter, the more the better)
Leftover Sponge Tops (quant doesn’t matter, the more the better)
M E T H O D -
If your cherry syrup/juice is quite watery, add it to a saucepan and place over a medium heat. Bring that to a boil, before turning round the heat and reducing to a simmer.
Allow the cherry juice to reduce by half to intensify the flavour and become thickened to a syrup consistency. Leave to cool.
Once the syrup has cooled, add the condensed milk, double/whipping cream, caster sugar, vanilla and grated chocolate into a mixer bowl.
Using the whisk attachment, mix until the ingredients reach medium peak.
Into your tin or Tupperware of choice, start by scattering an uneven layer of your cake crumb.


On top of this, add 1/3 of the cream mix.
Add a good drizzling of the cherry syrup before using the tip of a knife or back of a spoon to lightly ripple through. Add another uneven layer of chocolate sponge on top. Be generous with the nuggets of sponge, you want to make sure there is a little bit of that goodness in every scoopful.
Add another layer of cream and repeat the above process until every ingredient is used up.
Finish the top with a heavy grating of chocolate and pop into the freezer for at least 6 hours/preferably overnight.
When it comes to eating, leave to sit at room temp for about 30 minutes for a soft serve.
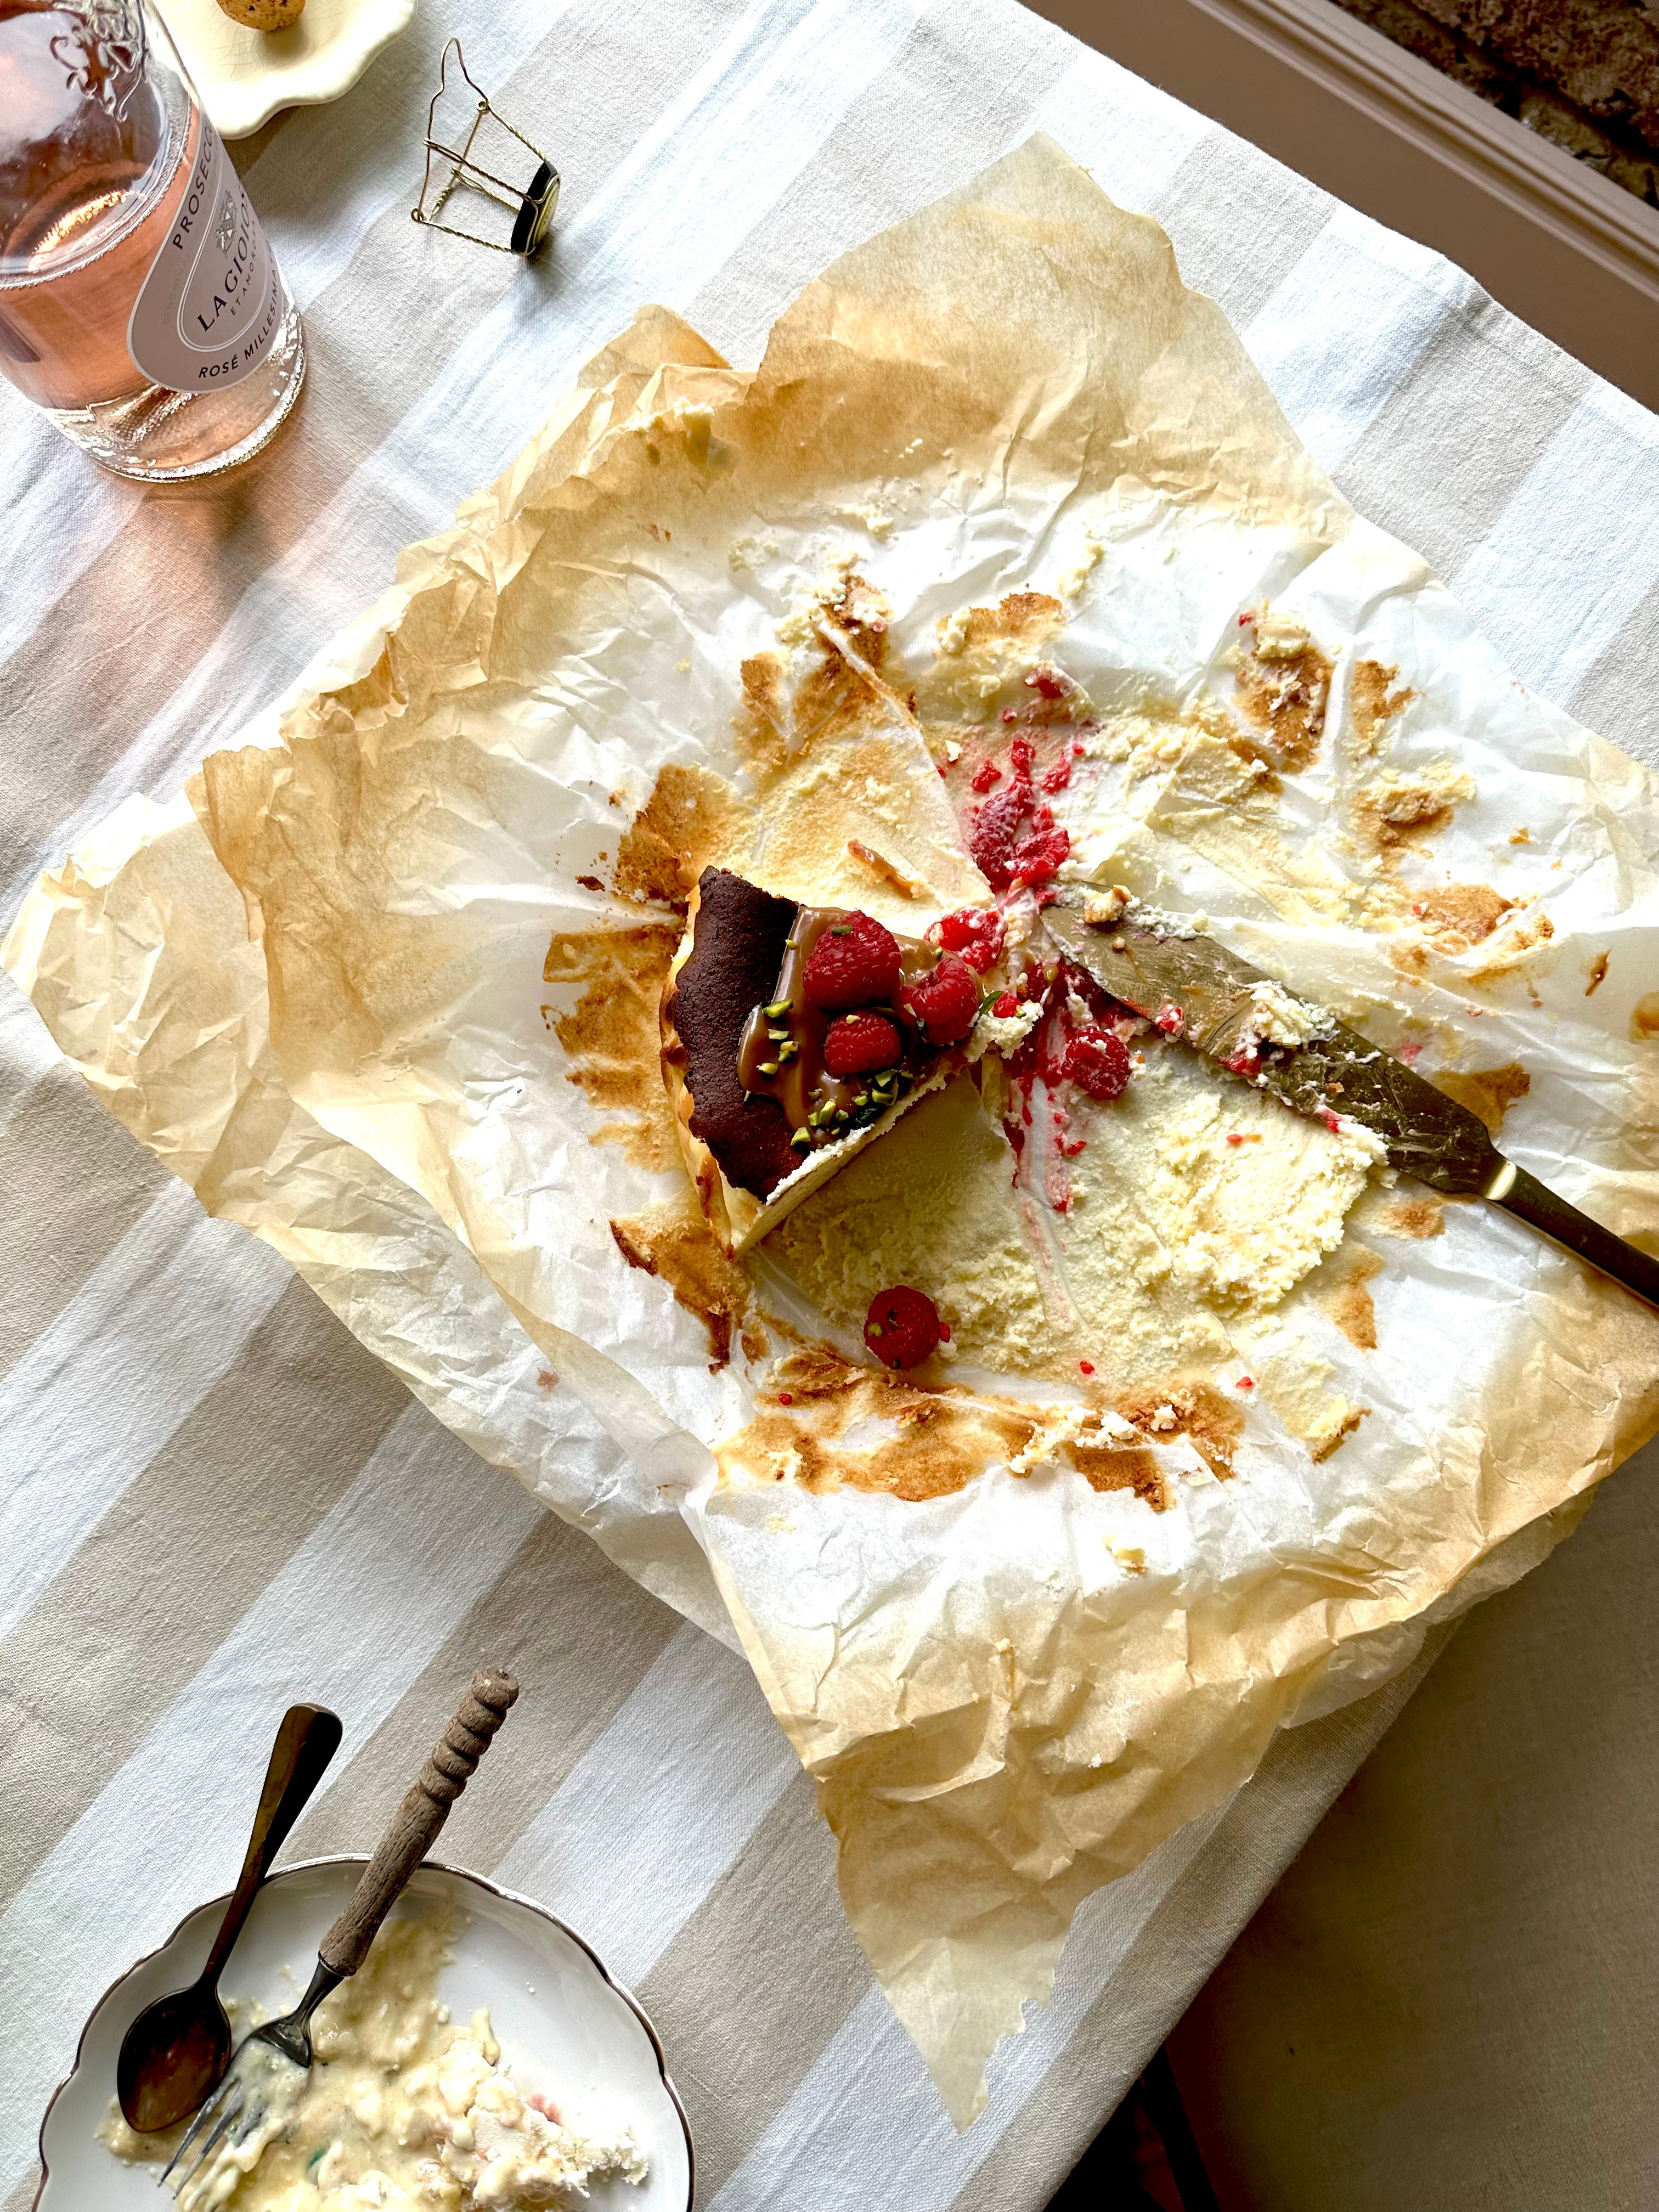
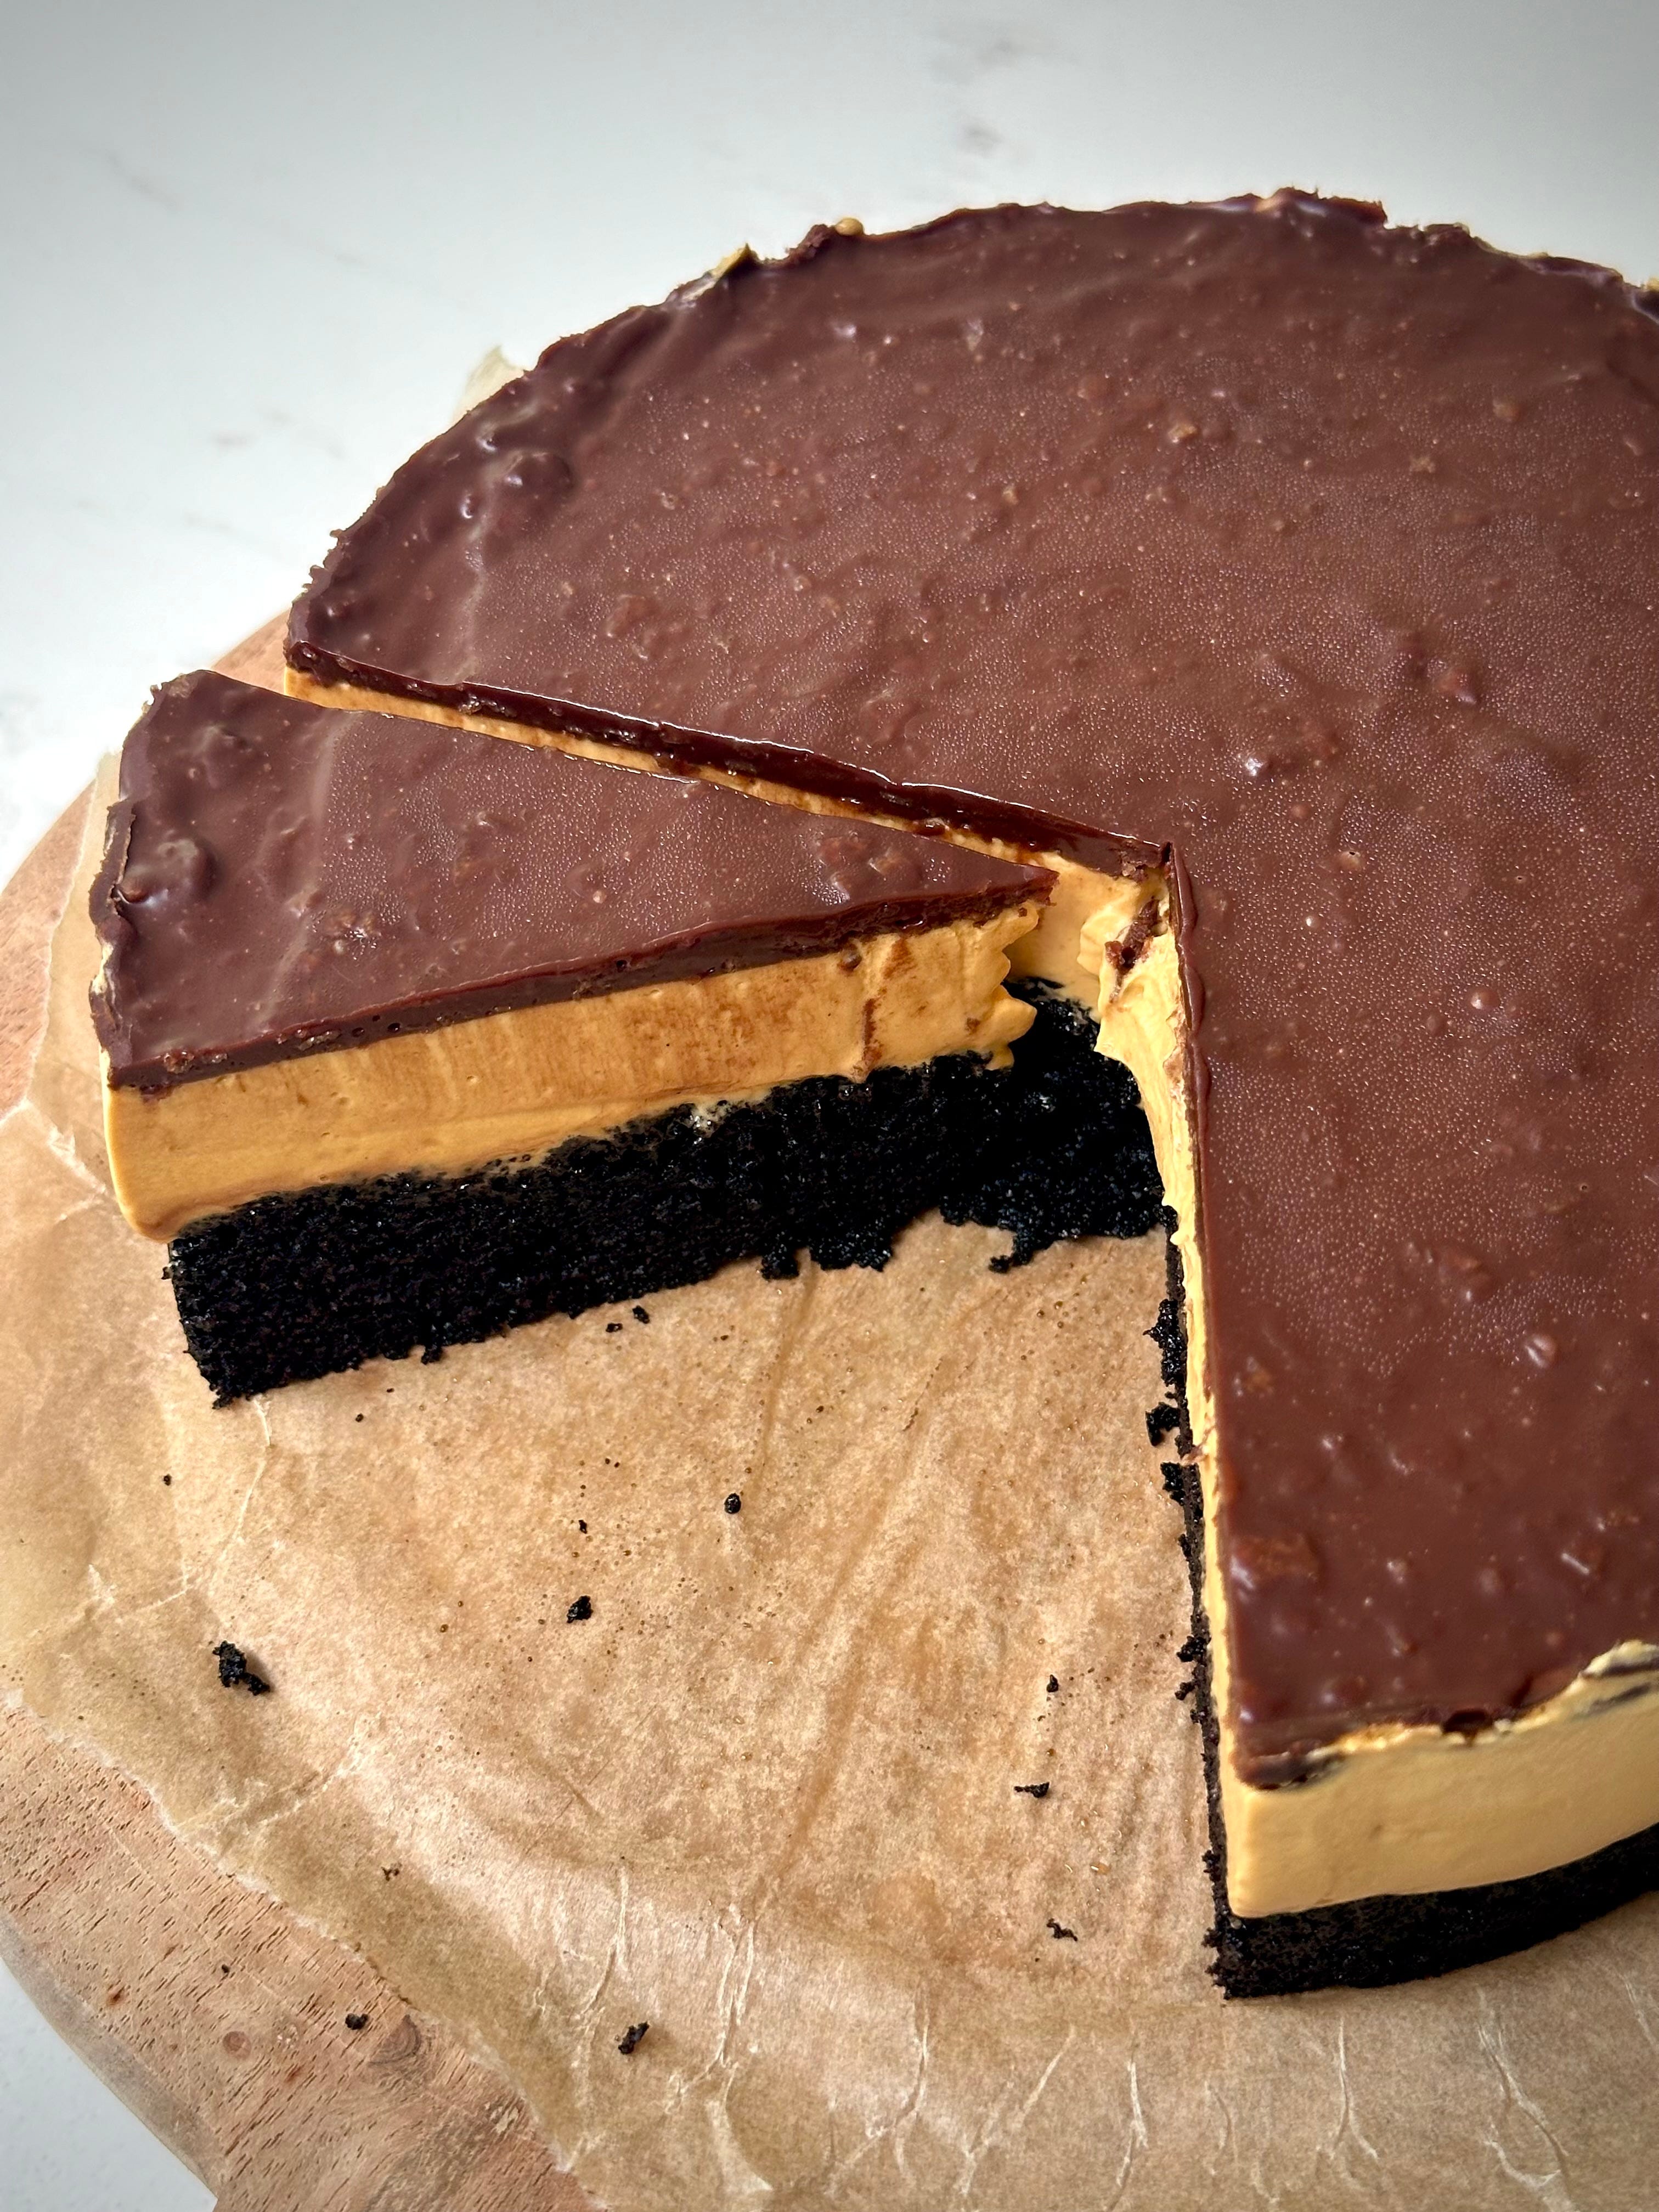
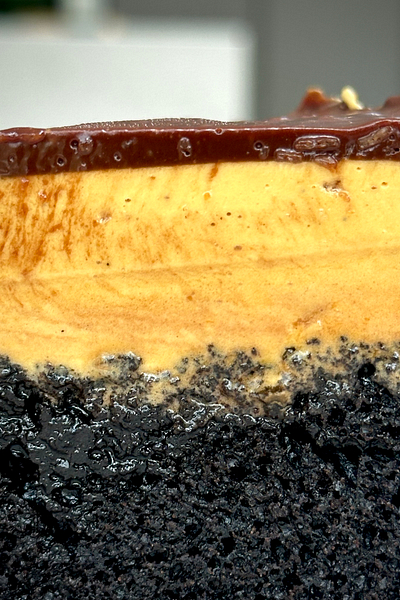
Finally, we move onto the last recipe using up the very best of the chocolate scraps – my Chocolate & Honeycomb ‘Mousse’ Cake. This is a variation, easier and smaller version of my Triple Threat Chocolate Cake and…I can’t believe I am saying this but this one could be my preferred version now?? Like…honeycomb?? HELLO. That ingredient goes hard no matter how it is included in a bake and I for one am a huge fan.
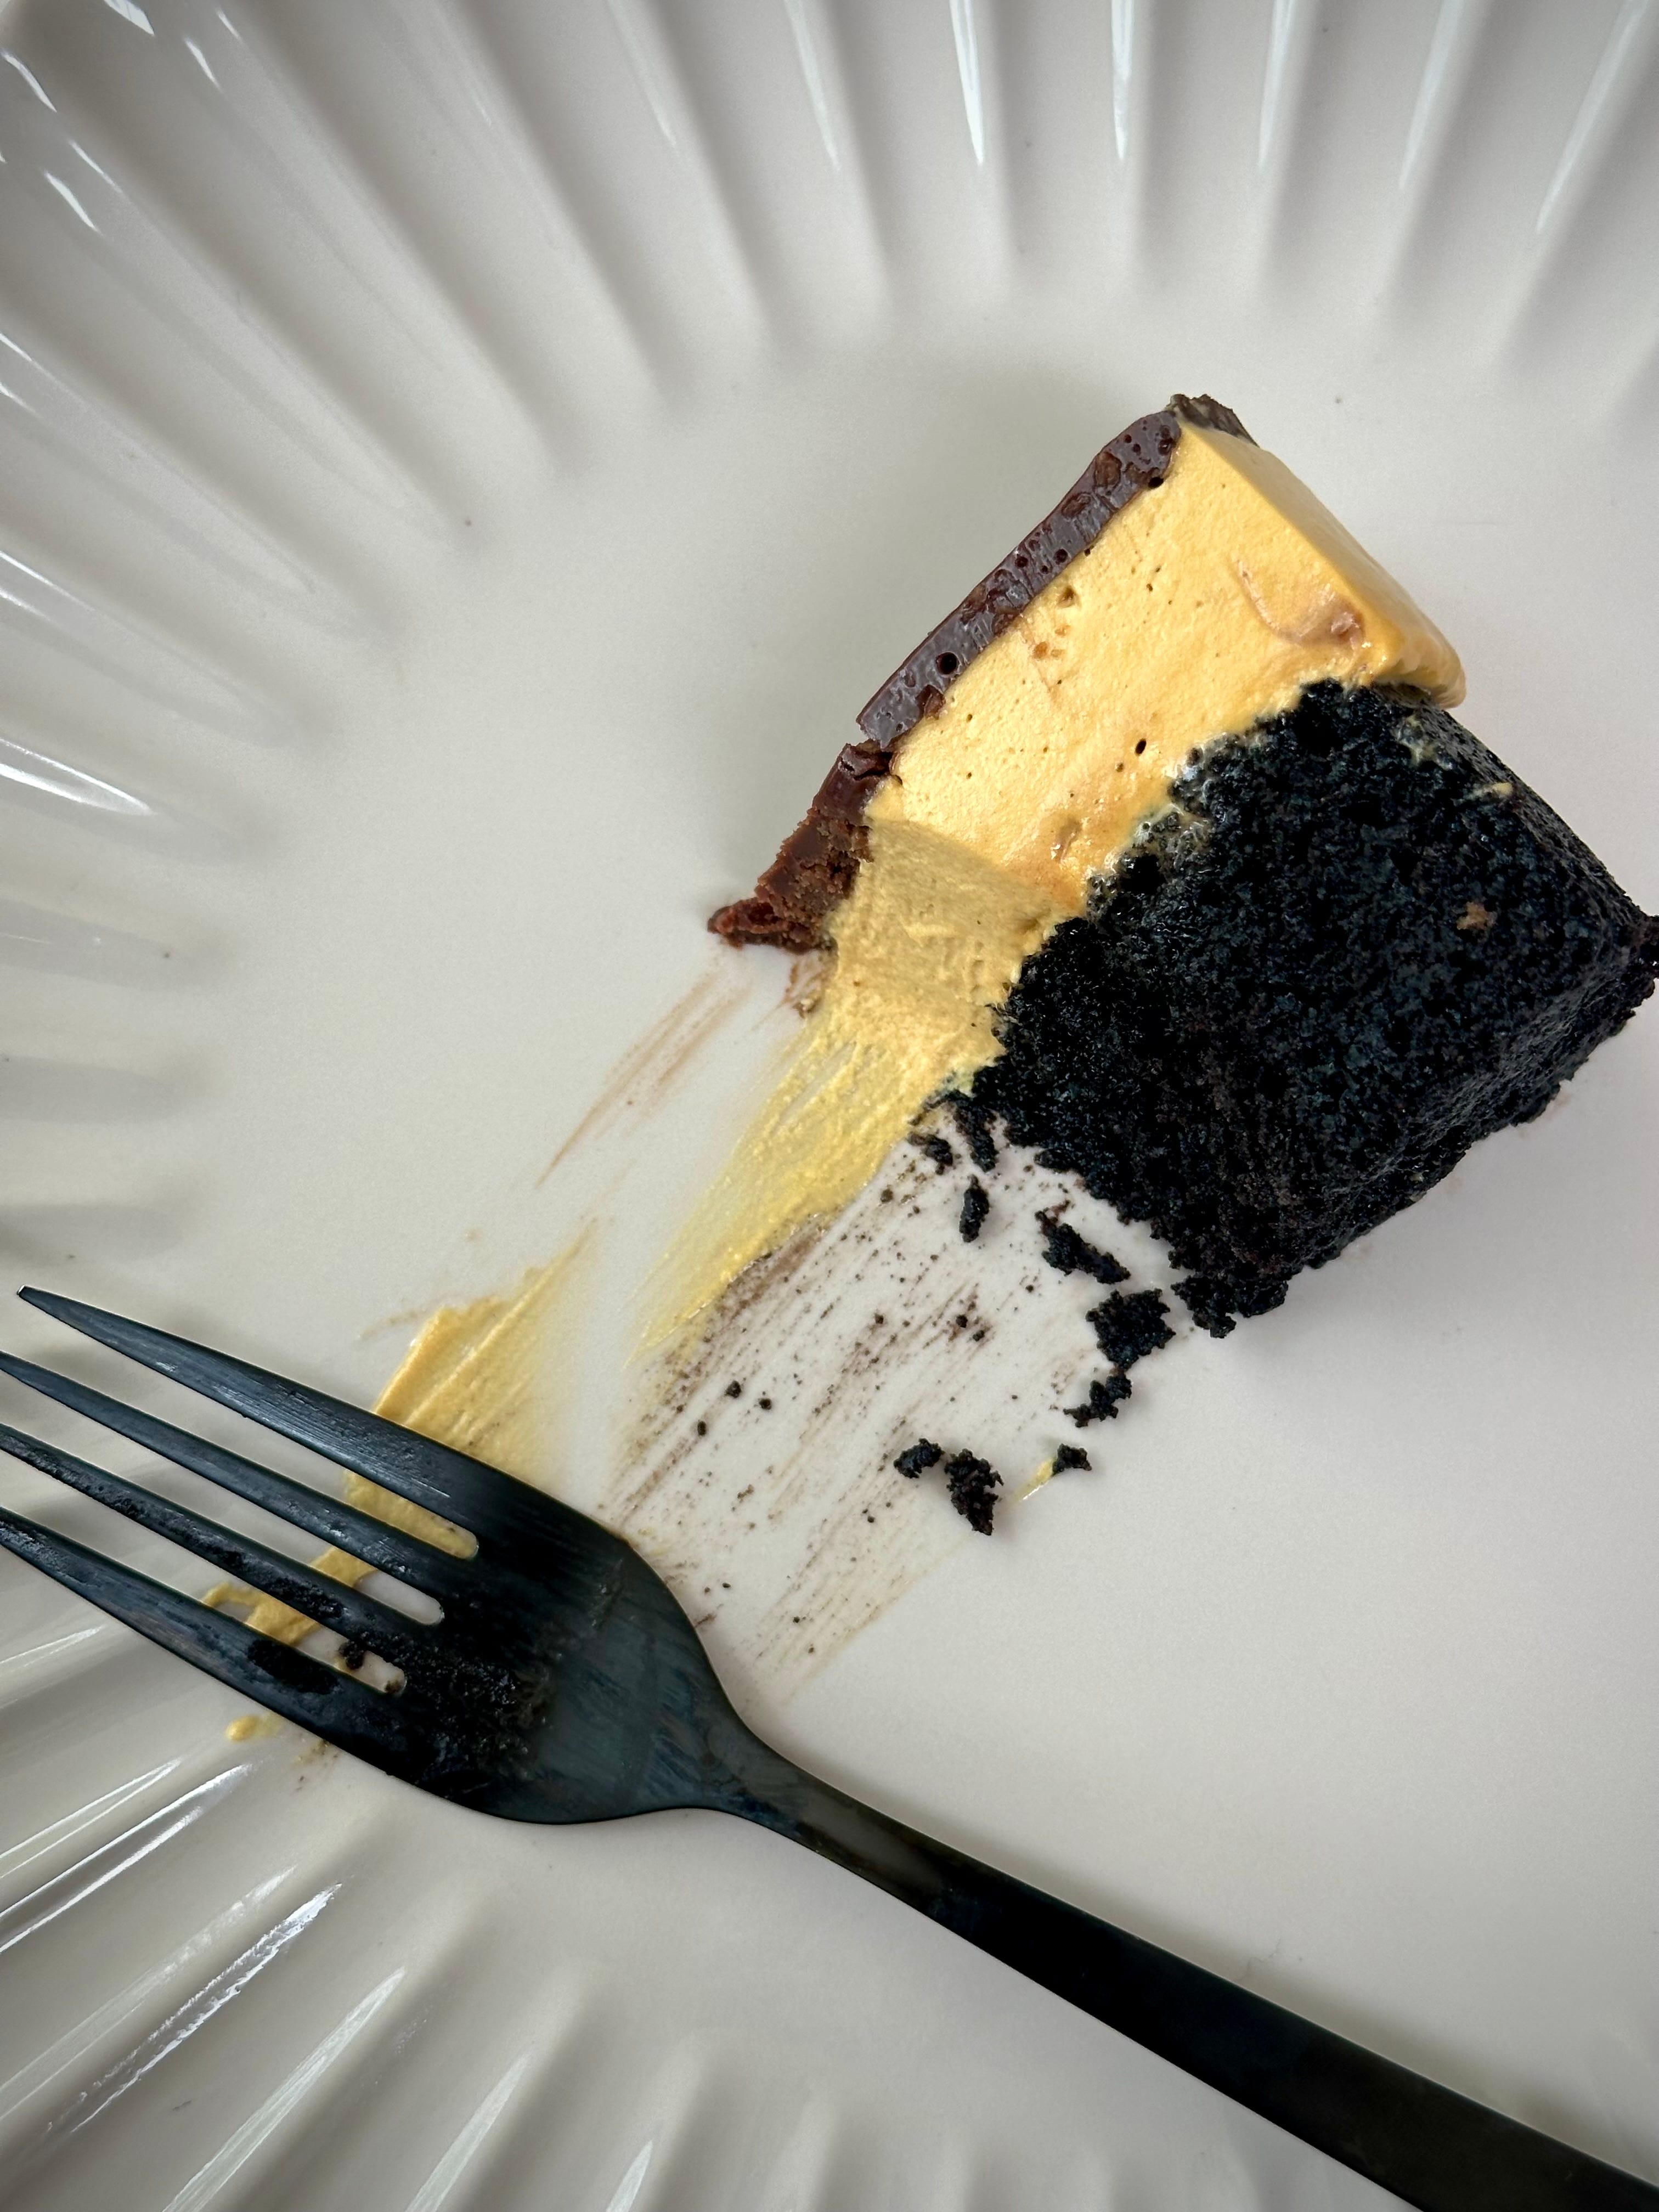
As itself, as dust, as chunks, in buttercream, in batters, on top of cookies, in ice-cream (swap out the choc sponge for honeycomb and ditch the cherry syrup for choc sauce in my no churn ice cream for a sinfully naughty variation) and now…in a cheats mousse on top of a rich, fudgy, chocolate sponge.
This recipe uses up the spare sponge from the BFG recipe and my Extra Bite friends, if you still have that spare sponge lurking in your freezer from an earlier recipe, THIS is how you use it. If you don’t have a spare choccy sponge hiding in your freezer (this is the reason I promote the emergency stash of cake at all times), you can grab a store-bought sponge to substitute. The honeycomb mousse is so delicious that it quite honestly could be slathered on top of a brick, and I would still devour it so whatever your base may be, the end result will still be full of magic.


We are topping the honeycomb cheat mousse with a chocolate ganache laced with feuilletine. Again, this is optional and if feuilletine isn’t something you happen to have knocking around (cause why would you?), you could leave out or alternately crush up wafer or cornflakes to a fine chunky crumb instead.
The end result is just magnificent. I would highly recommend using my sponge recipe for best results but this is truly something so divine that the minute I get a bakery, this will be the first cake going on the menu. It is decadent, luxurious, outrageous and sickeningly delicious. The sponge is stupidly moist, the honeycomb is incredibly moreish and the choc ganache is truly the cherry on top. The perfect way to end the newsletter and the best way to see in the weekend.
Recipe Makes: 1 x 18 cm / 7 inch cake
Recipe Serves: 6 nice portions
Y O U – W I L L – N E E D –
Sponge
1 Chocolate Fudge Sponge (see BFG recipe OR use a shop bought)
Any remaining leftover Cherry Syrup/Juice
Honeycomb
200 g Caster Sugar
100 g Golden Syrup
2 tsp Bicarbonate of Soda
Cheat Mousse
300 ml Double/Whipping Cream
1 tsp Vanilla Bean Paste
150 g Honeycomb Dust, made from the above
Chocolate Ganache
75 ml Double/Heavy Cream
50 g Dark Chocolate, chunks/callets
10 g Feuilletine, optional
M E T H O D -
Prep your sponge by defrosting overnight at room temperature if you have used an emergency cake stash. Once it has defrosted (or if you are using a storebought chocolate sponge), use a serrated knife to trim any domed tops. Remember to reserve any cake crumb for your no churn ice cream or to top any muffins, cupcakes, banana breads etc please do not make me sad and use it to make cake pops. You are better than a cake pop.
Move onto making the honeycomb. This is incredibly easy to make but also one that seems to trip people up – the key here is temperature. NOTE: I’ll give you some tips and tricks for transforming and nailing honeycomb in the Rubes Recommends section in case you are still left with any doubt.
Add the caster sugar and golden syrup to a medium sized saucepan. Place over a medium heat and allow the sugar to dissolve until a dark amber colour – the degree of caramelization on the sugar is super important as too much will result in burnt tasting honeycomb and too light, will be too soft to blitz to a dust for our mascarpone. The ideal temp you are after here is around 145C/293F (use a thermometer probe, I promise you it is an inexpensive bit of kit which is super useful across sweet and savoury and will give you solid results as opposed to winging it on a hope and prayer).
Whilst you are waiting for your sugar to come up to temp, line a deep baking tray (a brownie pan is a good shout) with some baking paper and place to one side.
Once temp has been reached (or eyeball it on colour if you don’t have a temp probe but this is risky business so don’t tell you I didn’t warn you), remove pan from the heat and sprinkle in the bicarb. Mix well for a few seconds until all the bicarb has dissolved and has been thoroughly mixed through. Stop stirring and watch it instantly foam up.
When it nears the top of your pan, immediately pour the honeycomb into the reserved lined tray. NOTE: Don’t pour from a height as you will lose some of the aeration, so go low and slow!
Leave to completely cool at room temp and DO NOT place this in the fridge uncovered. TIP: if it is raining outside, keep your windows shut to prevent excess moisture in the air and if it is cold, turn off any standalone heaters or fans.
Once the honeycomb has set hard and is cool, break it up into chunks and blitz in a food processor to a fine, golden dust. You might need to give this some time to get fine enough to dissolve in the cream – my ninja processor is pretty hardcore but still needs a good couple of minutes to break down.
Make the cheat mousse by adding your cream, vanilla bean and about 150 g of the honeycomb dust to a large bowl (reserve any surplus honeycomb dust for ice-creams, toppings to muffins, cake batters, buttercreams etc).
Use a balloon whisk to whisk this until you just reach medium peak. You do not want to overwork this so don’t be tempted to go for using your stand mixer. Go by hand and it should take you a few minutes to get to where you need You want this holding it’s shape but in a relaxed, soft manner. Remember the more you keep stirring, the more it will stiffen and have faith it will set in the fridge. You don’t want soup but same time you don’t want it to be as thick as a brick.
Place your sponge into a lined (bottom and sides) 7 inch springform cake tin (or one that has a removable bottom at the very least).
Use any surplus syrup to coat the top of the sponge before piling in the deliciously, velvety smooth honeycomb faux mousse. Use the back of a spoon or offset palette knife to spread to an even layer before popping into the fridge.
Whilst that is setting, make the chocolate ganache by adding the cream to a pan. Gently bring to heat until it nears boiling. Remove the pan from the heat and add the chocolate chunks.
Allow the chocolate to sit for a minute or two before mixing well until glossy and smooth.
Add in the feuilletine if using and mix to coat. Leave to one side to cool until lukewarm.
Once lukewarm, transfer the ganache to a piping bag (you don’t have to but does make it easier) and pipe the ganache on top of the honeycomb layer. Use the back of a spoon or offset palette knife to smooth over into a nice even layer.
Pop back in the fridge to set for at least 6 hours but preferably overnight.
Remove the cake from the tin.
Allow the cake to sit at room temp for about 30 minutes before slicing with a hot knife.


My Extra Bite besties will know what this section is about but for everyone else, this is where I drop my tips and tricks to ensure you nail each recipe included in the recipe. You’ll find more detail, pictures, and key points (imo) highlighting any tripping points and how to work through them. Think of this part as offering the assurance you need and if there is STILL somehow some ground I haven’t covered, you can drop me a message and I’ll offer up some more advice if you need it.
Today we are purely focusing on honeycomb because that really is the only tripping point out of all three. Plus substack is going crazy at me right now for going horrendously over limit (and it is nearing 6pm on a Friday) so I better wrap this up pronto.
Let’s get to it.
For the Honeycomb :
Keep reading with a 7-day free trial
Subscribe to The Last Bite to keep reading this post and get 7 days of free access to the full post archives.