

Basic but Brilliant
With my Brown Butter Brownies, done 2 ways. Plus 3 easy to make and delicious to eat meal prep recipes and my Sticky Chocolate & Banana Pudding.


Hey Friends!
Oh boy do we have an update for you this week.
Here I was on Monday, thinking this is gonna be a good week, Rubes. We got a LOT we need to achieve. Lots we need to make moves on. Lots of decisions to make. Lots of bits that need to be filmed. Let’s be bloody ‘aving you.
So off I went to Padel on a Monday morning like I normally do. Nothing new about this by the way. This isn’t a new random hobby I have decided to spontaneously immerse myself in. Like sure, I didn’t grow up playing racquet sports, I don’t have years of experience behind me and my technique leaves a lot to be desired but on a whole, I am fairly decent…or so I like to think.
So mid match, I’m feeling good. I get this feeling that we are going to win the game – which huge ya know, cause the woman I was playing diagonally opposite against was an ex-tennis player of 20 years and she’s got a real walloping forehand on her. She hits the ball, it’s coming right towards me, it’s coming at me like a rocket, it’s not slowing down but then at the same time it also weirdly felt like it was in slow motion so I run over to go hit the ball with my backhand, thinking I am allllll over this. And in truth, I was over it. So over it to the point the ball didn’t hit my racquet but hit the edge which then had the audacity to rebound straight into my eyeball.


It could have gone ANYWHERE folks. ANNNYYYYWHERRRRREEEE. But alas, it decided to neither hit my brow bone nor my cheekbone. It decided to totally forego any bit of surrounding surface area and make direct contact with my eyeball. Just ol eyeball to tennis ball contact. Simply lovely.
One long trip to the eye casualty midweek and one eyepatch later, here I am on a Friday night furiously typing away my newsletter because all those feel good vibes of making moves and being productive at the start of the week, left my body the minute that ball hit my soul. Am I holding a pity party for myself tonight? Absolutely. I have scheduled a cry on the sofa at 8pm this evening and there’s absolutely nothing no one can do about it. At 8.05pm, said cry will finish, I’ll chuck on some trash tv to mindlessly watch via my one good eye and eat my body weight in crisps and chocolate because I fear I have entirely earned it.
Maybe exercising is bad for you, after all??

As it’s been quite the tumultuous week, I am pleased to announce all the recipes on the newsy this week are incredibly easy to make. If you don’t believe me, I did them all whilst either wearing sunglasses (which actually proved to be quite the hindrance) or whilst wearing an eyepatch so hopefully that quells any cause for concern.
That being said, we have some delicious morsels on the menu, including:
Chilli, Cheese & Chive Focaccia
Egg Salad Sandwich Filler
Chicken, Leek & Mushroom Filo Pie
Sticky Chocolate & Banana Pudding
Nutella & Feuilletine filled Brown Butter Brownies
PB & J Brown Butter Brownies
Easy, simple, soul warmingly delicious.


Let’s get cracking with our food prep haul. As always, the bits I prep will be available to everyone and will 98.9% of the time always include a bread (cause what is life without carbs??), a sandwich filler (cause I live for them), a good dinner option and maybe, possibly, occasionally a sweet treat (cause I am trying to be healthier but not a total savage).
Focaccia is a great bread to dunk into soups, dip into dips, sandwich with whatever tickles your pickle or top with a smothering of spread. A great tip for injecting more flavour and oomph whenever baking homemade bread is to sub wherever the recipe calls for water, with stock – or in my case here, bone broth. I feel like I shouldn’t have to say this but will state the obvious anyway and say please do not use this tip whenever you are making a sweet bread cause ya know, that would probably taste quite unpleasant. Not commonly or traditionally done but I will always look for how to take something a little basic and make it basically brilliant instead and this focaccia being one of them.


I know baking bread can seem daunting, but I truly believe focaccia is one of the easiest to master. You really are relying on the yeast to do the heavy lifting and it really does make a great foundation for a plethora of toppings – a brill way of using up leftover veggies, cheeses, and meats you may have lurking in your fridge. As I was using the bread this week as a base for my sandwich filler and to mop up the chicken pie filling I made for dinner, I opted for flavours that would compliment both without overpowering either.
My Chilli, Cheese & Chive Focaccia is dangerously delicious. If like me, you will be the only one consuming the bread, fear not. The bread keeps good for up to 5 days when well wrapped and stored at room temperature and can be revived daily with a quick warm up in the oven, keeping the top crunchy and the middle pillowy soft, making it good to go whenever your carb craving calls.


Recipe Makes: 1 x 20 by 30 cm / 8 by 12 inch deep baking tin
Recipe Serves: 6 sandwiches or 15 good square chunks for dunking
Y O U – W I L L – N E E D –
Dough
500 g Strong White Flour
7 g Sea Salt
12 g Fast Dried Yeast
45 ml Chili Oil, plus extra
375 ml Chicken/Beef Bone Broth or Stock of your choice, cool
1 tsp Marmite, optional
Toppings
100 ml Olive Oil
70 g Parmesan Cheese (half grated, half diced)
50 g Comte, diced
4 Large Garlic Cloves, minced
Handful of Kalamata Olives
1 tbsp Chives, finely chopped
1 tsp Chili Flakes
1 tsp Sea Salt
M E T H O D –
Generously oil the base and sides of a deep rectangular 20 by 30 cm / 8 by 12 inch deep baking dish.
Add the flour and salt to one side of a bowl and yeast to the other. Add the oil, stock (if using, sub for water if not) and marmite, to the bowl.
Using the dough hook attachment on a stand mixer, mix on low until the sides of the bowl are clean of flour. Leave to sit for 5 minutes for the flour to hydrate.
Use the dough hook attachment to mix for 7-10 minutes on a medium speed until the dough begins to soften and become elasticated. The dough will be wet but trust the process!
Transfer to the oiled dish, cover with clingfilm and leave to prove in a warm environment for 2 hours. If you have a proving drawer, fab but if not, place a tray filled with hot water at the base of your oven and pop the dish onto a rack above.
Once proved, gently fold the top half of the dough over the bottom half. Turn the dough 90 degrees, before repeating twice over. Gently stretch out the dough to cover the base of the dish, cover and prove again for 1 hour. By now your dough should be thriving and bubbly.
Preheat oven to 220C (no fan)/430F/gas mark 7.
In a jug, add the oil, chives, chilli flakes, salt and minced garlic and mix well.
Once the 2nd prove has completed, pour the oil over the proved dough. Use the tips of your fingers to make dimples in the focaccia pressing them all the way through the dough to the bottom. Try to not disturb any formed air bubbles as this will give us that glorious aerated texture we are after.
Press in the olives, and cheese cubes, scattering over a hefty blanket of grated parm to finish.
Bake for 20 mins until golden brown on top and cooked through (you are looking for an internal temp of 92 C/197 F or higher). Remove from oven and let it sit for 30 mins before gently turning out the bread and leaving to cool on a wire rack. If you find the base of your focaccia is a little sticky or tacky, place the bread base side up back in the oven for 10 minutes to crisp.
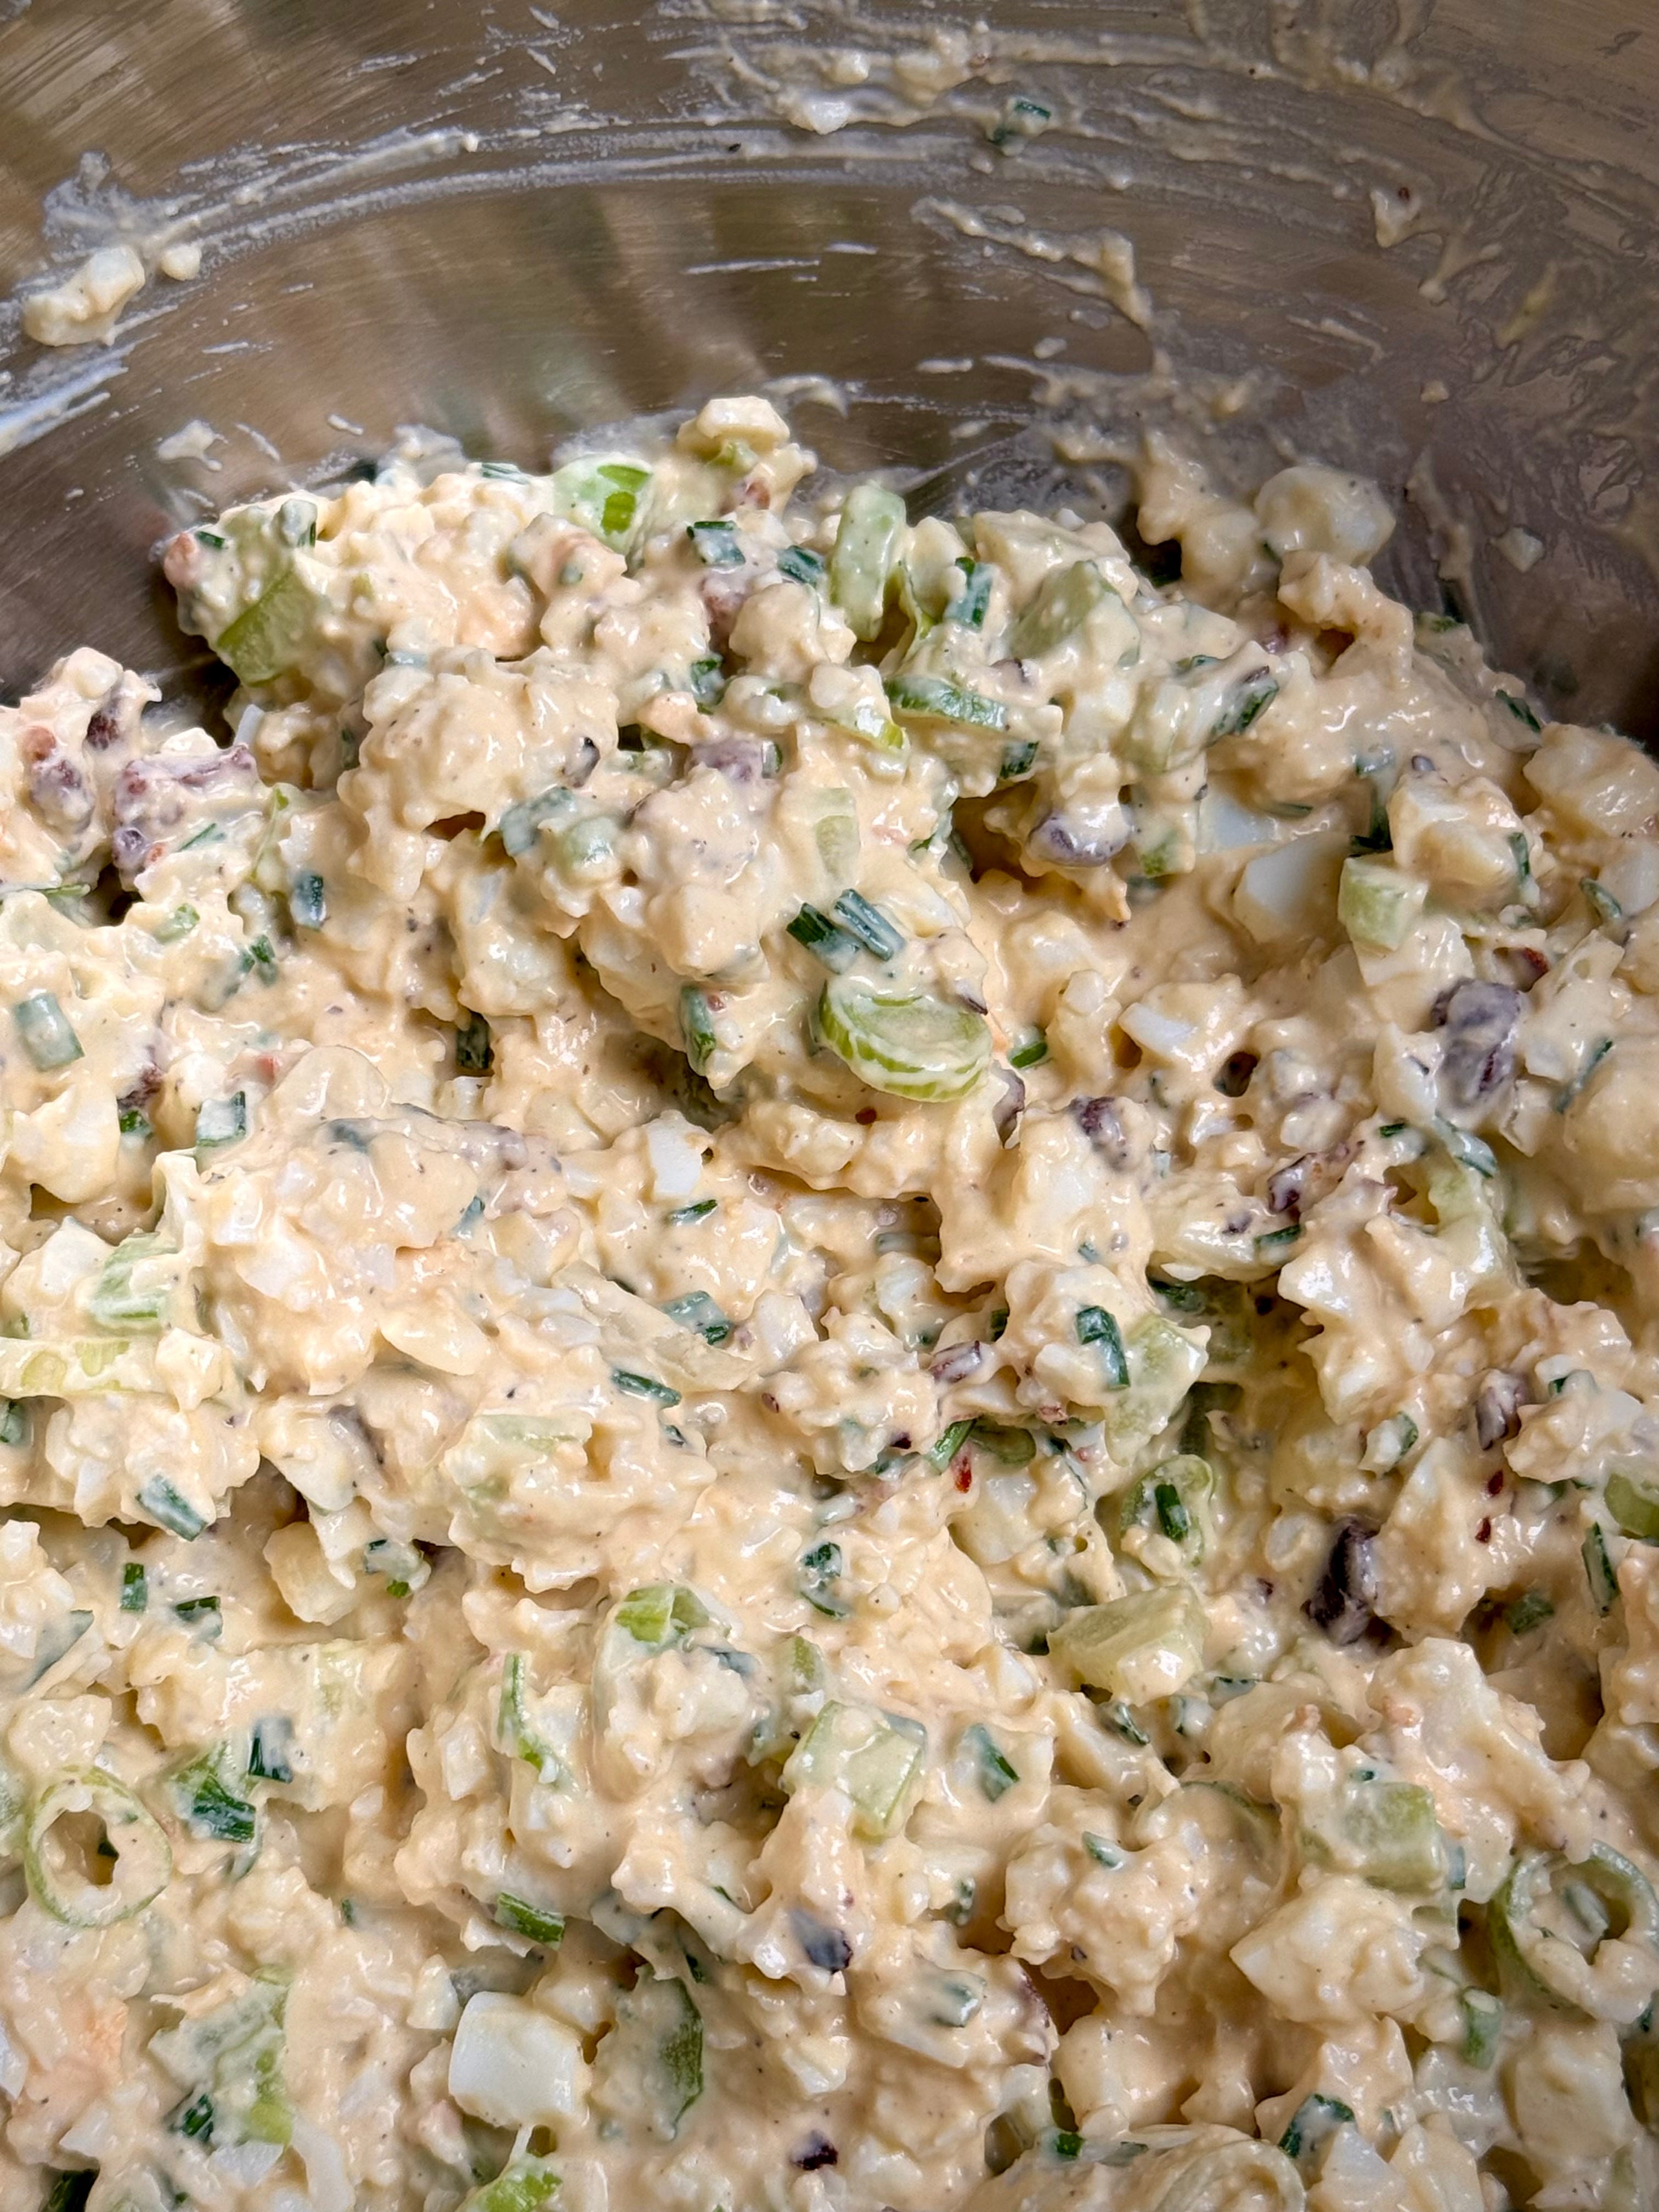
Moving onto our sandwich filler – a real easy win this week packed full of protein (no macro stats here because obsessing over numbers can be a slippery slope in my experience) and lots of additions because whilst I do love an Egg Salad sandwich, I also cannot stand the taste of anything remotely eggy. Like you know when you get a really light sponge that barely has a pinch of flavour to it and just tastes eggy?? GET IN THE BIN. I cannot tell you how grotesque I find it and I am fully aware and fully intentional with the dramatics.
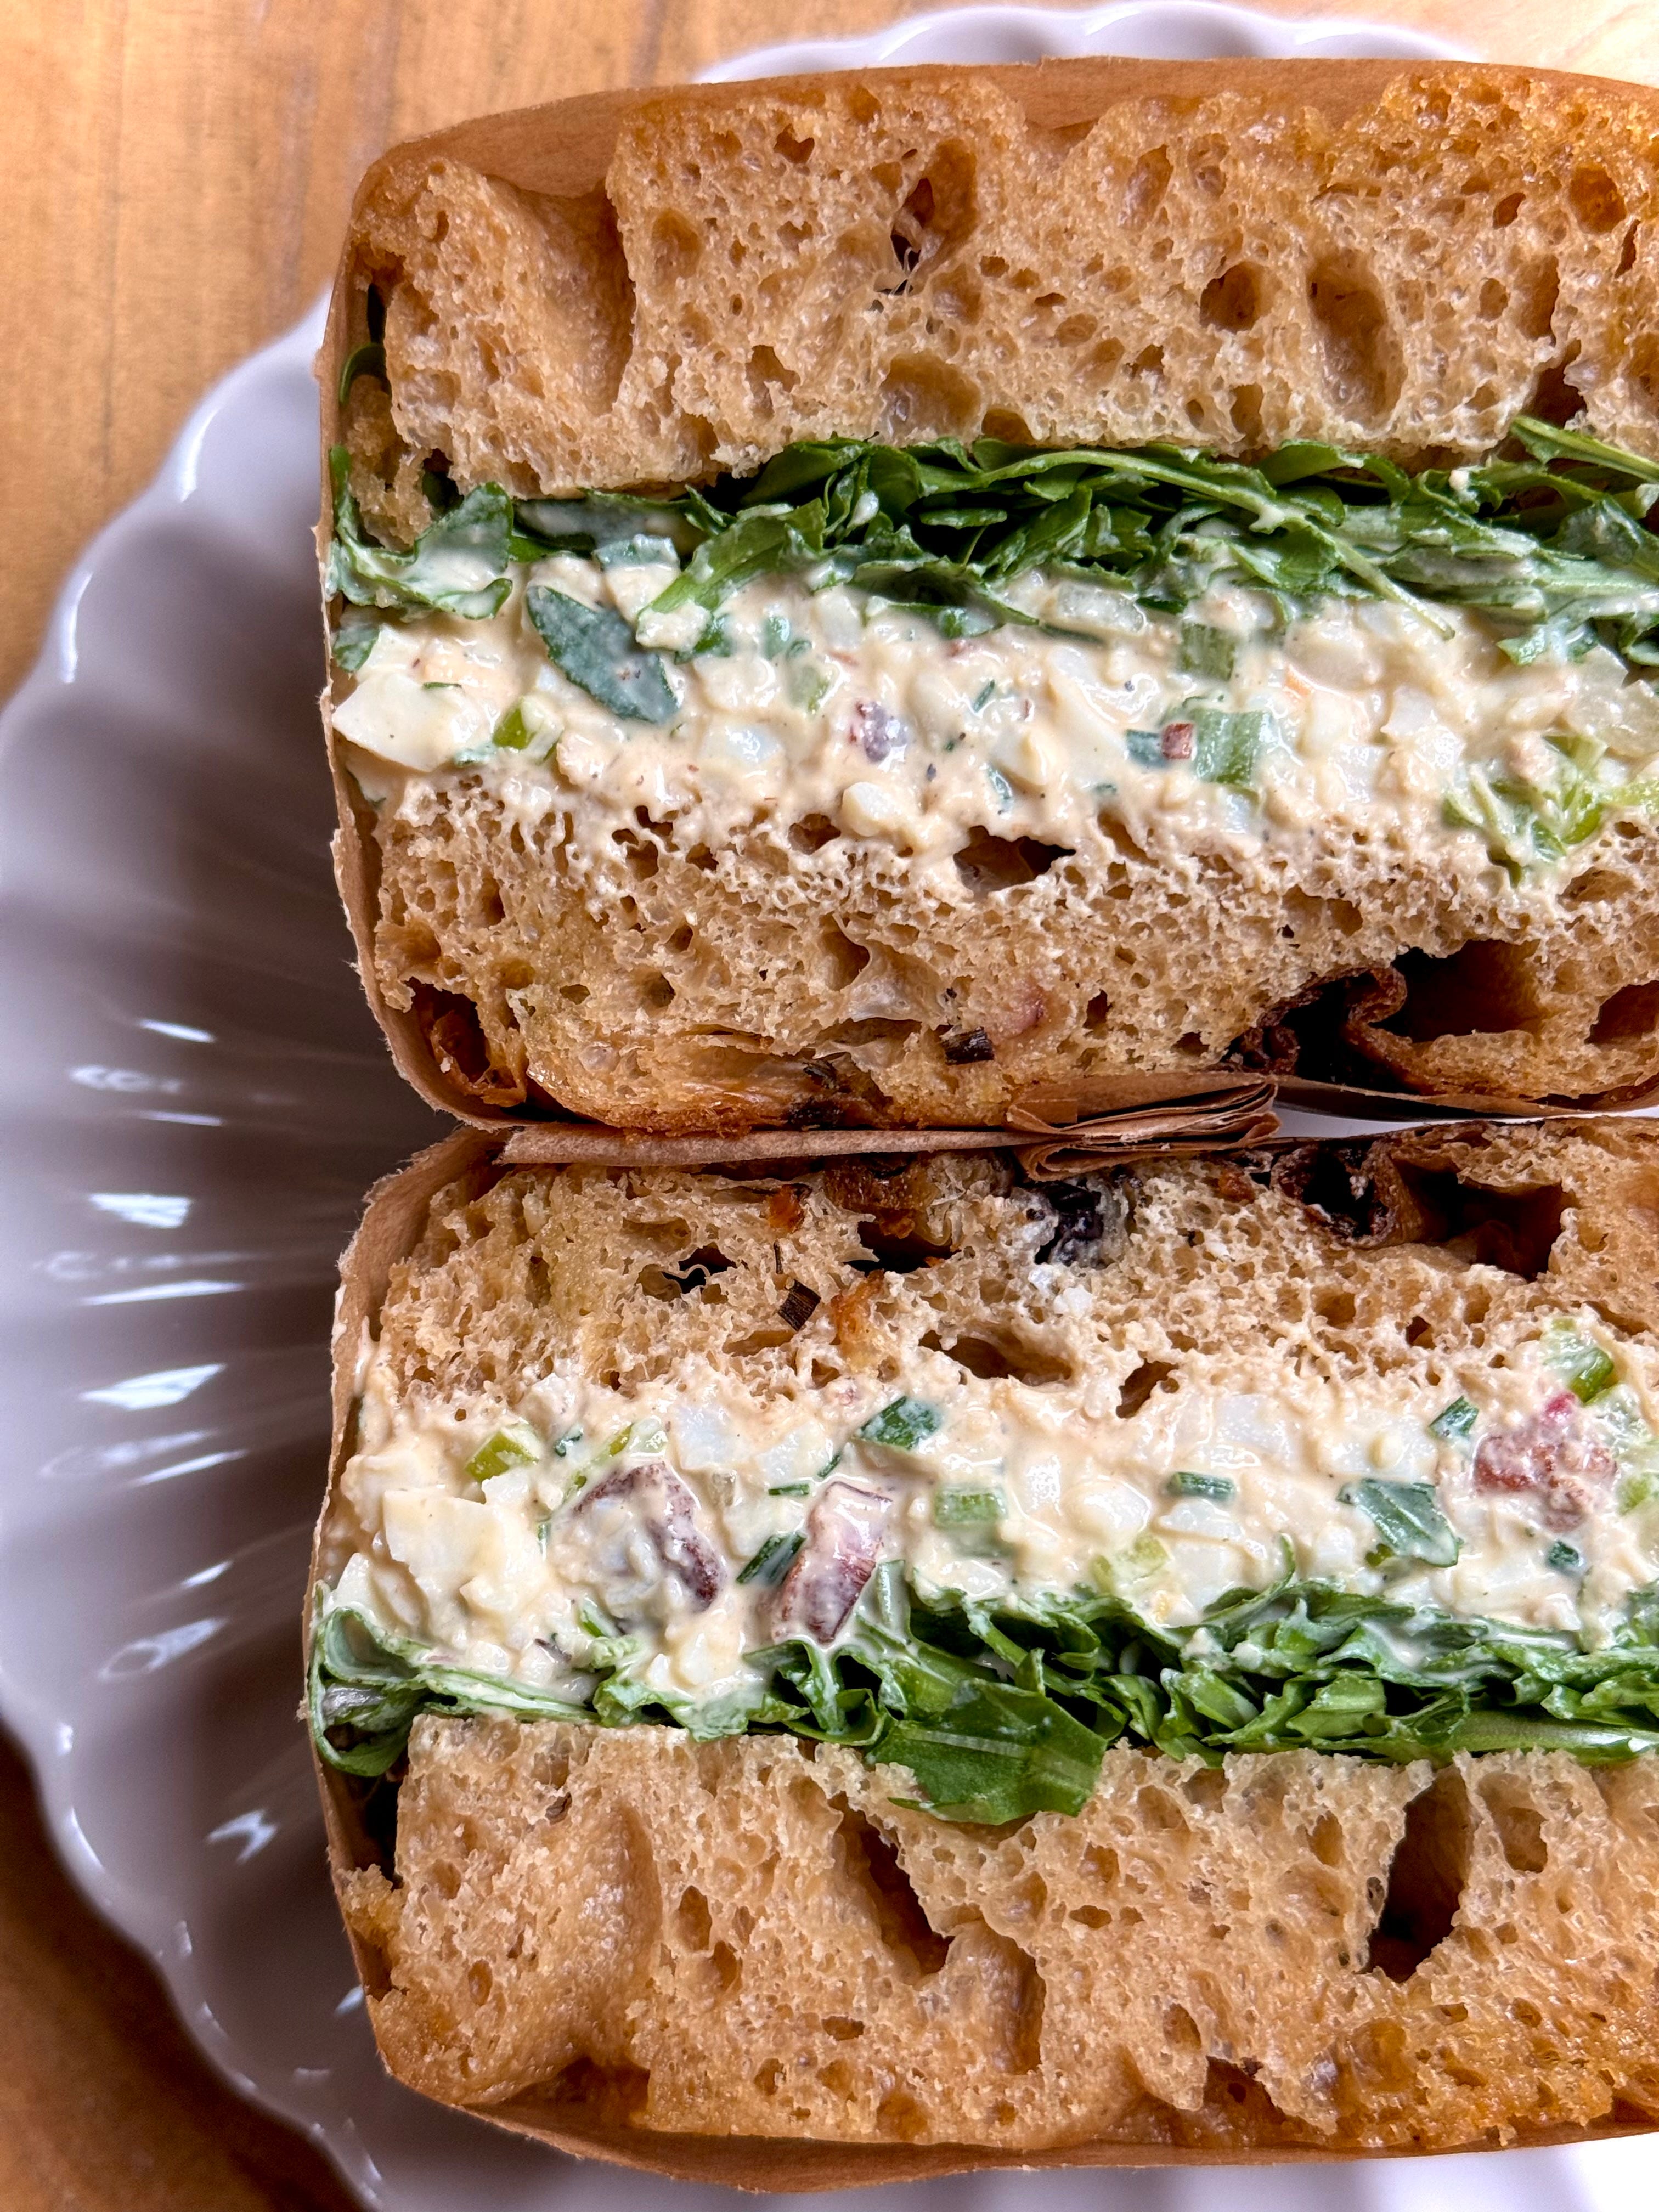
The additions I have gone in with are mainly for flavour but also for texture. A lot of egg salad fillings are quite mushy, smushy and soft, whereas here we introduce a few crunchy additions because I am a big texture gal. You can of course skip, double up or replace any of accompaniments but would recommend sticking to the wet quantities to ensure you have a good final finish. Something that is spreadable, saucy without being too wet and not overly rich.
If you are also a sandwich filler lover, make sure you check out the previous newsies where we’ve also tried a Chicken Chipotle and a Tuna Crunch variation. All 3 delicious. All 3 packed full of goodness. If you are a solo eater, make just one portion of any of these to see you through most of the week but if you are feeding a family or a partner, double up for generous portions for all.
Recipe Serves: 4 servings
Y O U – W I L L – N E E D –
6 Large Eggs, boiled (I did mine for 10 mins in boiling water)
130 g Pancetta, fried until crisp
1 Celery Stalk, finely diced
4 Spring Onions, finely diced
Handful of Chives, finely chopped
60 g Greek Yoghurt
50 g Dijonnaise
1 tbsp Sweet Chilli Sauce
Pinch of Chilli Flakes
Squeeze of Lemon Juice
Salt & Pepper, to taste
M E T H O D –
Remove the shell from the boiled eggs – you will find this easier to do if you submerge your boiled eggs once done straight into a bowl of ice water. Ensure the eggs are cool to touch before removing the shell.
Add the eggs to a large bowl. Use a potato masher to mash until they have broken down to an even sized texture (I go for a small sized chunky texture, but you go for whatever floats your boat).
Add all the remaining ingredients, alongside a pinch of sea salt and a hefty crack of black pepper. Mix well before tasting and adjusting the seasoning according to preference.
Moving onto our dinner option this week, a Chicken, Leek & Mushroom Pie. And I say the term pie loosely because I live with Gluten Free James so finding something that works as a dinner option for us both without either of us compromising on flavour, can be occasionally tricky. If you’re in a similar boat or live in a family where intolerance doesn’t run across the board, this is the perfect dinner option for you.


I make the pie filling and keep it all stored in the pan it is made in. Each night we want to eat it, I dish up our portions into individual oven proof bowls, top mine with filo pastry, top James with gluten free pastry and bake in the oven for 20 minutes until golden brown and crisp on top and hot underneath. No soggy pastry night after night and no compromising on either side.
And for the times when I want something nourishing and comforting for lunch, I spoon into a bowl and heat in the microwave for a bowl of chunky chicken and veg ‘soup’ and a chunky serving of focaccia to mop up all the sauce. This dish isn’t groundbreaking, nor is it supposed to be. It’s just good mood food at its finest - and doesn’t require a tonne of prep time to make either.


It’s rich, filling, packed full of protein and veg and doesn’t scrimp on flavour in the slightest. Serve it up alongside some buttery, garlic mash or sweet potato fries and this my friends, is a dish that’s been heavy on my meal rotation since I was at university. Yup, a dish that’s been going strong for the last 15 odd years. That should tell you all you need to know.
Recipe Makes: 8 generous servings
Y O U – W I L L – N E E D –
100 g Pancetta, optional
1 White Onion, finely diced
150 g / Approx. 3 Celery Stalks, finely diced
150 g Carrots, finely diced
200 g Leeks, half finely diced & half sliced into 1cm coins
6 Large Garlic Cloves, grated
10 Thyme Sprigs
600 g Chicken Thighs, diced
400 g Chicken Breast, diced
200 g Button Mushrooms, halved
75 g Shitake Mushroom, sliced
700 ml Chicken Bone Broth (make sure you use the one suitable for cooking)
100 ml Water
2 tbsp Cornflour
1 tbsp Marmite
2 tsp Dijon Mustard
2 tbsp Crème Fraiche
175 g Frozen Vegetables
1 packet Filo Pastry
M E T H O D –
Begin by placing a large pan over a medium heat. When warm, add the pancetta – if using. If not, add 100 g unsalted butter.
Fry off the pancetta until browned and the fat begins to render (break down) or until the butter has melted.
Add in the diced onion, celery, carrot, 100 g diced leeks and a hefty pinch of salt. Mix well. Continue cooking until the veg has sweated down, stirring little but often to avoid the base from catching. You want to take the bite out of the veg and should be able to smush the carrot when a bit of force is applied. This will take about 20 minutes but is worth the time to build a solid base of flavour for the pie.
Add the garlic and thyme sprigs. You don’t have to remove the leaves from the sprigs and you can add them in whole. Mix well and continue cooking for a further 5 minutes.
Next in, go in with all the chicken. Mix and cook until the chicken has browned. It doesn’t have to be completely cooked through at this point, but you do want to make sure there is no visible pink meat.
Add the mushrooms and sliced leeks. Mix well and cook for a few minutes.
Pour in the bone broth/stock. Mix the water with the cornflour to make a flurry and pour into the pan. Mix well.
Go in with the marmite, Dijon mustard and crème fraiche. Stir to combine. You want to continue cooking everything for another 20 minutes until the liquid has thickened, resembling a thickened gravy consistency.
Add in with the frozen vegetables and mix well. Cook for a few minutes before taking off the heat.
Add a hefty crack of pepper, mix and taste. Adjust the seasoning where necessary and adjust to preference.
If you are cooking this as a whole pie for your family, transfer the contents to a large pie dish.
Preheat the oven to 180C Fan/200F/390F/gas mark 6.
Whilst the oven is warming up, remove the filo pastry from the fridge and allow it to come to room temperature whilst still in the packaging.
When ready, scrumple up the sheets of filo and gently place on top of the pie filling. If you want a glossy finish to the pastry, mix one egg with a splash of milk and use a pastry brush to gloss the tops of the pastry.
Place in the oven and bake for 20 minutes or until the top of the pastry is deeply golden and crisp.
Serve up alongside buttery, garlic mash and enjoy.

And because we all need a bit of filth at some point during the week, next up is something that is perfect if you’re looking for a little pick me up sweet treat or an easy pud to make for someone special.
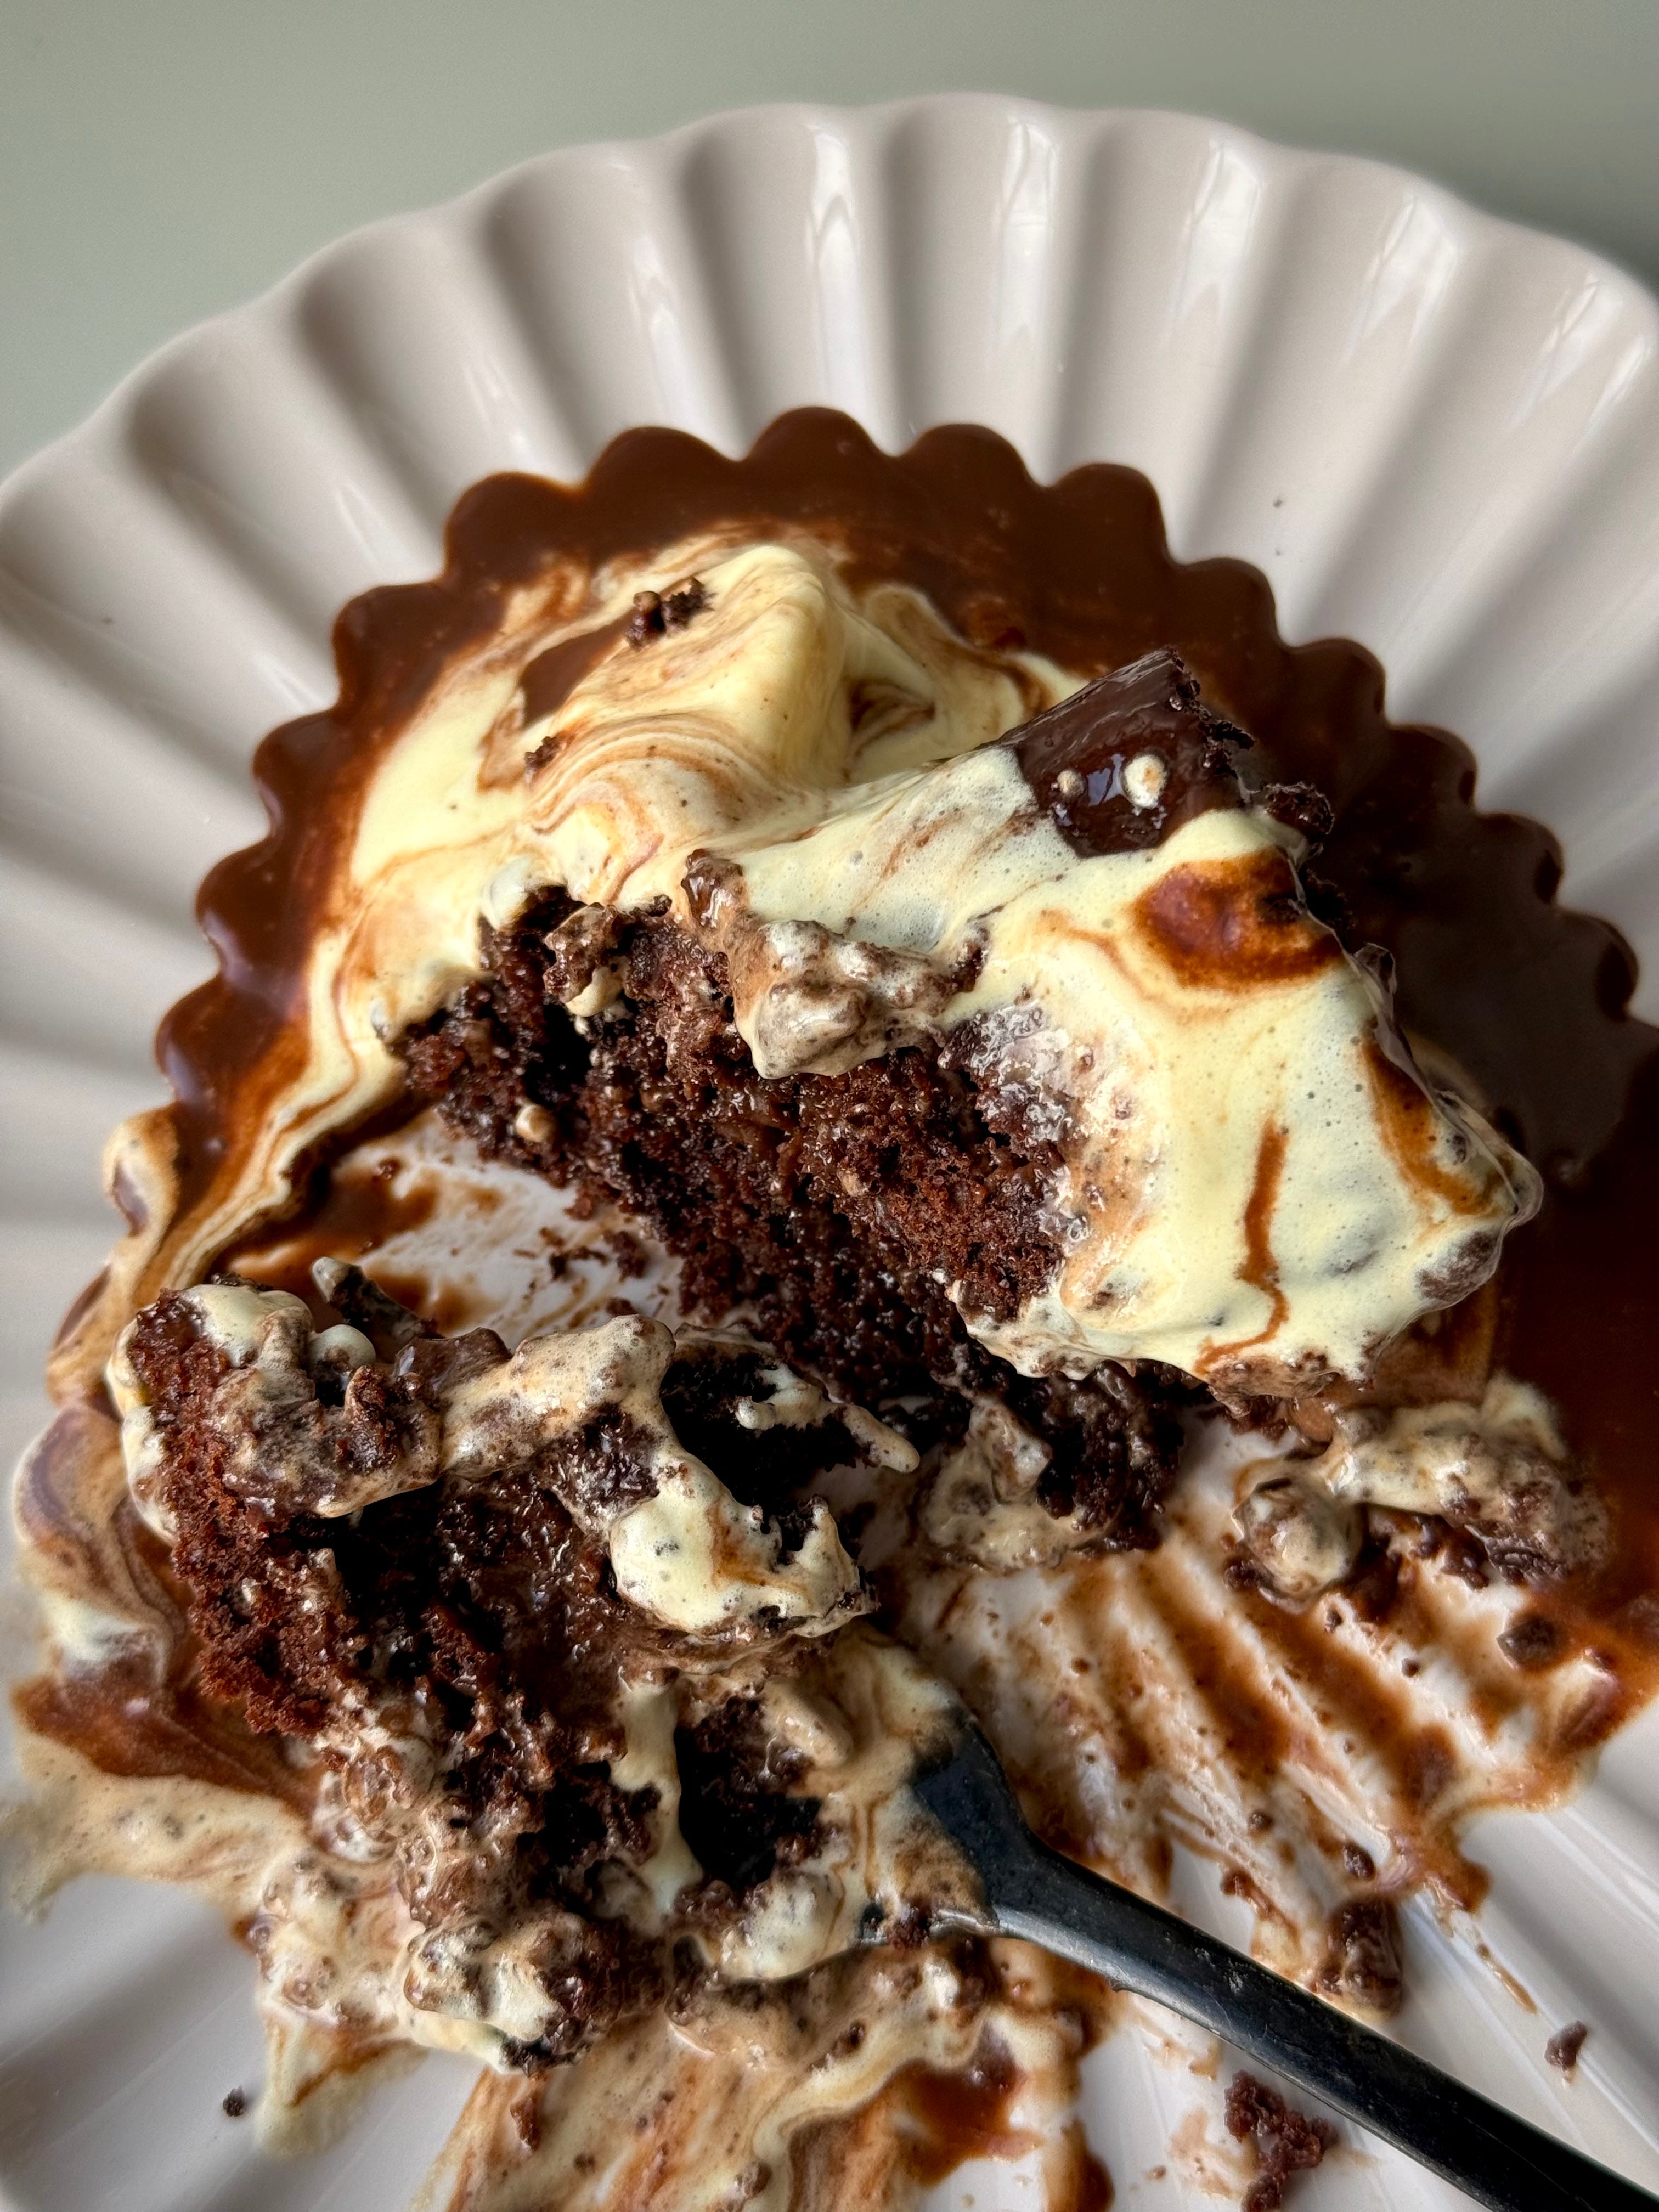
Disgustingly delicious, sickeningly sumptuous and moreishly moist, my Sticky Chocolate & Banana Pudding will just about tickle everyone’s pickle. Made up of a tender, soft, deeply rich chocolate and banana sponge, studded with chopped chocolate and soaked in a salted chocolate sauce - this is chocolate on chocolate on chocolate (with a special guest appearance of banana) and I’m not mad at it one single bit.
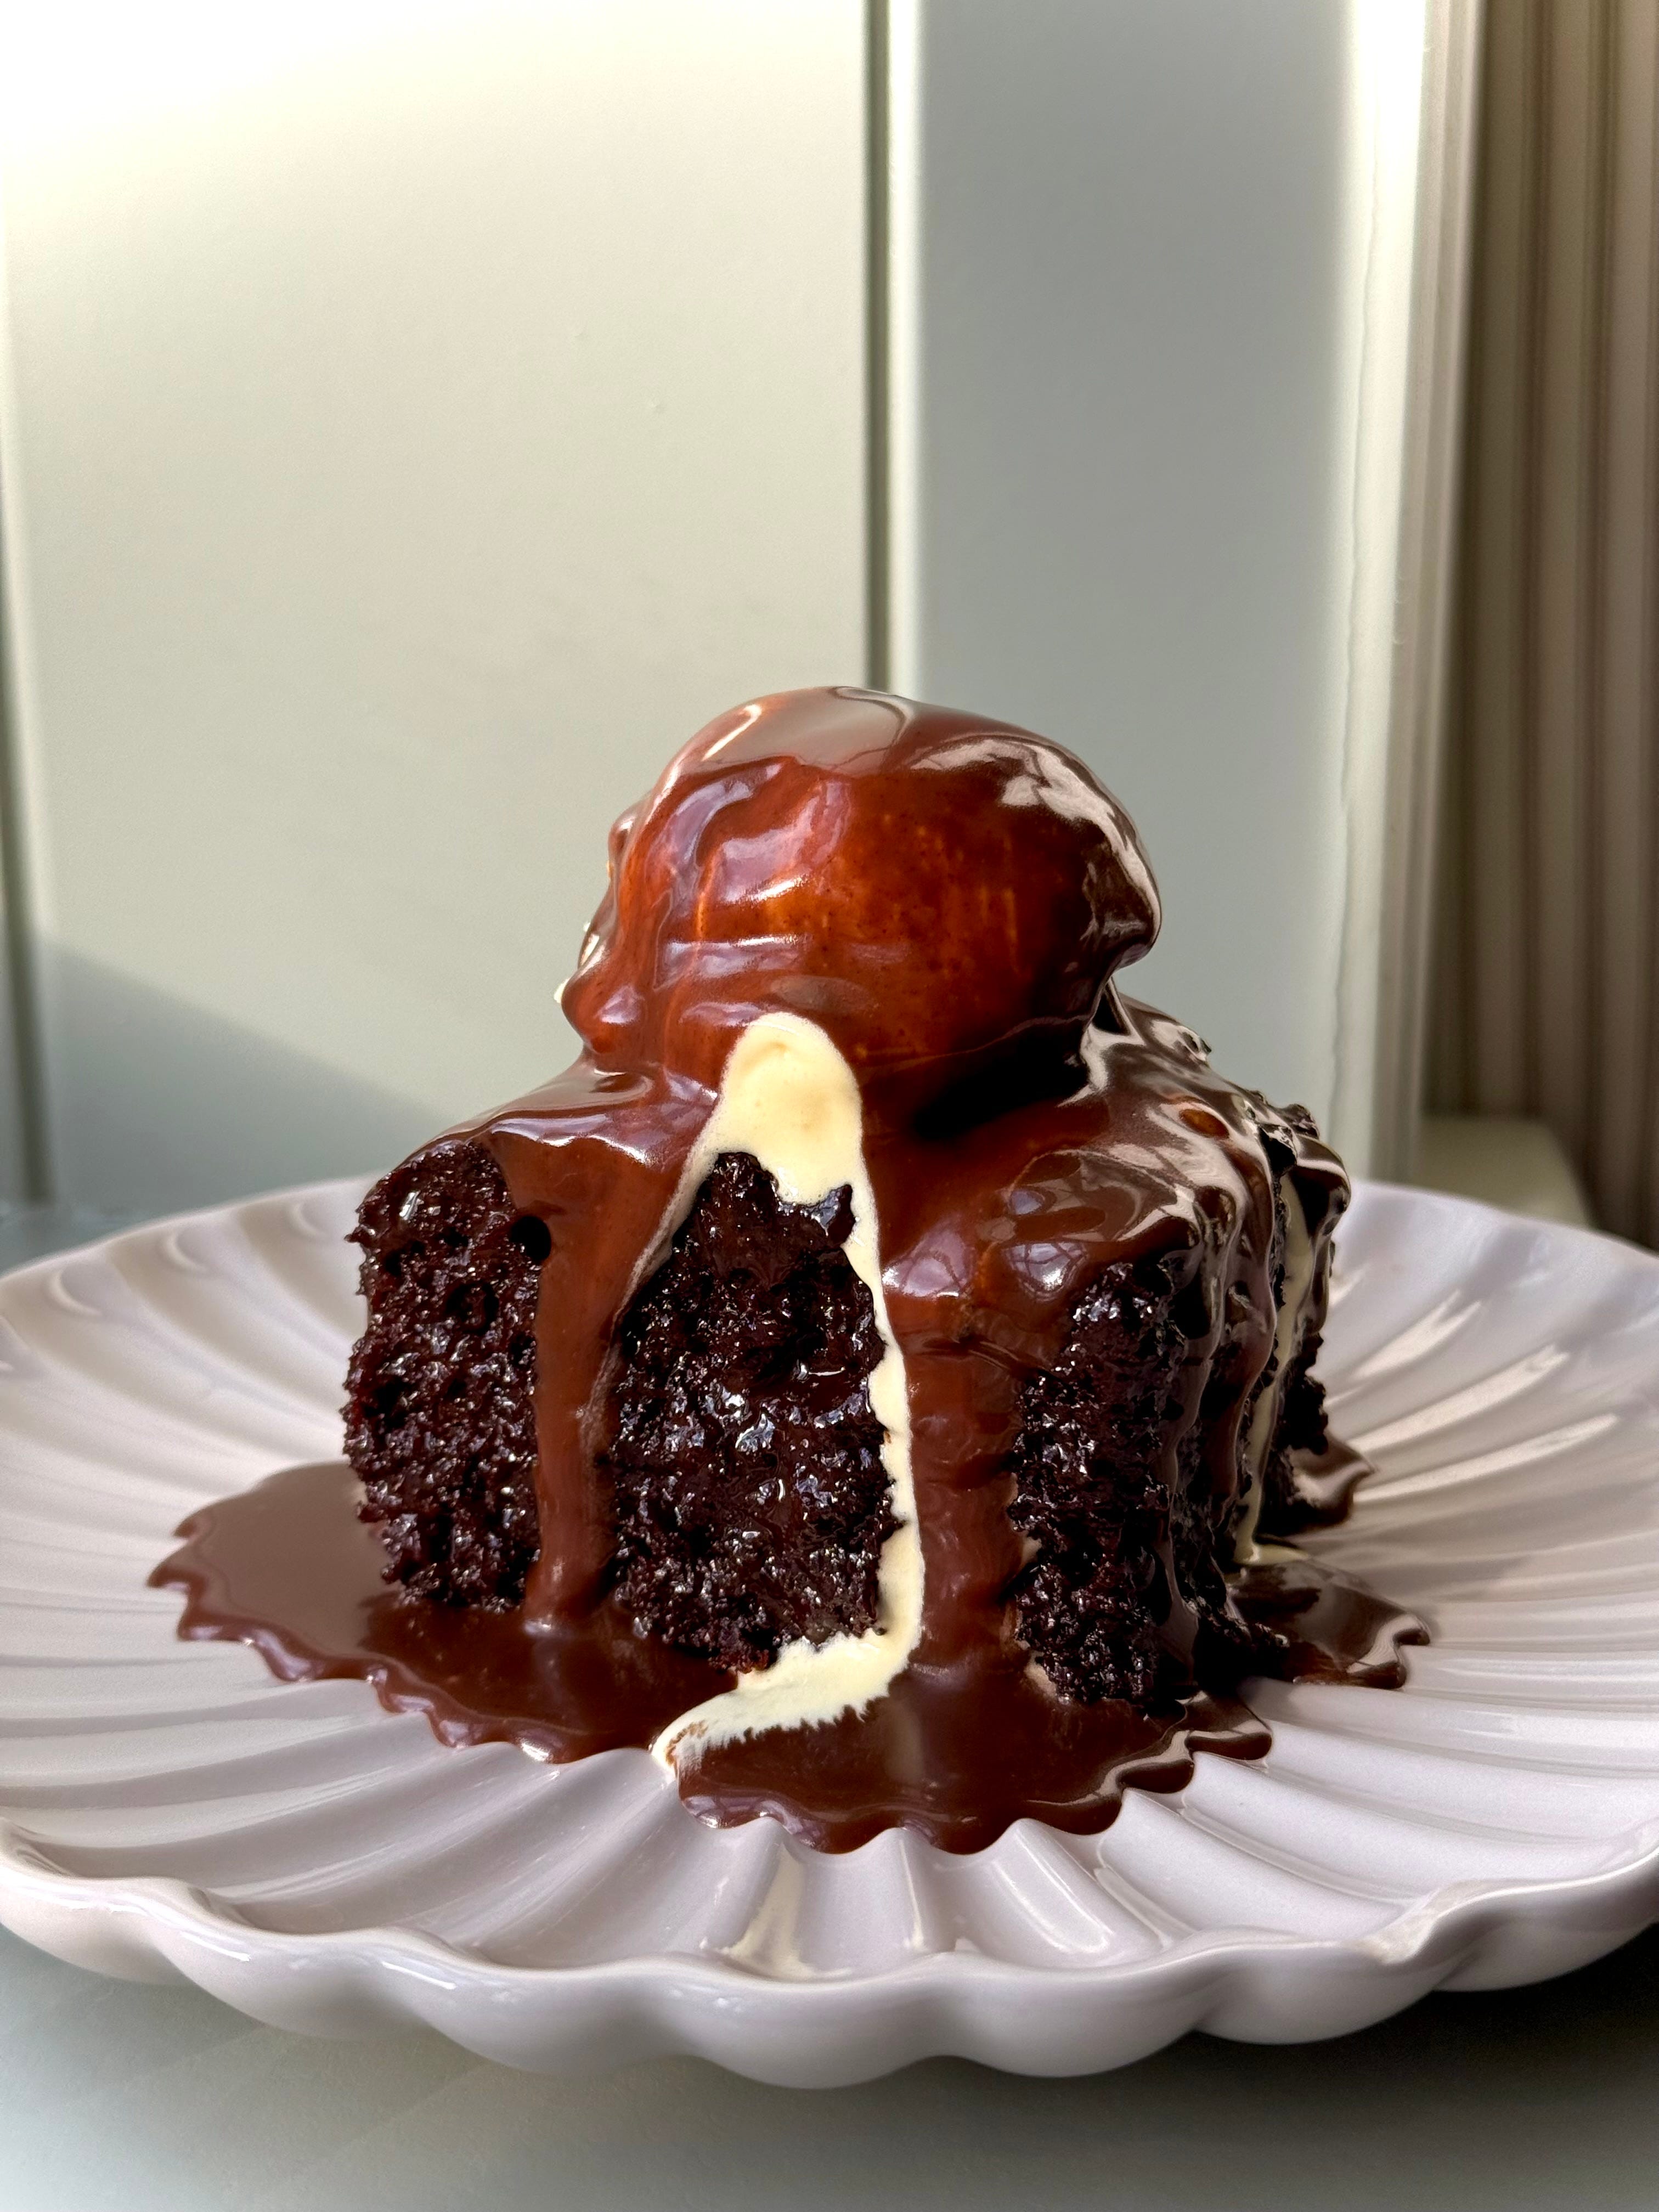
When I say this is an incredibly easy pud to make, I mean it. It’s just a simple wet and dry mix, drowning in a sauce where you just plonk it all together and heat up. Top each slice with a scoop of vanilla ice-cream, smother it all in more sauce and it’s a devour the lot and lick the plate clean sorta good. Augustus Gloop mode well and truly activated.
Any leftovers also keep well for up to 5 days, without losing any moistness or spoiling – just pop into the microwave to reheat for a minute and drizzle over any warmed leftover sauce. I am a big fan of saucy puddings and this one may be my favourite one yet. With Mother’s Day (for my UK friends) and Easter on the horizon, this is definitely a recipe you want to keep in your back pocket. A real crowd-pleasing plate of yum, drown it in custard, top it with ice cream or eat solo. Whichever you chose, you’re in for a good time.


Recipe Makes: 1 x 20 by 30 cm / 8 by 12 inch deep baking tin
Recipe Serves: 15 generous portions
Y O U – W I L L – N E E D –
Sponge
325 ml Greek/Natural Yoghurt, room temp
300 g Ripe Bananas, mashed
4 Large Eggs
75 ml Vegetable Oil
2 tsp Apple Cider Vinegar
1 tsp Vanilla Bean Paste
350 g Plain Flour, sifted
100 g Cocoa Powder, sifted
200 g Dark Muscovado Sugar
4 tsp Baking Powder, sifted
1.75 tsp Bicarbonate of Soda, sifted
Good Pinch of Sea Salt
125 g Dark Chocolate, chopped
75 g Milk Chocolate, chopped
Sauce
400 ml Evaporated Milk
300 ml Coconut Milk
300 g Unsalted Butter, diced
250 g Light Brown Sugar
150 g Dark/Milk Chocolate, chopped
20 g Cocoa Powder, sifted
1/2 tsp Sea Salt
2 tsp Cornflour, sifted
M E T H O D –
Preheat oven to 150C Fan/170C/340F/Gas Mark 3 and liberally grease the bottom and sides of a 10 inch x 13 inch / 25 x 33 cm deep baking tray with butter.
For the sponge, add all the wet ingredients for the sponge: yoghurt, mashed banana, eggs, oil, apple cider vinegar and vanilla bean paste into a bowl. Give it a good stir with a balloon whisk and mix until smooth. Leave to one side.
Into a larger bowl, add all the dry ingredients for the sponge: flour, sugar, cocoa powder, baking powder, bicarb, and salt. Use a whisk to thoroughly mix – integrate all the ingredients now to avoid overmixing in the next step.
Pour the wet ingredients into the larger bowl and thoroughly mix using a balloon whisk. Once you are left with little to no visible flour streaks, use a rubber spatula to wipe down the edges and bottom of the bowl to ensure there are no flour pockets. Add half of the chopped chocolate to the batter and lightly fold through.
Transfer the batter to your greased tin and use the back of a spoon to level out the batter. Sprinkle over the remaining half of the chopped chocolate before popping the tray into the oven and bake for 35 to 38 minutes.
Whilst the sponge is baking in the oven, make the sauce by adding all the ingredients to a pan (bar 1 tsp of cornflour) and placing over a medium heat.
Allow the butter to gently melt, stirring little and often for the sauce to get saucy. Once the sugar has dissolved and the butter has completely melted, allow the sauce to cook for a further 5 minutes to reduce slightly and thicken.
Once the sponge is baked (give the top a press and if it bounces back, you’re all good), remove from the oven.
Use a skewer to poke holes into the sponge (the more the better) before carefully pouring about 3/4 of the hot sauce over the top. Don’t worry about the liquid pooling, let time do its thing. Cover the top of the tin with clingfilm and allow the pudding to sit for at least 30 minutes to soak up all the liquid.
When ready to serve, add the remaining tsp of cornflour to the reserved sauce and heat until thickened until you are left with a velvety smooth, thick pouring sauce. Portion up the sponge into 12/15 generous servings and use a fish slice or spoon to scoop out. Transfer to a serving plate, top with some vanilla ice-cream, a drizzling of the reserved sauce before finishing with a light sprinkling of sea salt.
And then finishing up our recipe haul for this week is for something I have always vouched to not share a recipe for because I believe there are so many recipes for it lurking around on the internet but after the week I have had, I was craving something simple, something delicious and something decadently naughty that I could eat on the sofa whilst I moped about my continued misfortune (I am being dramatic, I have saged myself profusely this week but that’s as mopey as it has gotten).
Something that I could whip together easily whilst I am walking around my kitchen sporting an eye patch (a new post hospital visit addition) and attempting to ignore the pounding pain which currently lives rent free behind my eyeball. I’m talking about that bake that is guaranteed to feature at every bake sale, can be bought in plastic tubs in supermarkets, can either be too sad, too dry, too crumbly, or worryingly underbaked. I am talking about Brownies of course.
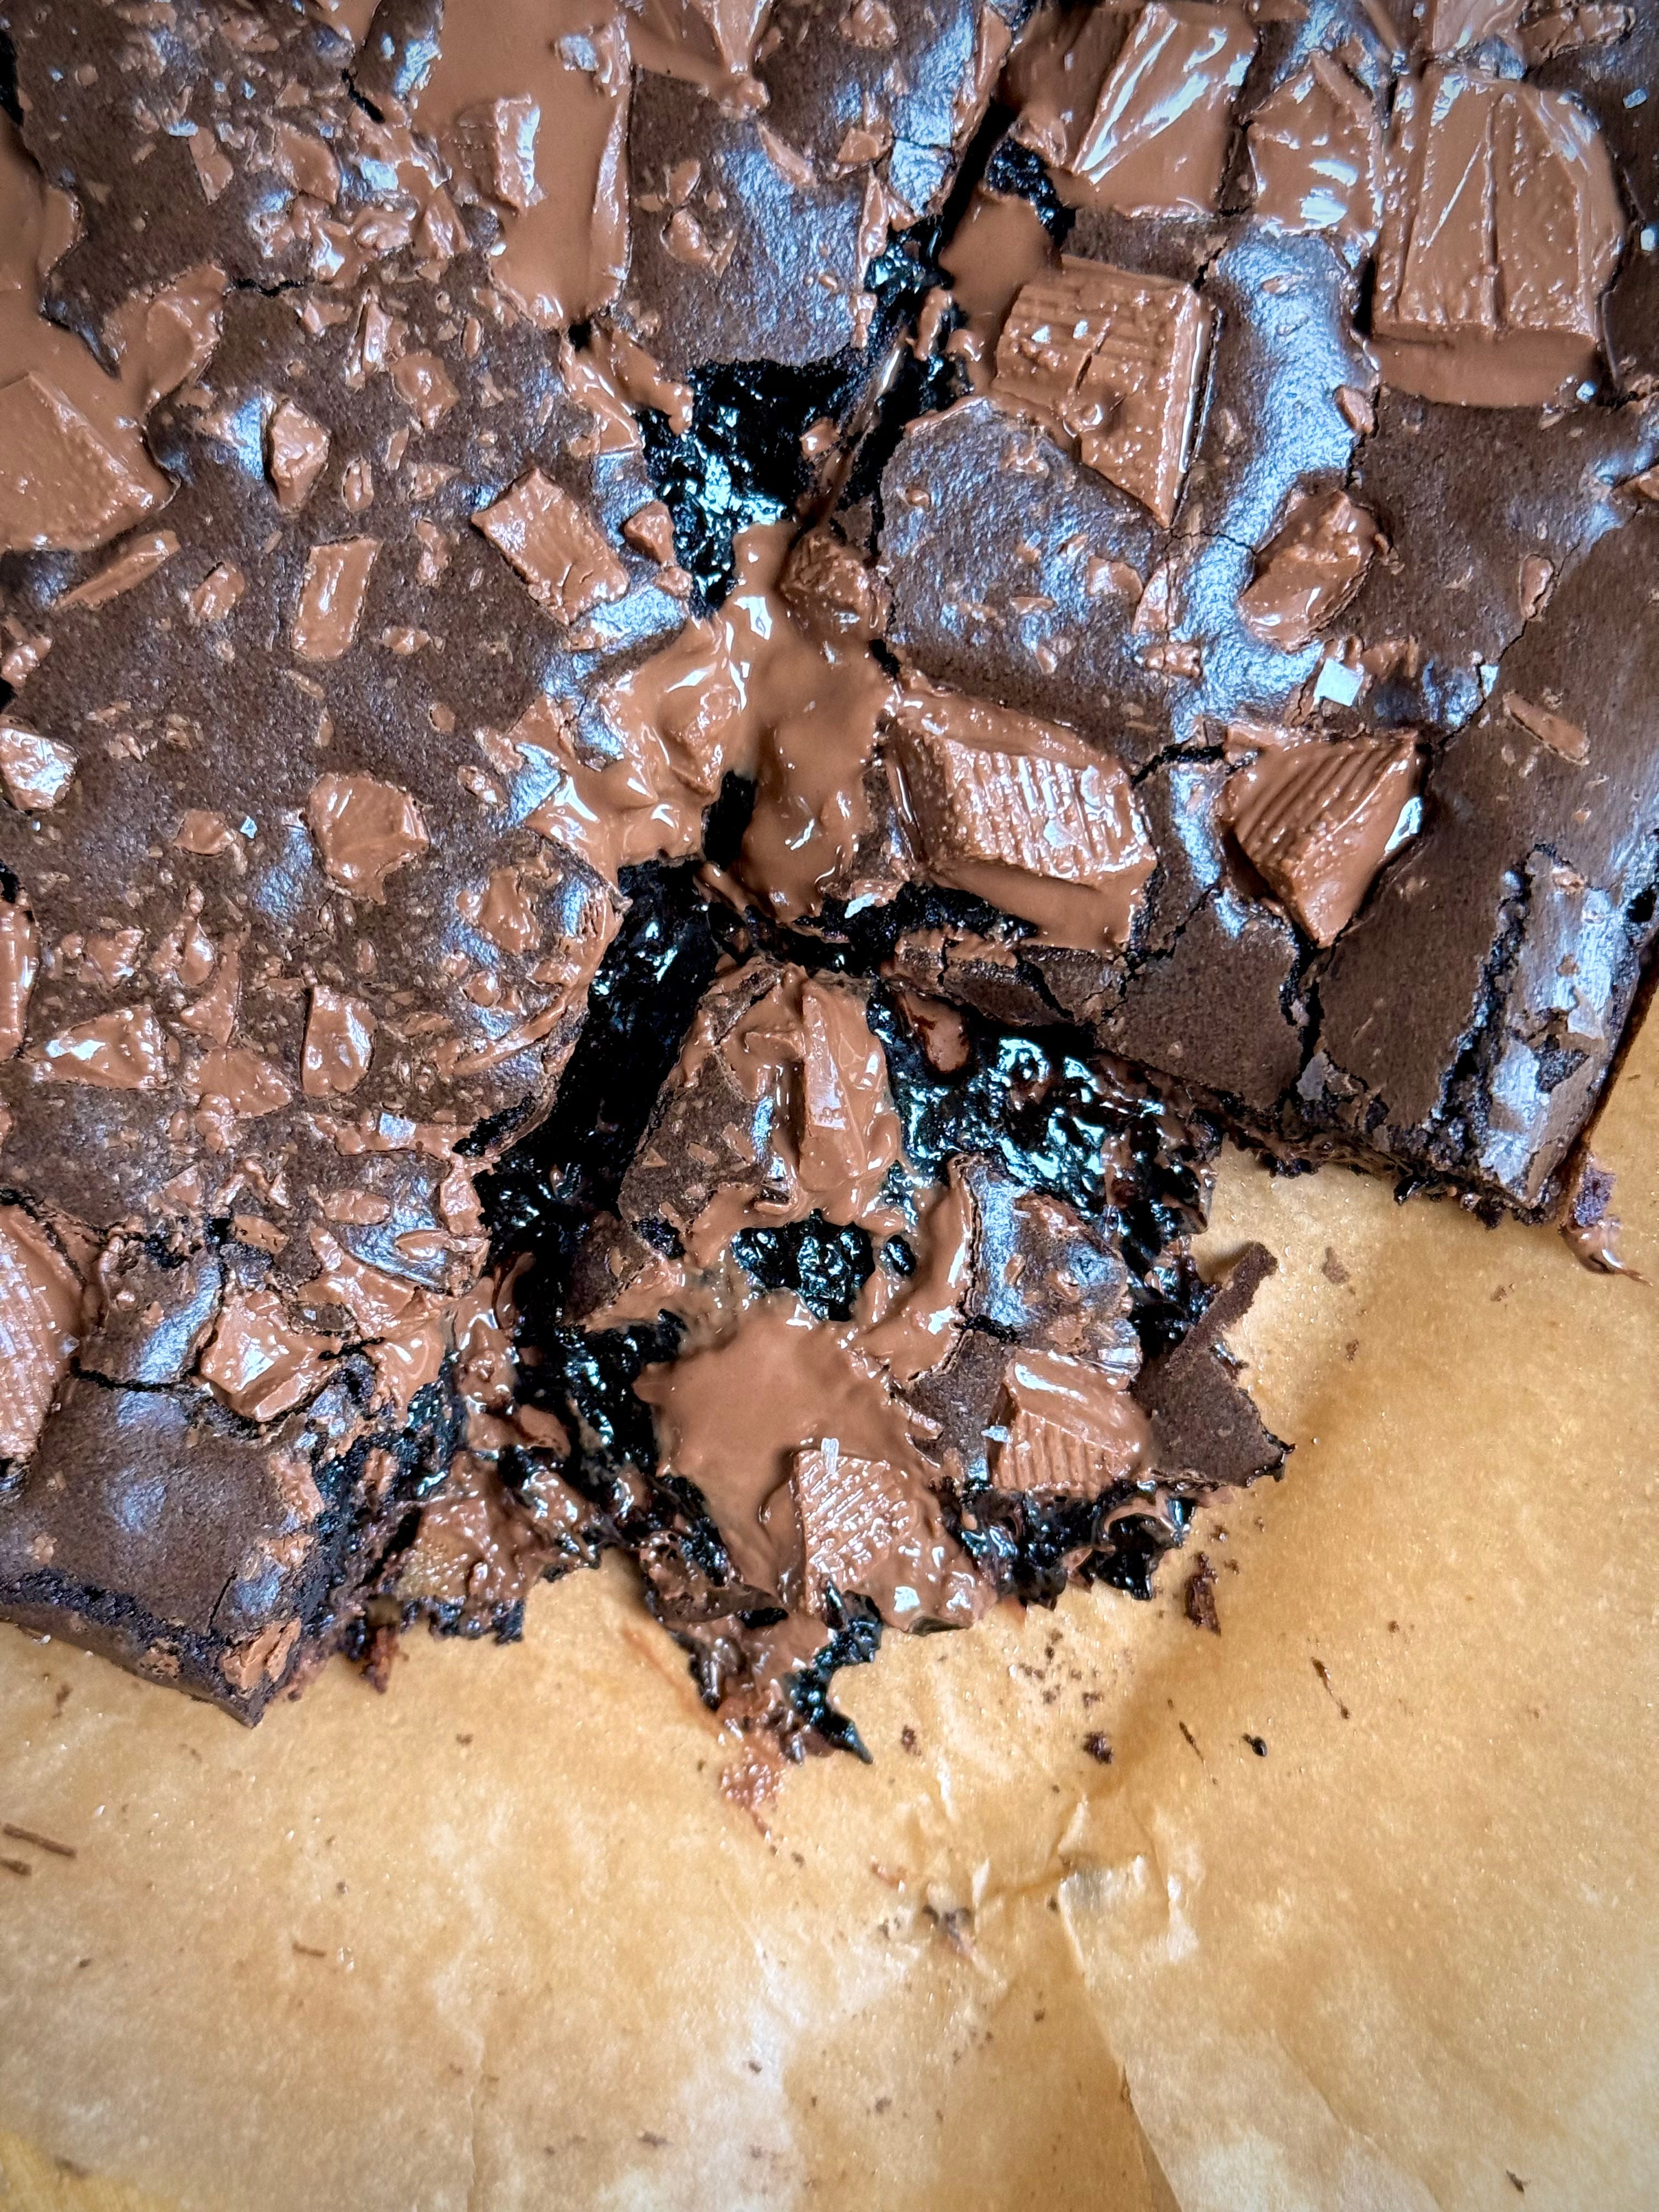
But Brownies done my way. A way in which a brown butter base is MANDATORY, no swirls, twirls or ripples of cheesecake or cookie batter feature, and a way where we hit that oh so sweet spot of well baked and yet perfectly fudgy.
And because if I am finally committing one of my own cardinal sins of sharing a brownie recipe with you, both options (I think I have forgotten to mention I am sharing two variations here, oops), feature a hidden middle layer of something a little naughty and a little unexpected. One version sees a nutella & feuilletine layer, whilst the other features that classic PB & J filling. Two basic brownies done brilliantly well. Will these become your new go to? I sure hope so. They are sweet but salty, rich yet moreish, fudgy but perfectly baked and soft yet well put together. Brownies seem to be that bake that are so easy to make but also so easily messed up.


We have that classic, crackly top, that just baked fudgy middle, ooey gooey insides and crisp crunchy edges for those who like a bit of texture (I’m a middle piece girly so you guys can take those). A small note to say that both of these recipes require a little overnight prep of freezing our hidden middle layer but can easily be made in one day if your tight for time – just make sure you freeze your filling first thing and bake later in the afternoon, allowing a solid few hours for the brownies to set before serving in the evening.
And whilst I have given you options for two different fillings below, if they don’t set your tastebuds tingling, how about trying some other crowd pleasing faves like:
Biscoff spread topped with broken biscoff biscuits
Booze soaked cherry compote
Store bought caramel
A simple layer of white chocolate topped with freeze dried strawberries
And of course, the trend that was everywhere and now everyone hates, pistachio kataifi (aka dubai chocolate)
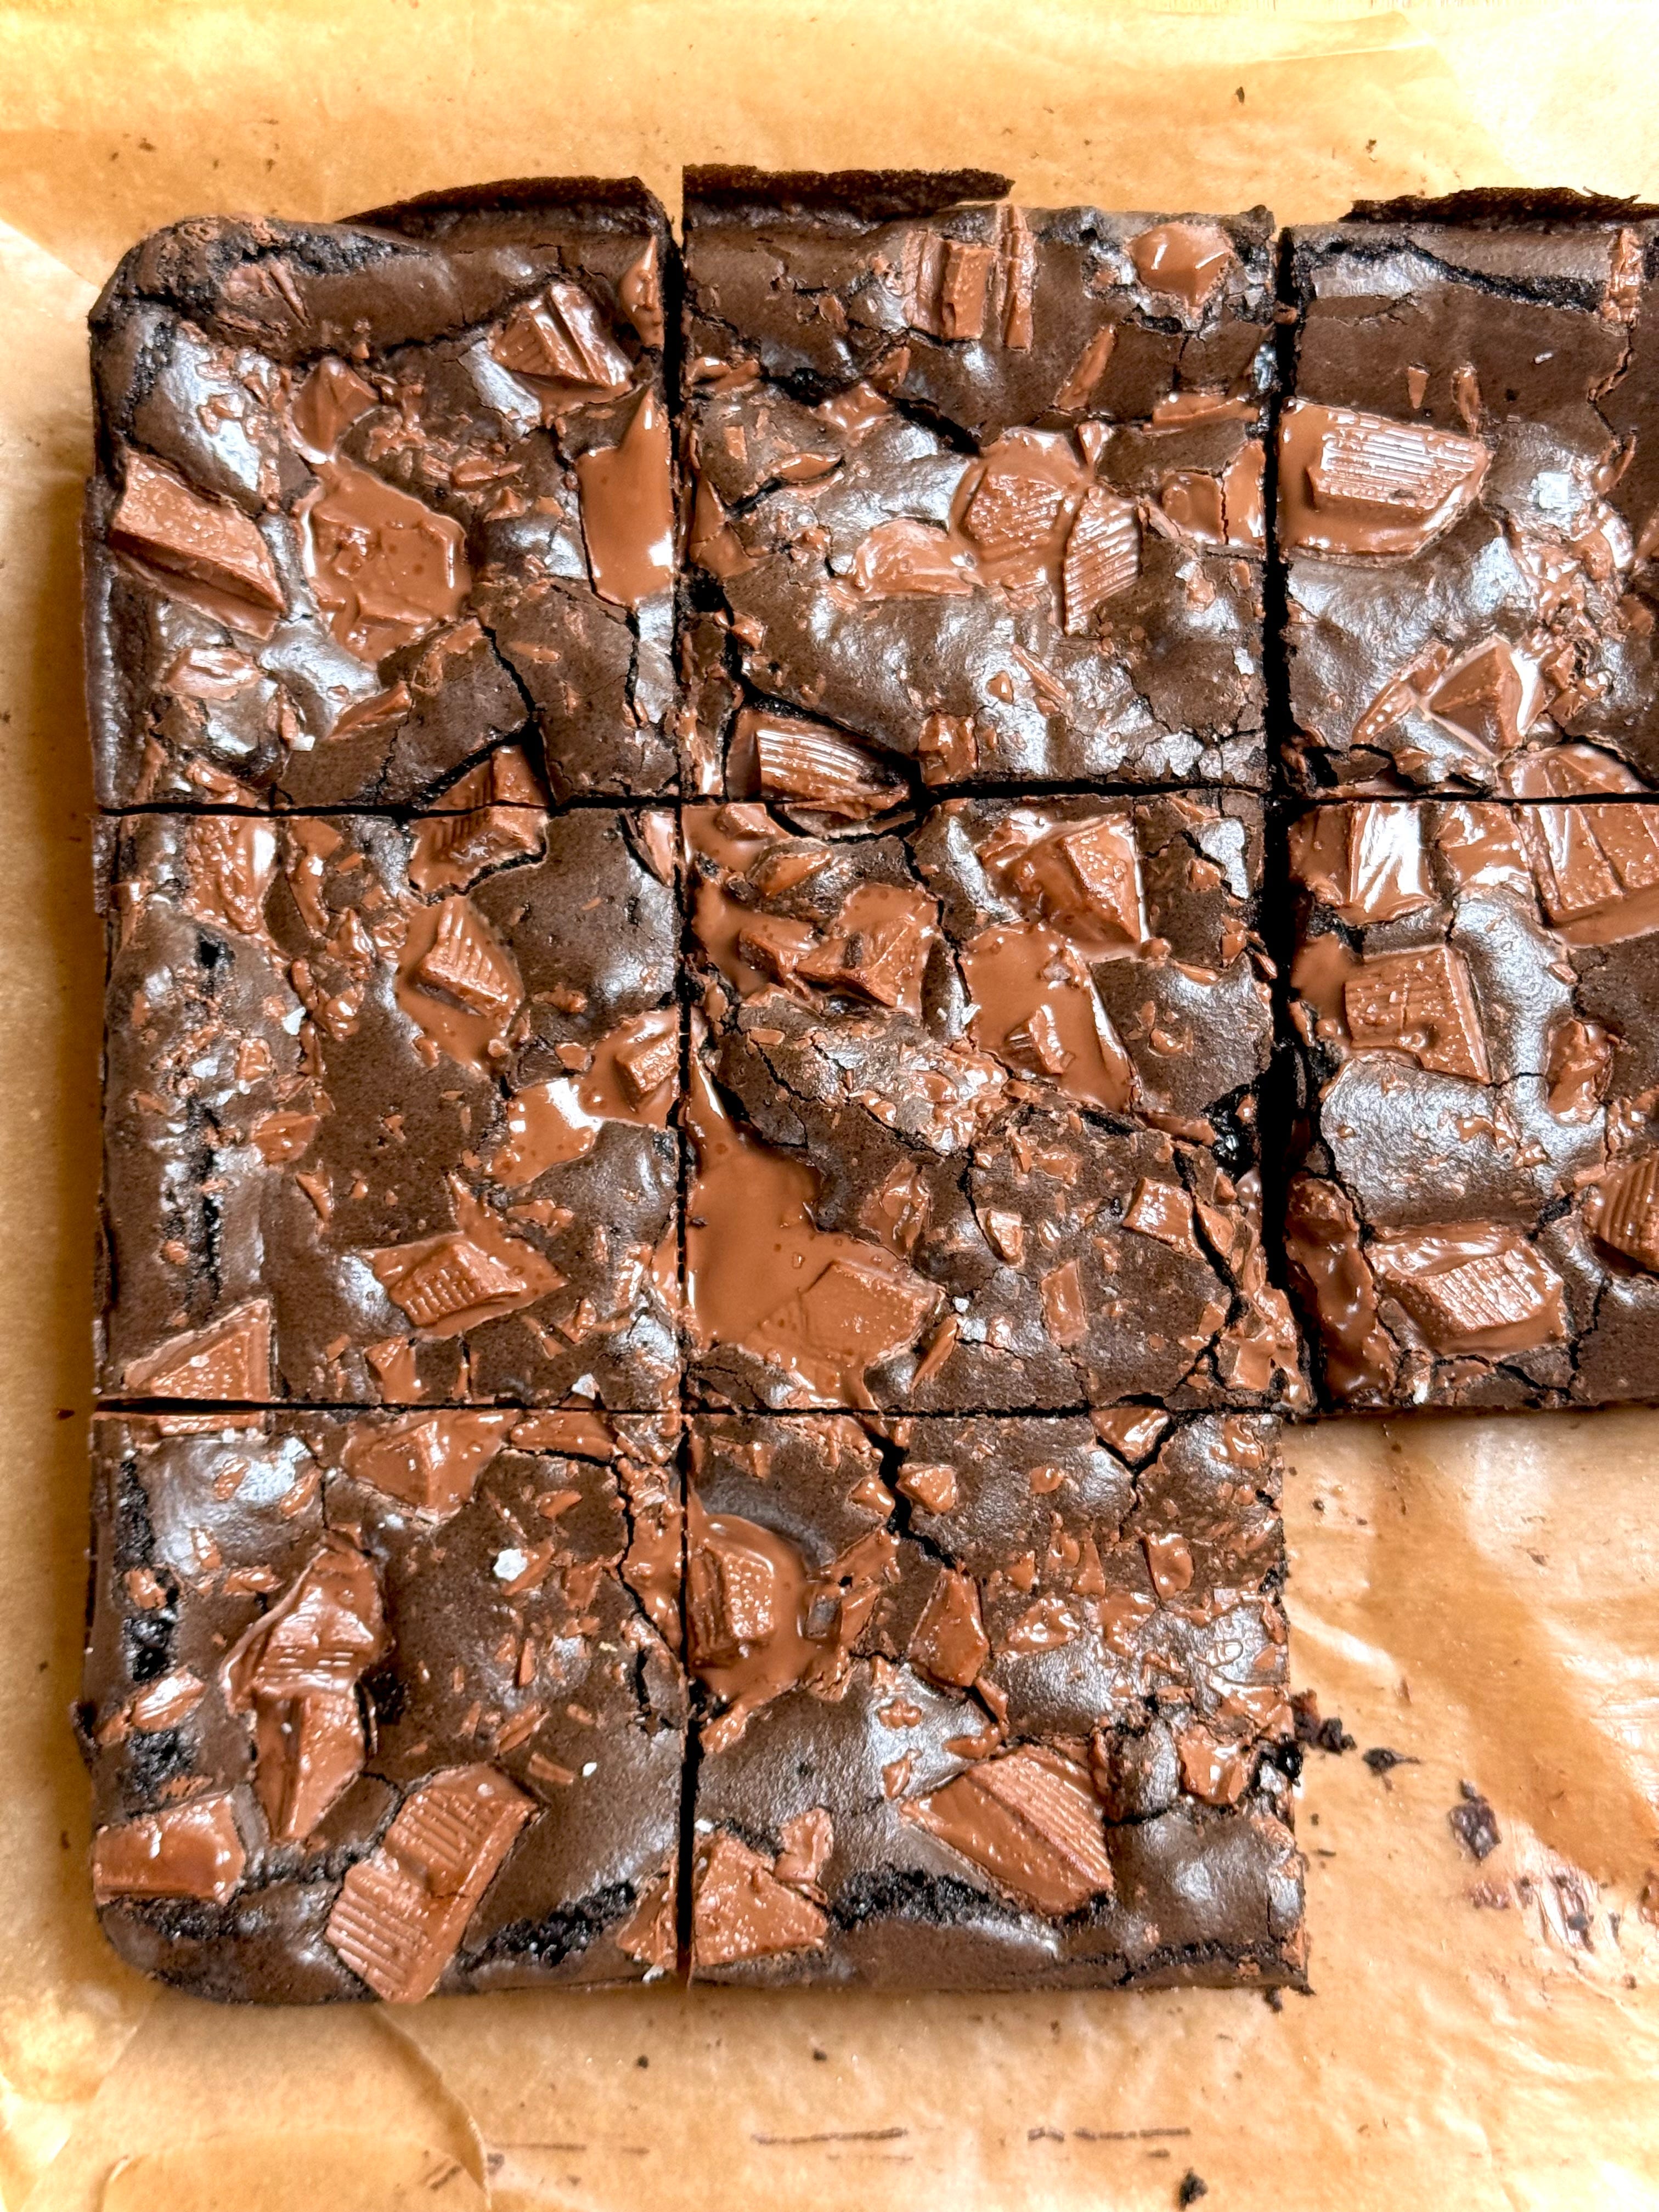
Recipe Makes: 2 x 23 by 23 cm / 9 by 9 inch tins
Recipe Serves: 1 batch of brownies makes 9 generous squares
