

Banana Pudding Tiramisu
Italian friends, sorry for the cardinal sin but I promise you, it’s worth it. We also have my Malt & Milk Choc number making a comeback, plus the two latest Around the World Cakes.


Hey Friends!
It’s heatwave week again in the UK but I am going to spare you my incessant whining over it and instead ramble over something equally as boring – yes folks, I am now in my DIY era. Who would have guessed it? Absolutely not me but then absolutely also me. I have always been partial to putting together bits of furniture or giving something a smothering of paint (just don’t expect me to be taping the walls cause I ain’t got the time nor patience for that) so this shouldn’t be a big surprise to myself but that feeling of self-gratification that comes through (or is it smugness? TBD) once something you’ve put together with your own hands takes shape, damn that feeling is good.
Which now reflecting back on it, makes total sense as to why I live for cakes and baking so much, and never lasted more than a few years in the architectural world. Yes, long term projects can be good but ya girl is impatient and I want to see progress in 2 to 3 working days max. Whilst I am making out as if I am building the Sistine chapel over here, what we have put together is a gym…or a glorified shed. But home gym sounds more snazzy.
We have a tonne left to do on it, kit it out, decorate the inside but the walls are up and painted, electrics have been installed, floor has been cut and added (painfully can I say) but as I am sat here in my garden staring at our handywork, I’m feeling that feeling which we are never supposed to admit out loud…and that is pride.


James and I initially were going to pay an extortionate amount of money for a pre-fabricated version, all finished and decked out to be literally craned into the garden but for some unknown reason, we decided to give it a go ourselves and thank goodness. I mean, has he accidentally painted the room trim the wrong colour from the rest of the gym? Absolutely. Did I get more paint on the windows than on the actual frame itself? Duh. But this hodge podge attempt is ours and I love it.
Home improvements were never part of the plan or on our radar but having done the gym for a smidgen of the original price, I’m now thinking what else can we do and should I buy myself a handbag with the surplus cash to congratulate myself? Answers on a postcard but only if the answer if yes. I am not here to surround myself with negativity my friends!


Really unsure as to why I decided to share about our shed reno but the rambles flow where they needa go. Hopefully next time I check in with you, I’ll have some better goss to share with you OR I’ll do some holiday recco’s as I am away to Greece next week for a mini-moon redo (remember e.coli gate from last year??). Either way, thanks for being here so I can free up some brain space.

I promise, when I am back from my travels, that the next newsy will go back to including some savoury bits and bobs – I have good reasoning as to why its been so sweet heavy of late but I’ll spill the deets on that next time. For now, we have:
The first of our Around the World cakes, which sees us pay a little trip to Bulgaria for their Torta Garash. Think walnuts, think meringue, think chocolate and then more chocolate to finish it all off. If you like desserts that aren’t overly sweet, this could be your gal.
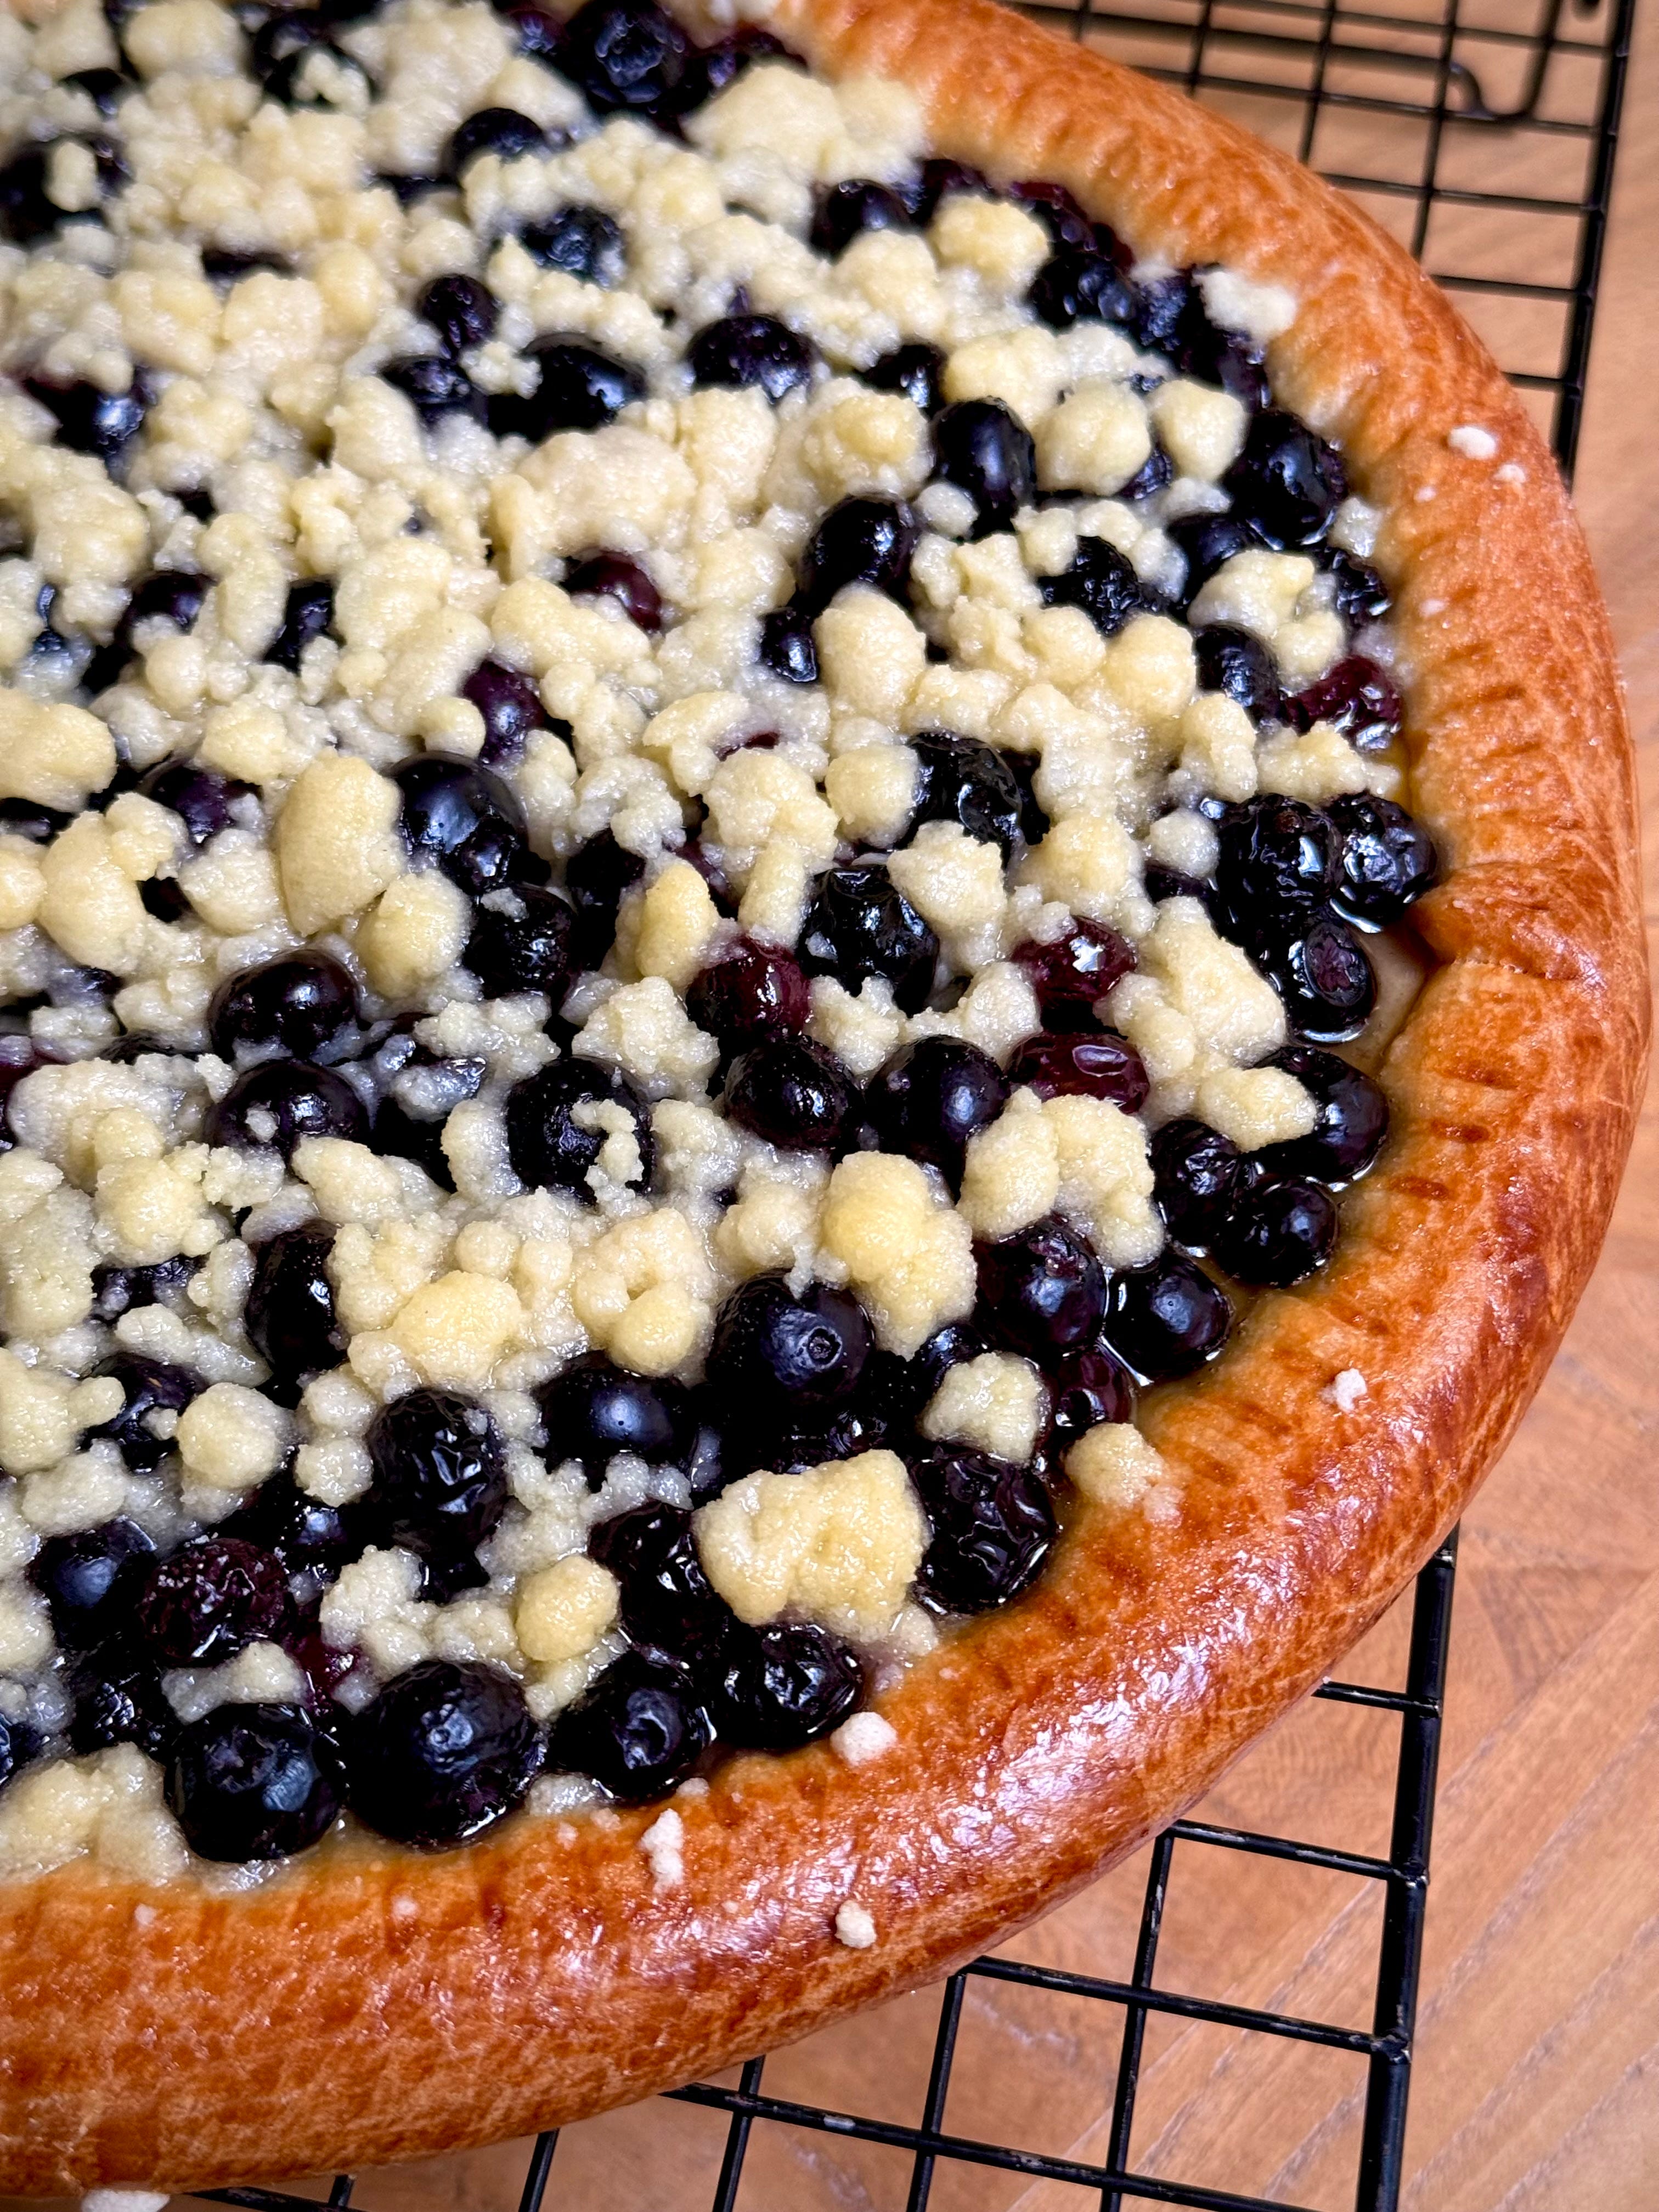
Our second Around the World cake takes us back over to Czech Republic for a Valašský Frgál – a sweet, thin layer of yeasted dough, topped with a singular filling (we’ve gone for blueberries here) plus a crumble and then bathed in a spiced rum butter. Baked until golden brown, it looks more like a sweet pizza than a cake I am more familiar with but it’s a tasty little morsel which doesn’t require any niche ingredients or a tonne of skill or time.


Moving onto our first tiramisu offering – it’s one of my all time fave desserts and one I will never EVER stop reminding you about because I’ve only ever had rave reviews from everyone who has tried it or anyone who has made it. My Malt & Milk Chocolate Tiramisu is the perfect sweet treat for anyone who doesn’t enjoy a heavy tasting coffee dessert and/or is looking for a kid friendly alternative. A no bake pud in this weather? Sign me up my friends. This would be without doubt on the menu at my future (aspiring) bakery.
Finishing up the menu this week, is the main bake of the day, it’s my Banana Pudding Tiramisu. All I am going to say is, don’t knock it until you try it. Yes, it looks slightly like slop but it will be some of the tastiest smush you have eaten for a long time. We’ve got all the hallmarks of a traditional tiramisu with the soaked lady fingers and a mascarpone enriched sabayon but with all the usual suspects of a banana pudding (shout out magnolia bakery for the OG). Think custardy, biscuity, banana-y filth, topped with hundreds and thousands if served up in a coupe because we aren’t above a bit of basic fun over here.



Getting things off to a strong start, we are getting stuck into the latest Around the World Cakes. Both cakes also feature in my new book coming out in September but with tweaked, reworked and redeveloped recipes so would highly recommend (obvi, not biased in the slightest) checking that out and pre-ordering so you are locked and loaded with options ready for cosy season.
First up, we head to Bulgaria for their Torta Garash. First made back in 1885 by Kosta Garash, featuring just a handful of ingredients, it is known for its simplicity and rich chocolate flavour.
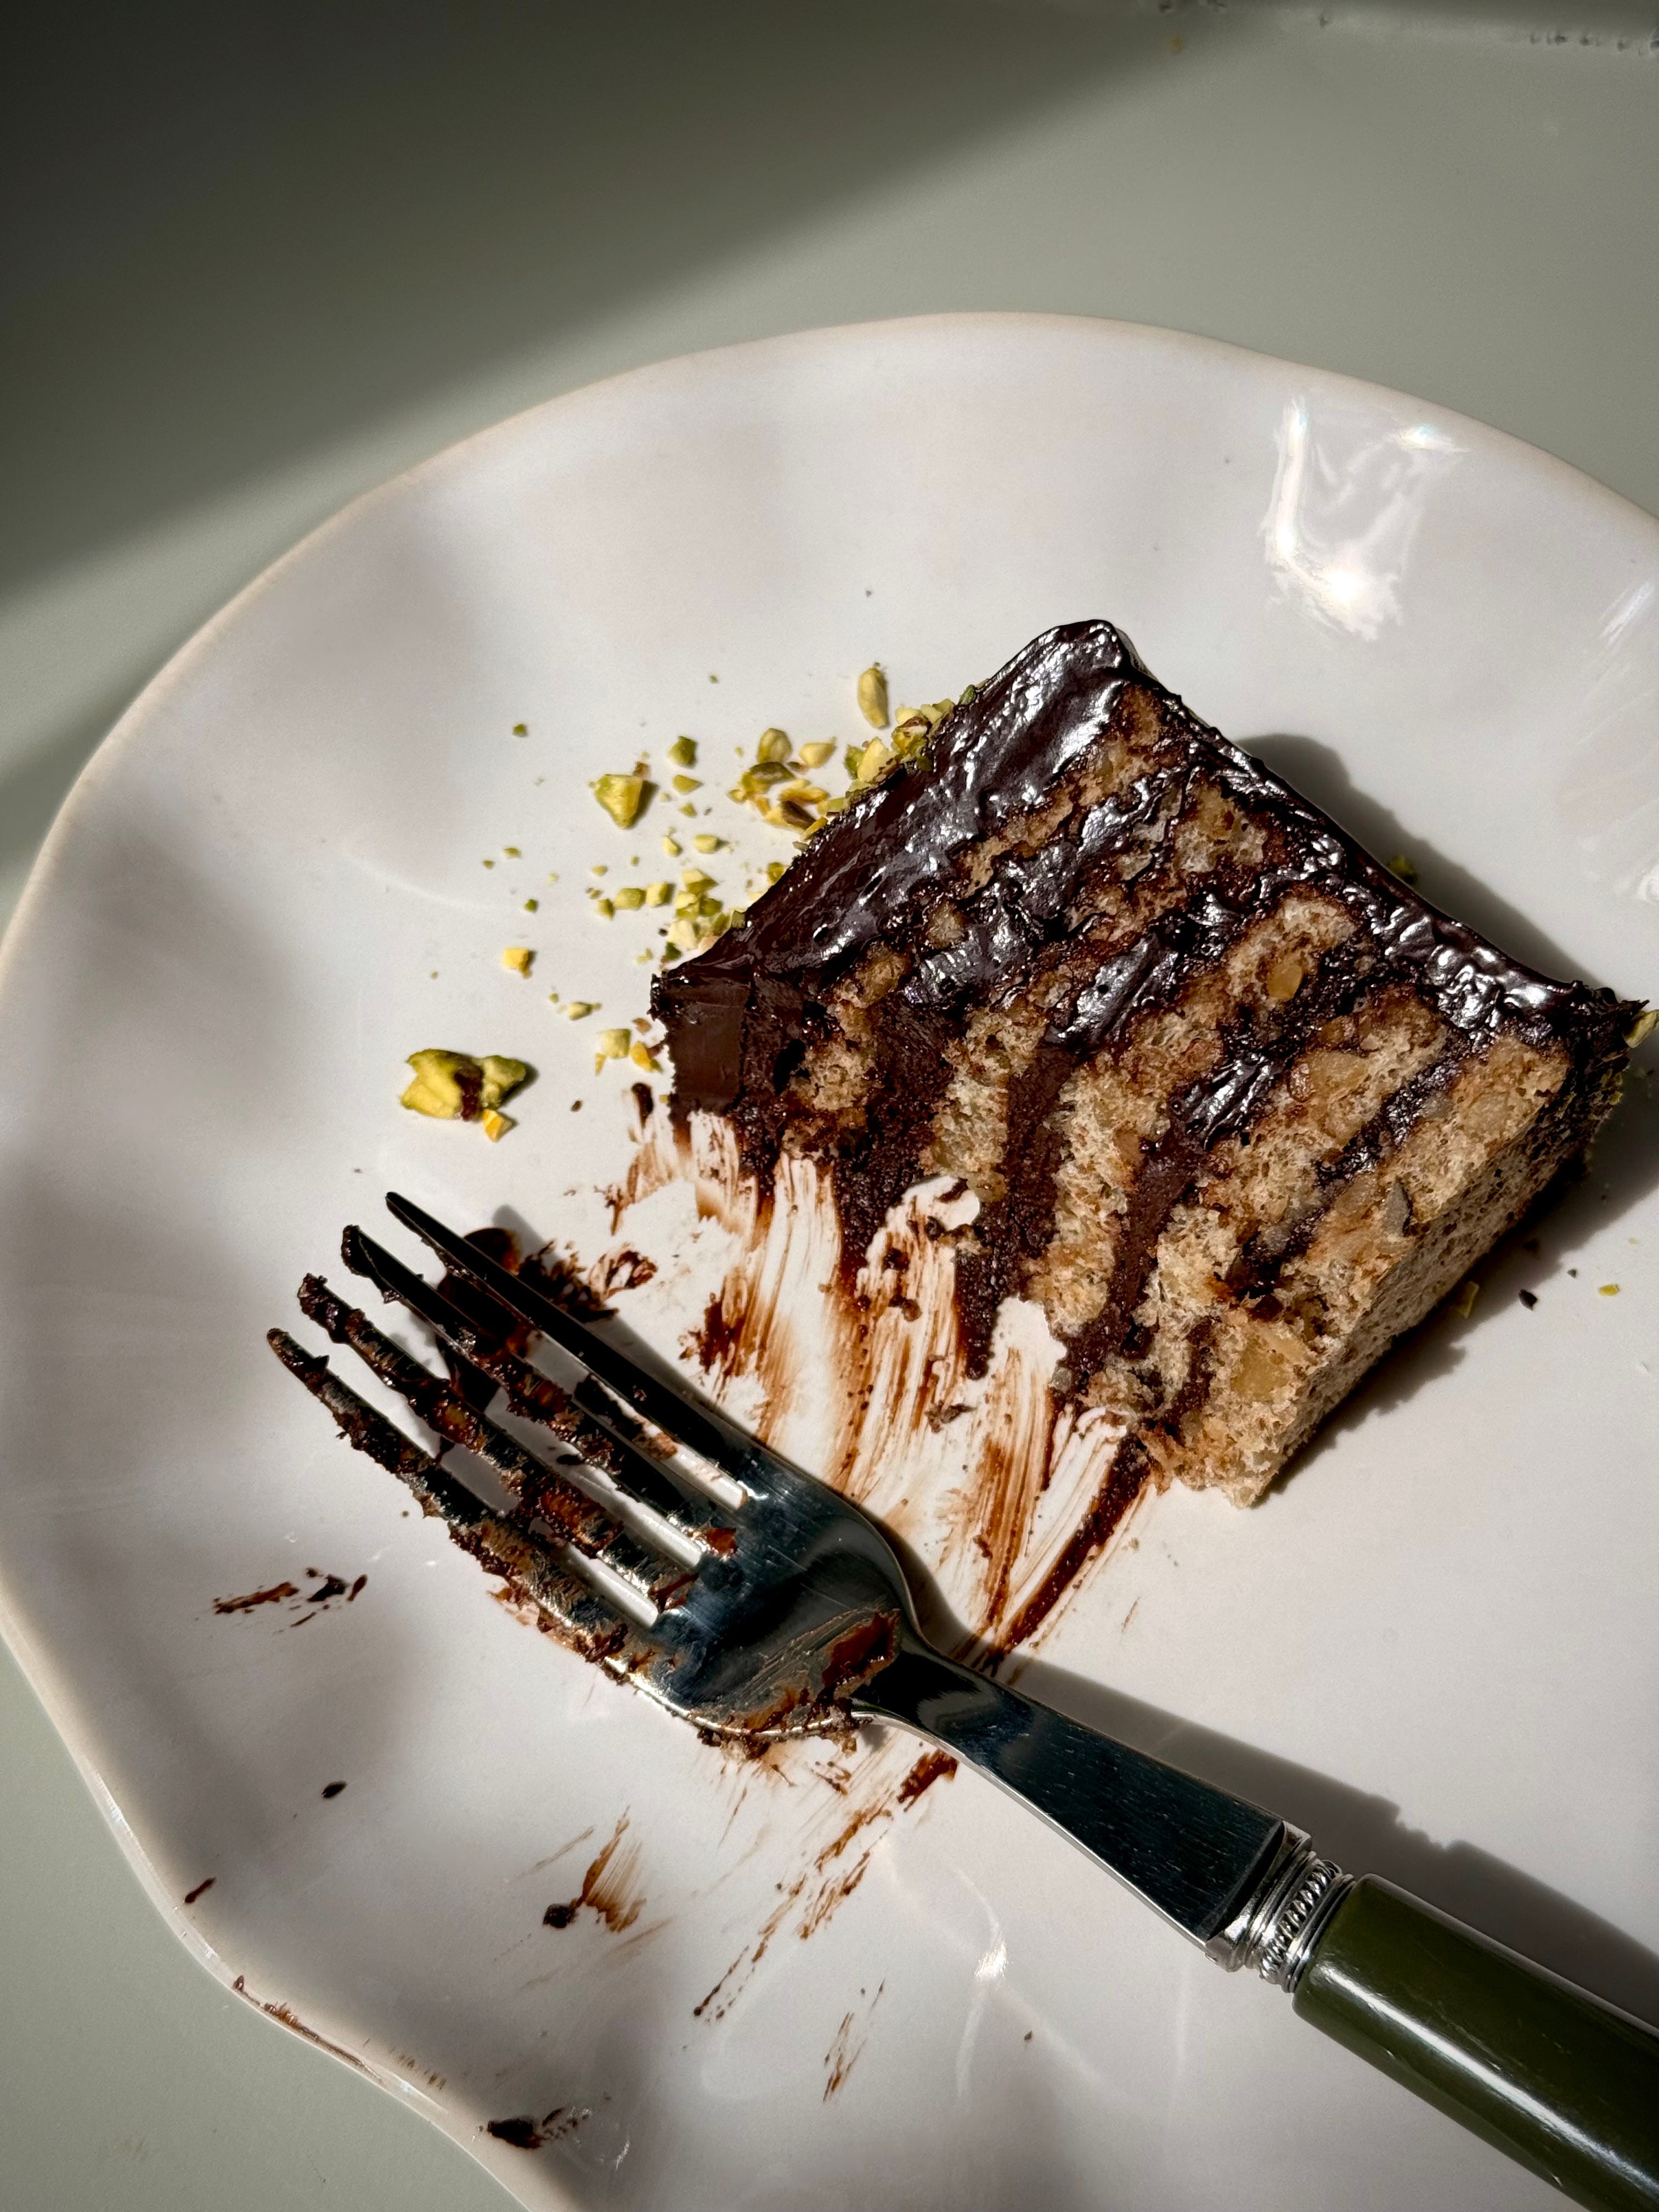
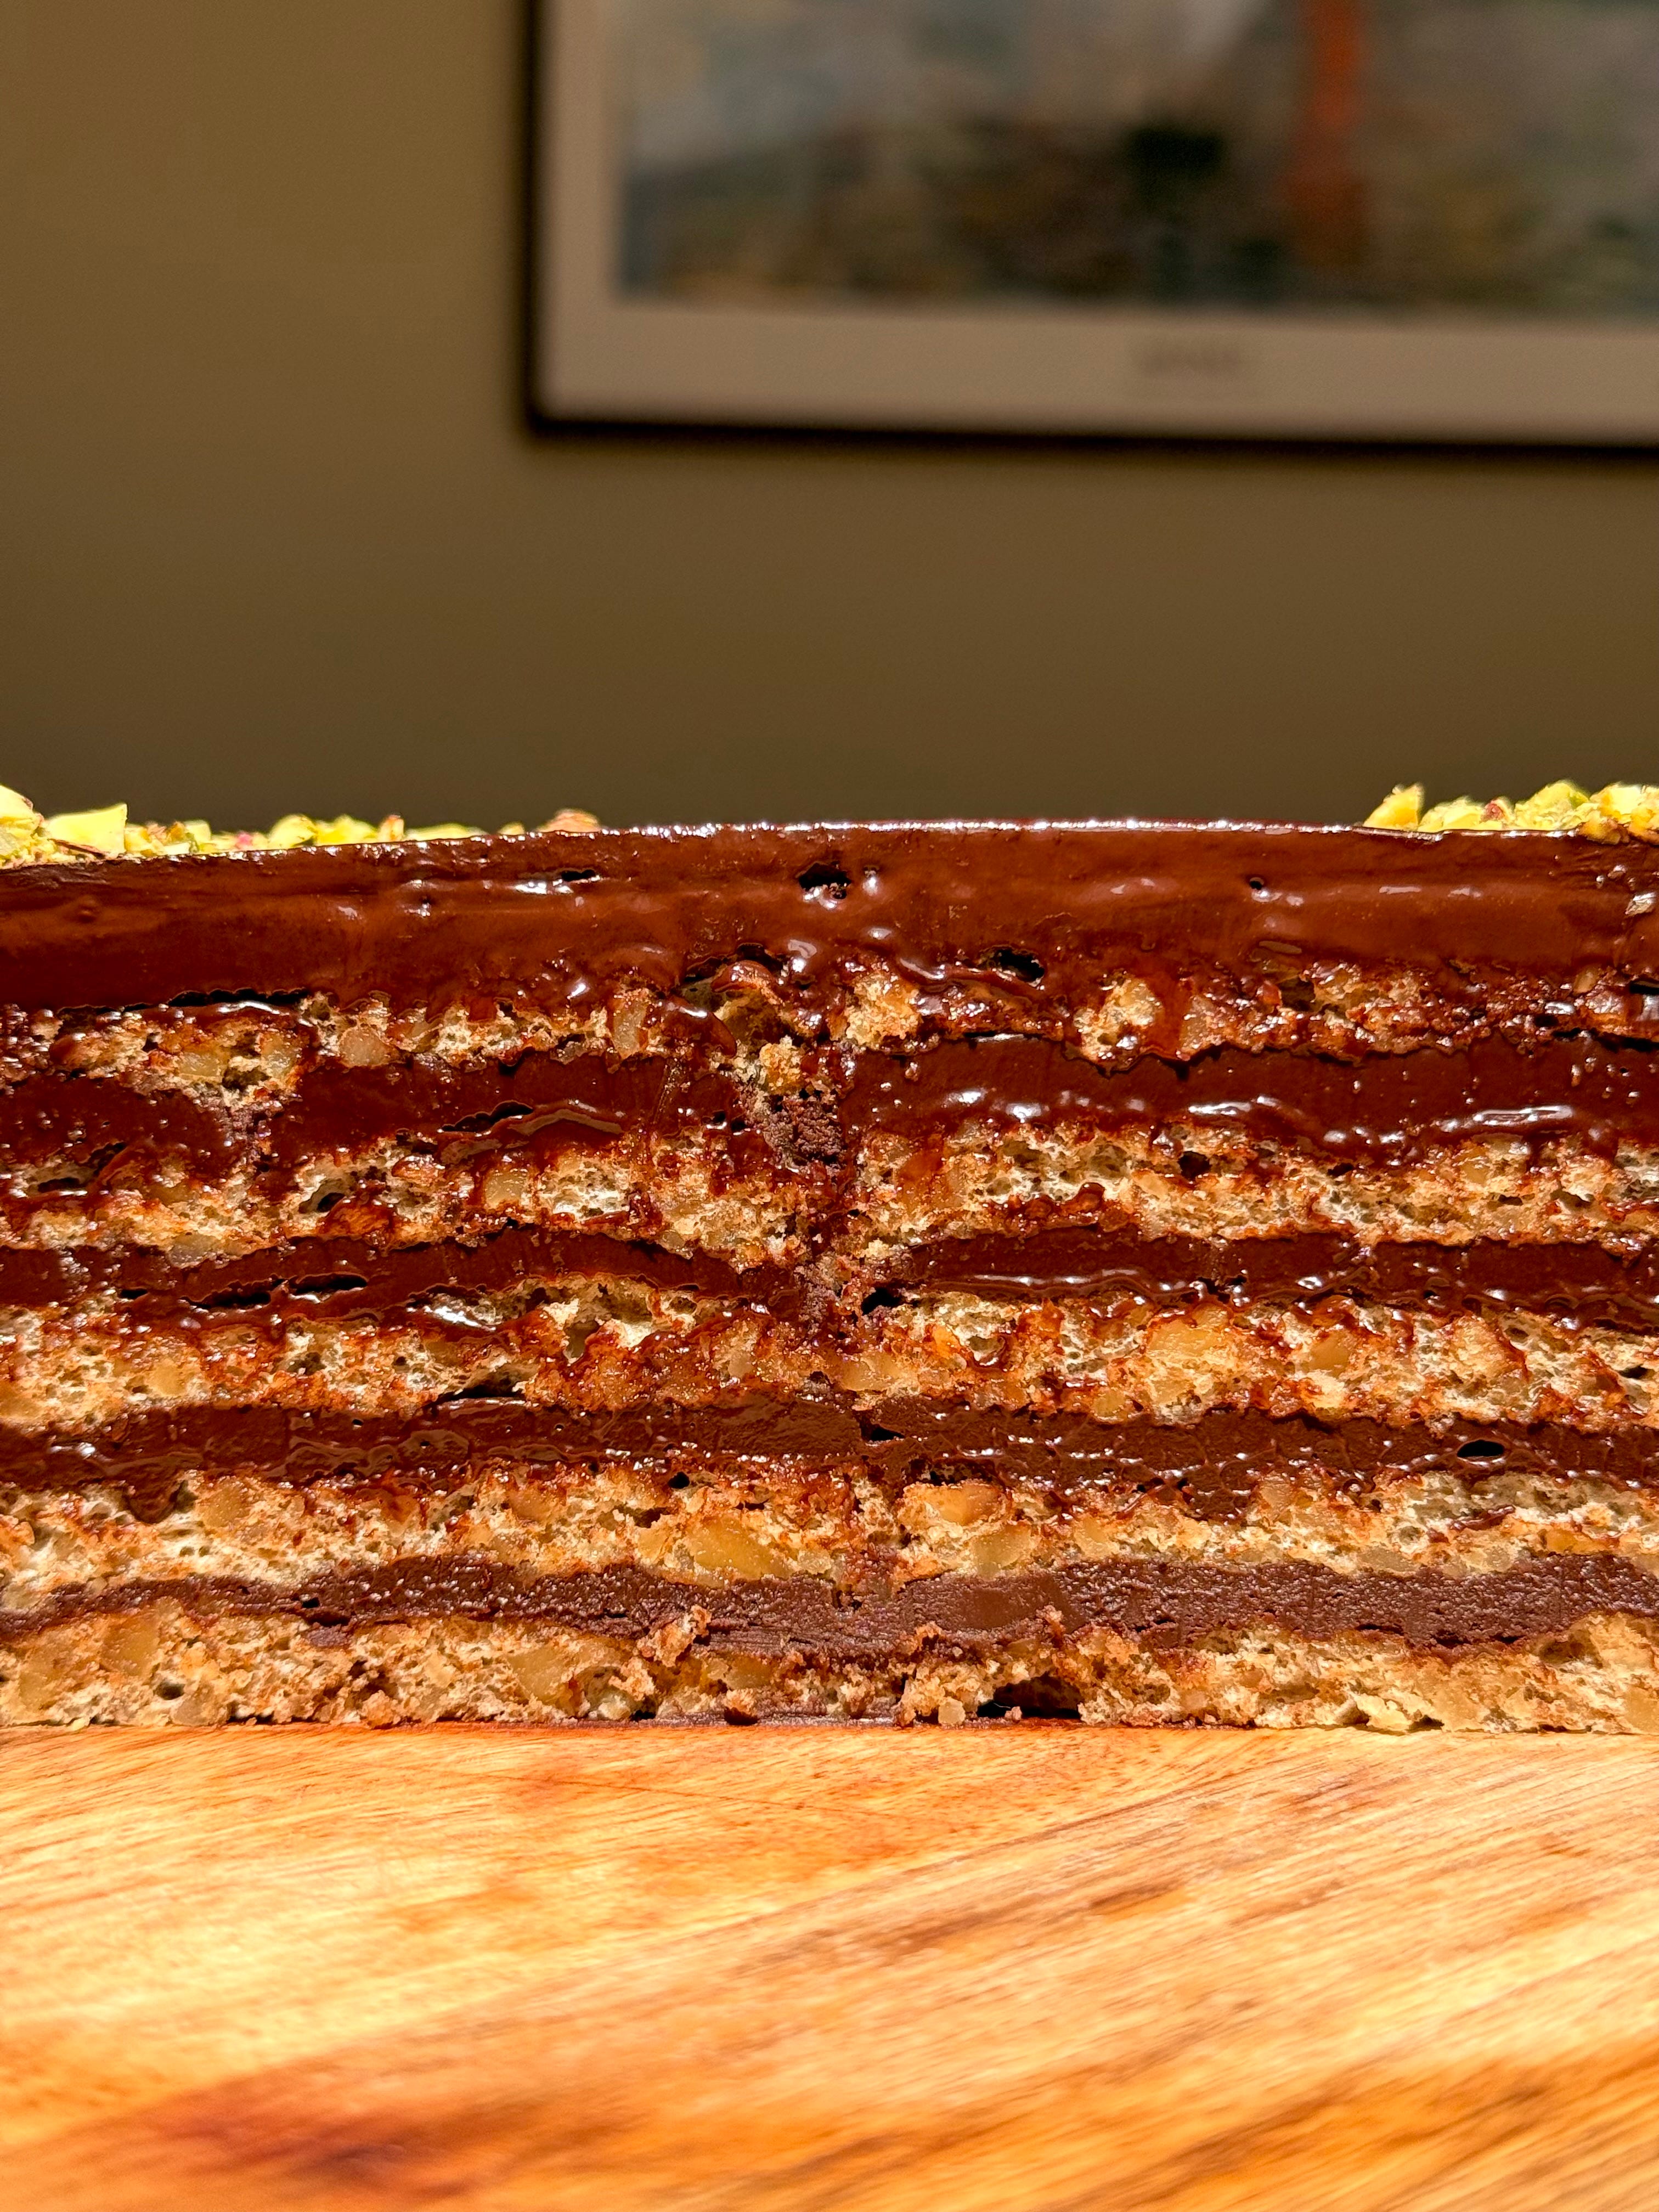
Made up of nothing but 5 layers of walnut meringue, sandwiched between a dark chocolate cream and finished with a simple chocolate glaze and sprinkling of chopped pistachios - this cake seems to be following suit of the others which came just before it, shunning interesting flavour combinations for something a little more one dimensional.
I had big hopes for this cake, with it being the last before we head into the top 10 but felt like there wasn’t much going on in the cake to keep me interested in eating more than just one or two bites. For a seasoned chocolate fiend like myself, it was too rich even for me BUT with a few tweaks and a hefty pinch of salt to help balance the flavour, I think it could be vastly improved.
The below – despite being told by many of my Bulgarian friends on insta that it isn’t correct, featured on lots of websites claiming to be an authentic recipe. IF my research and findings have done me dirty, I wholly apologise and whilst I think it has a good foundation for something deliciously delectable, I would highly encourage amending the below to something that suits you. Maybe switching out the walnuts for something like hazelnuts or almonds, or lightening the heaviness of the chocolate cream filling for something less bitter like milk chocolate and a good pinch of salt?


Play around with the below but don’t play around with the version you’ll find in my new book. Cause that baby? That baby is perfect.
Recipe Makes: 5 x 20 cm / 8 inch cake tins
Recipe Serves: 12 – it’s a small but mighty cake
Y O U – W I L L – N E E D –
Walnut Meringue
8 Large Eggs, whites only
130 g Icing Sugar, sifted
350 g Walnuts, finely chopped
40 g Plain Flour (optional)
Chocolate Cream Filling
400 g Dark Chocolate, chopped
400 g Double/Heavy Cream
50 g Caster Sugar
50 g Golden Syrup* (can sub for equal quants caster sugar)
Chocolate Glaze
250 g Dark Chocolate
40 ml Neutral Oil
Handful Chopped Pistachios, to finish
* you won’t find this addition in recipes online, this was a small tweak by me for a more glossy, fluid finish
M E T H O D –
Preheat the oven to 150C Fan/170C/340F and grease and line as many 20 cm / 8 inch cake tin that you have. I baked this in two batches, seeing little difference in the second batch.
For the walnut meringue, add the egg whites to a stand mixer bowl and use the whisk attachment on a medium soeed to mix until the whites begin to reach stiff peak.
Begin to add the icing sugar, one spoon at a time, allowing each addition time to mix in well. Once all the sugar has been added, increase the speed slightly and mix until you are left with a thick, glossy meringue.
In a separate bowl, add the walnuts and flour and mix to coat, before folding in through the meringue. Be gentle but be thorough to ensure it is well combined.
Transfer the meringue to a piping bag, weighing the mix and dividing by 5 to ensure you add equal weight to each tin. Mine was approx 155 g per tin - use the back of a spoon to level off the added meringue for an even layer before popping into the oven to bake for 12-14 minutes, until the tops are lightly golden.
Once baked, allow the meringue to sit in the tin for a few minutes before turning out onto some greaseproof paper sitting on a cooling rack. Carefully peel off the greaseproof paper off the back of each meringue layer - note, the meringue will be slightly sticky and tacky so be gentle. Leave to completely cool.
Whilst cooling, add all the chocolate filling ingredients into a pan. Place over a medium heat (you may prefer to use a bain marie if you have a gas hob) and gently cook until the chocolate has melted. Give everything a good mix until smooth and leave to cool until thickened.
Once the meringue is cool, begin to construct the cake by adding a layer of meringue to your cake board (go for one same size as the cake for ease when glazing). Add 1/5 of the chocolate cream filling on top, using an offset palette knife to smooth over for an even layer. Top with another layer of meringue, repeating until all layers are used.
Use any remaining cream to crumb coat the tops and sides before placing into the fridge to set for at least 2 hours.
To finish, make the glaze by melting the chocolate and oil together until fluid. Leave to cool until lukewarm. Transfer your set cake to a wire rack with a tray positioned underneath. Pour over the chocolate glaze, catching any surplus before reusing to glaze again.
Once all the chocolate has been used, leave to set for 30 minutes before topping with chopped pistachios.
Leave to completely set before using a warm knife to slice and serve.
Moving onto the latest Around the World Cake – that is right my friend, we are officially on the home straight now. Only took us 3 years to get to this point by oh me oh my, the end is so close! Coming in at number 9, we are heading back over to Czech Republic for the last time, for their Valašský Frgál.
Now between you and I, yes you are seeing this cake before instagram does but let’s keep that secret between us okay? I had initially posted the vid on wednesday evening which coincided with when instagram when down so my video disappeared into the ether never to be found again so need a teeny bit of time to redo. Remember, we say nothing and act surprised when we see it again over on instagram for the ‘first time’. Cool? Cool.
Before we begin and get stuck in with the nitty gritty here, let’s address the other teeny tiny elephant in the room. Yes. This does indeed look more like a sweet pizza slash pie slash pastry slash galette more than it does a commonly found sponge-based cake. That being said, it’s a real interesting (and this is by no way a means a detraction or deflection) addition to the list. Featured so far, we have had everything from stacked bonanzas, to single layered, to sandwich cakes, to tray bakes, to filled, to stuffed, to multi-layered cakes and everything in between. So it’s nice to have another variation, showcasing difference in interpretation, meaning and technique.


I love the back story of this cake (I touch upon it in more detail in the new book) and to briefly summarise, it was a mistake. And what a mistake bake it has turned out to be. So cherished and treasured over in the Morovian Wallachia region, it was granted a Protected Geographical Indication back in 1992, meaning that only cakes from that region can be baked, made and sold under the name of Valašský Frgál.
As you would expect from any cake with a PGI or PDO certification, they are a little hot on what the sweet pastry can be topped with. Traditionally you’ll find it with only one filling and never mixed – popular iterations include a poppy seed number, one with plum jam, topped with slices of pear or even cheese curd. More recently you’ll find a blueberry version knocking around which is what we’ve gone for here, with the obligatory drobenka (crumble or streusel to you and me) topping before being finished off with a spiced rum butter glaze.
It’s simple, doesn’t require any niche ingredients and comes together quickly and easily. I may or may not have broken strict protocol on my interpretation of a Frgál in my new book, which features a chai and apple caramel topping instead and let me tell you, combined with the crumble?? Heaven. Absolute heaven. It is cosy, comforting, scrumptious and insanely moreish. Sweet pizza? You gotta fan in me.


Recipe Makes: 2 x 12 inch dough rounds (the below makes 2 Frgál’s)
Recipe Serves: You’ll get 8 good slices from each
Y O U – W I L L – N E E D –
Yeasted Dough
350 g Plain Flour, sifted
120 ml Whole Milk, lukewarm (38 to 42C/100 to 107F and no hotter)
2 tsp / 6 g Active Dry Yeast
85 g Unsalted Butter, melted
1 Large Egg, yolk only
80 g Icing Sugar, sifted
Pinch of Salt
½ Lemon, zest only
1 Large Egg, beaten for egg wash
Streusel/Crumble (remember the below is for 2, so divide the quants in half if you are making just 1)
140 g Plain Flour
120 g Unsalted Butter, fridge temp & diced
120 g Caster Sugar
Blueberry Topping (remember the below is for 2, so divide the quants in half if you are making just 1)
800 g Blueberries, fresh
3 tbsp Caster Sugar
Spiced Rum Butter
150 g Unsalted Butter, melted
3 tbsp Spiced Rum
M E T H O D –
Begin by making the dough. Add the flour to a stand mixer bowl and make a well in the middle. Add the flour, 2/3 of the warm milk and a tsp of sugar.
Use a fork to lightly mix some of the flour into the milk, before covering the bowl with a clean dishcloth. Leave to sit somewhere warm for 30 minutes.
After 30 minutes, add all the remaining ingredients, bar the egg for the egg wash. Using the paddle attachment, mix on a medium speed for 5 minutes. Once a dough has formed, switch out to a dough hook and mix on a medium speed for another 5 to 7 minutes until the dough is soft, smooth and elasticated.
Transfer the dough to your worktop. Gently work the dough into a round ball, before dividing in half. Roll each half into a ball before transferring to a lined baking sheet. Cover with a clean dishcloth and leave to rise for 1 hr 30 to 1 hr 45 minutes in a warm place. I normally opt to prove in an unheated oven with a tray of boiling water placed at the bottom but with the hot weather this week, found leaving it out on my worktop to be sufficient.
Whilst the dough is proving, make the drobenka/streusel. Add all the ingredients to a bowl and use your fingertips to rub the butter into the flour until you are left with a chunky breadcrumb consistency. If the weather is warm, transfer the crumble mix to a lined baking sheet and place in the fridge.
Once the dough has proved, mark out a 30 cm / 12 inch circle on two sheets of greaseproof paper. Flip the sheets over and use the circles as a guide. Place a dough ball into the middle and roll out to the circle edges. If the dough sticks, lightly sprinkle a bit of flour on top but try to resist the urge to add more to prevent a dry base when baked.
Fold in the edges approx. 2cm to create a border. Brush the egg wash over the folded crust and press in a fork all the way around the edge to help seal the dough.
Add 400 g blueberries to the middle of the dough, evenly distributing. Sprinkle over half of the caster sugar (remember the ingredients listed are for TWO frgals) coating the top before liberally adding the chilled drobenka on top (again, using only half).
Transfer the greaseproof paper to a baking sheet and leave to sit at room temperature for 20 minutes. In this time, preheat the oven to 150C Fan/170C/340F.
After the second short prove, add to the oven and bake for 20 minutes. After 20 minutes, rotate the sheet around and bake for a further 5 to 10 for even browning (I would go for more to ensure you don’t have a soggy bottom).
Once baked, allow the frgal to sit on the tray for another 10 minutes before carefully transferring to a cooling rack.
To finish, make the spiced rum butter by mixing the butter and rum together. Use a pastry brush to brush over the crust and a spoon to lightly drizzle across the top.
Leave till lukewarm to slice and serve.
Next up we have my take on arguably one of the best puds around – a tiramisu. Please don’t send the hate mob for me with my impending confession but I stand by it, even if it does mean I may be denied entry to Italy for the rest of eternity. But like…do you ever sit there and just think…tiramisu would be great if it didn’t have coffee in it??? Orrrrr is that just me? I KNOW it literally translates to ‘pick/cheer me up’, which comes from the coffee, but you know what else cheers me up?
Chocolate. And a lot of it.
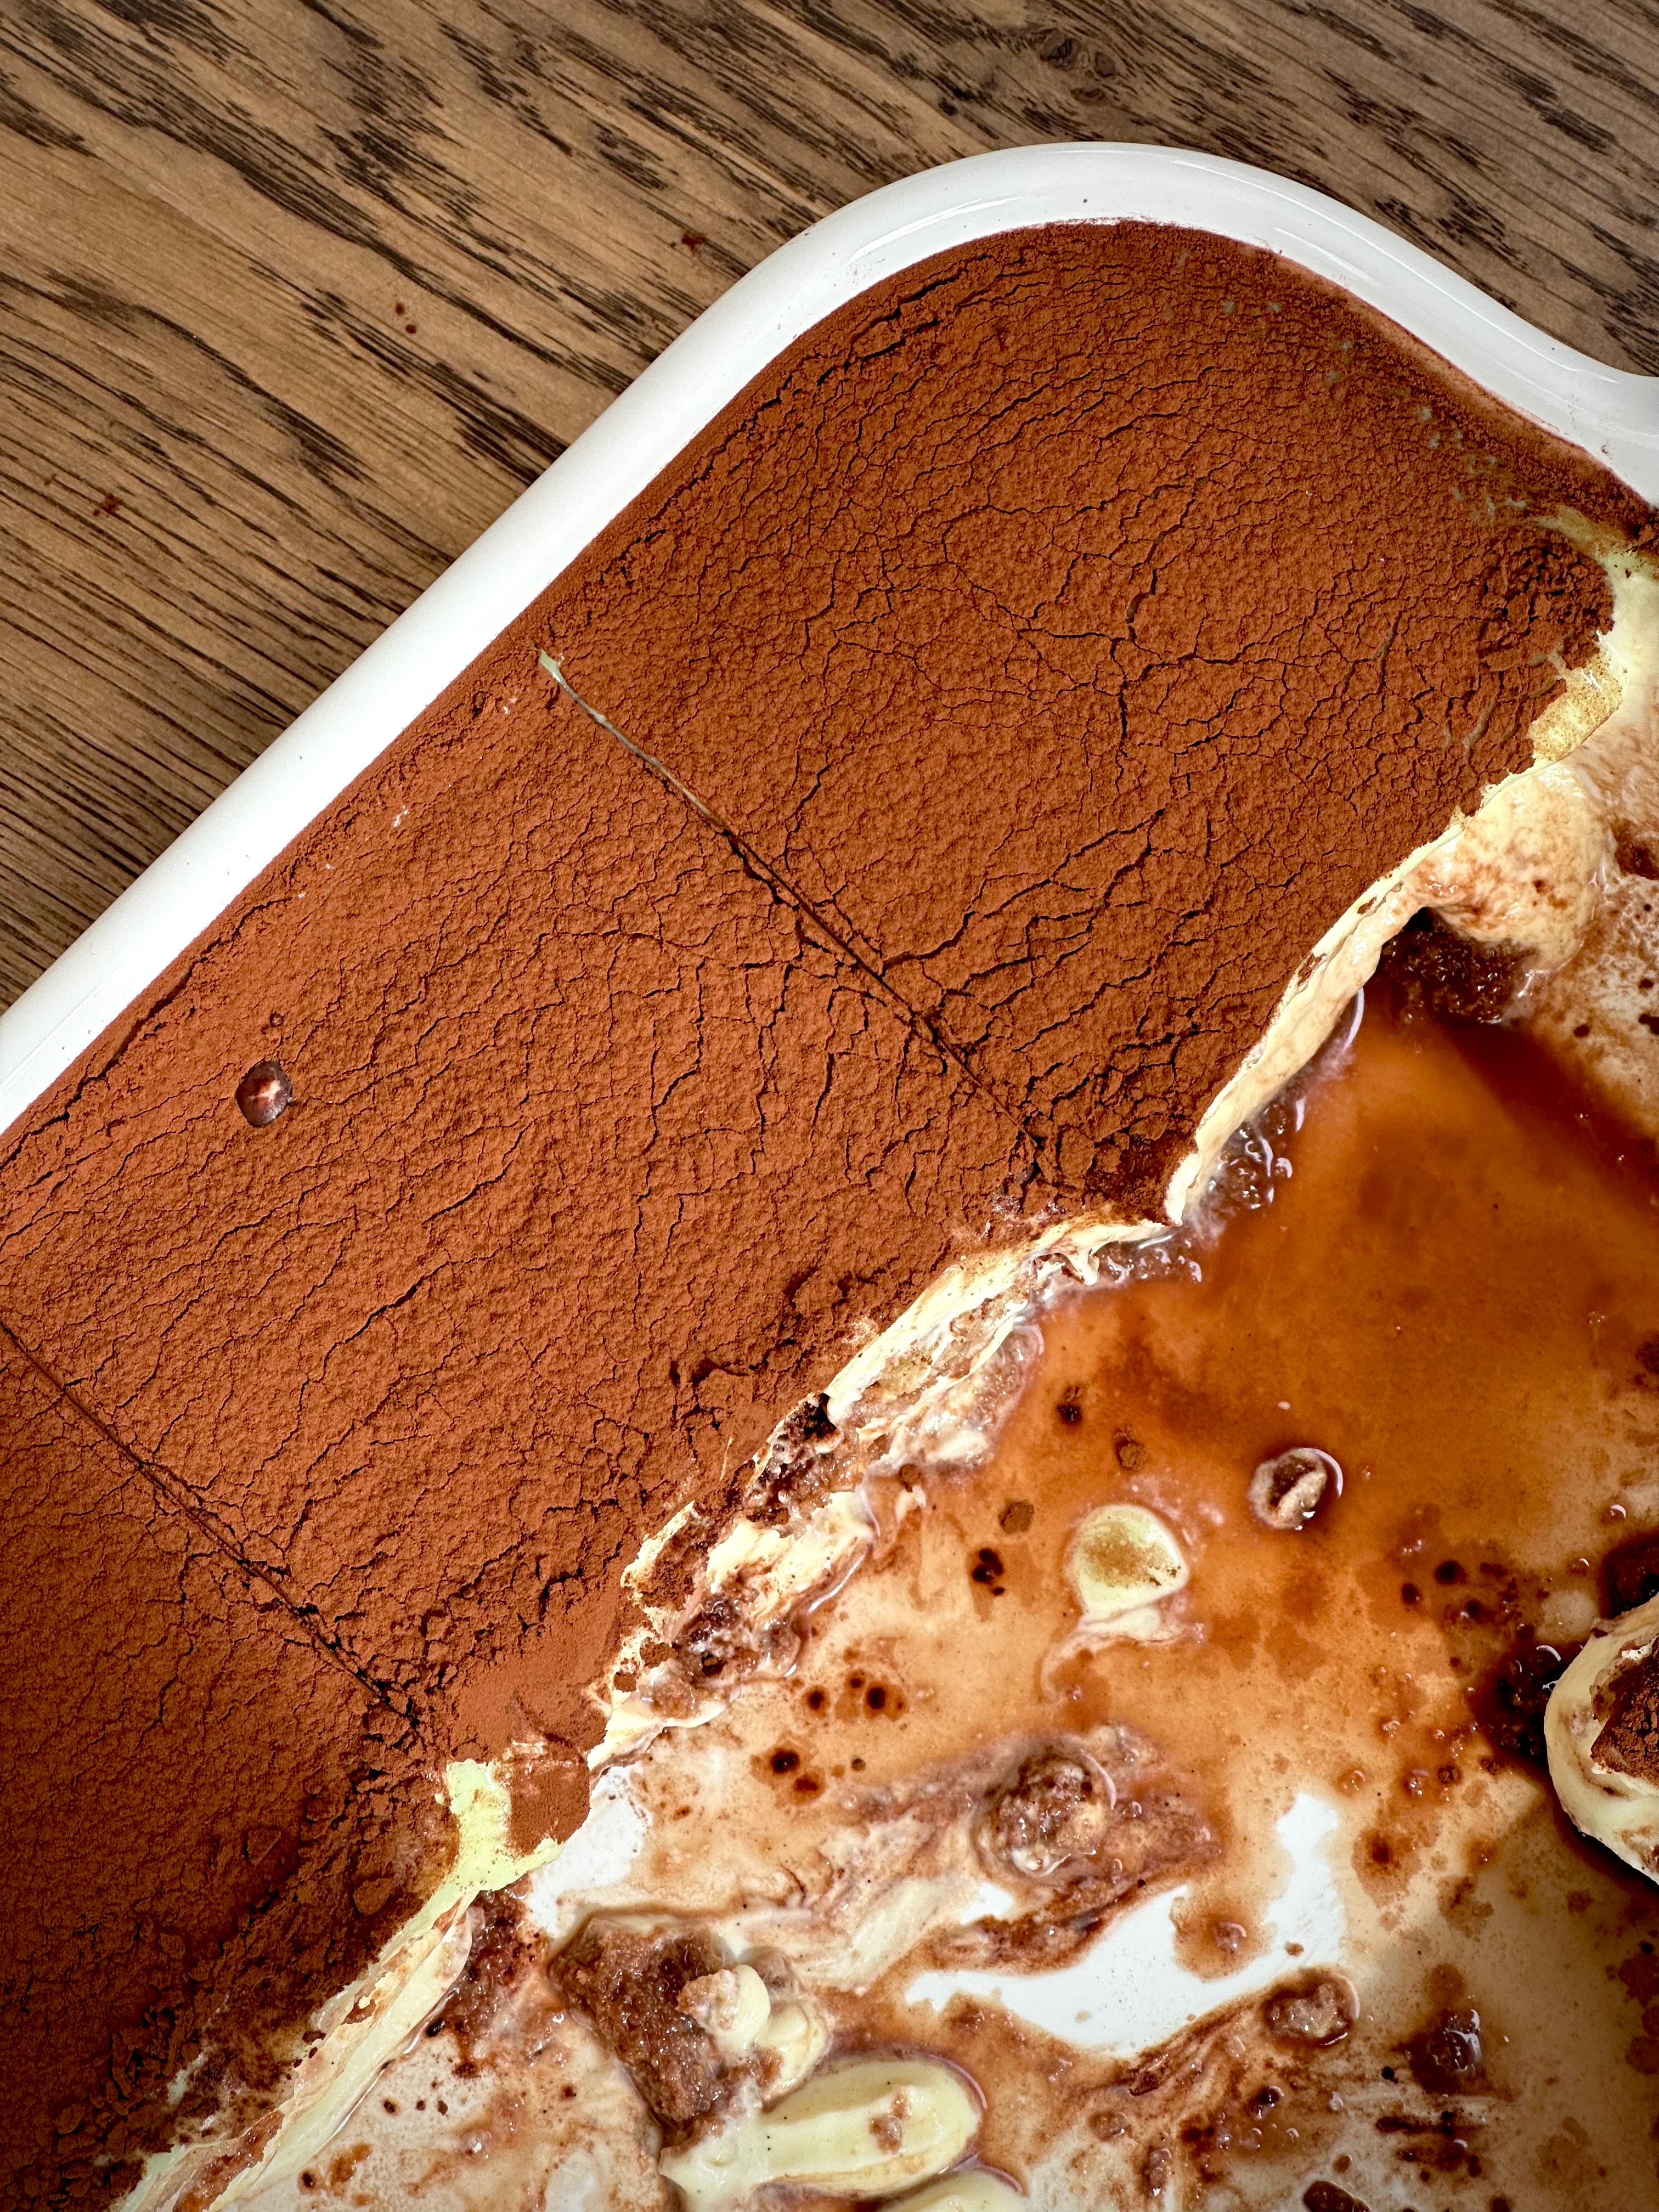
My Malt & Milk Chocolate Tiramisu is all the things which make the back of your cheeks squeal in delight and you, your soul and your belly, very, very, very happy. Is it a traditional tiramisu? No. But also do we care much when it tastes so damn good? Food is a privilege and should be all about fun, experimenting and importantly, exploring. I swear by my tiramisu recipes and so far, have had zero complaints. If chocolate isn’t your thing (are you okay?), take a look at my Lemon, White Chocolate & Basil Tiramisu that’s sitting in the archives. And, yes. Basil. It’s used sparingly but provides light relief from the tartness of the lemons and sweetness from the white chocolate.
In the version I am sharing with you today, instead of the obligatory coffee soak, we are dunking the lady fingers in hot chocolate (obviously) and the mascarpone enriched sabayon is spiked with a hefty amount of malt powder and rippled with a milk chocolate ganache. All finished with a generous coating of a fluid salted chocolate ganache and a not so shy sprinkling of cocoa powder. This my friends is sweet, sweet heaven.


My only advice when it comes to making tiramisu is don’t make this when you need a speedy turnaround dessert. This is one of the best to make when you want to make something ahead of time so don’t be whipping this out the same day you want it. It needs – nay – it DEMANDS an overnight chill. We want each slice to be sumptuously soft whilst still having its shit together. We aren’t serving up slop city. No, no, no. We are serving straight up perfection so give this time and you will reap the rewards, not only in how it looks but also in intensity of flavour. Allow things to mature. Allow flavours to develop. Give it time to chill and I assure you, this is one of those puds where someone will find you head stuck in the fridge, fork in hand, eating just ‘one more bite’ of it every single time.
Sweet, chocolatey, indulgent filth. Just the way we like it.
Recipe Makes: 1 x 20 by 25 cm / 8 by 10 inch deep dish
Recipe Serves: 12 to 15
Y O U – W I L L – N E E D –
Lady Finger Soak
400 ml Water
75 g Chocolate Ovaltine or Hot Chocolate Powder
25 g Caster Sugar
400 g Lady Fingers
Ganache Layer
200 ml Double Cream
175 g Milk Chocolate, chunks/callets
Pinch of Sea Salt
Malt Cream
150 g Caster Sugar
4 Large Eggs, yolks only
500 g Mascarpone Cheese, room temp
400 ml Double Cream, fridge temp
1.5 tsp Vanilla Bean Paste
75 g Malt Powder (e.g. Horlicks)
25 g Caster Sugar
To Finish
Cocoa Powder, sifted
M E T H O D –
To begin, let’s make the chocolate lady finger soak. Add the water, caster sugar and Ovaltine (or hot chocolate if that’s what you are using) into a small saucepan and place over a medium heat.
Allow to simmer for about 10 to 15 mins. We are after a slightly reduced consistency, so the colour will have deepened slightly and the flavour intensified. When done, remove from the heat and leave to cool.
Next up is the chocolate ganache. Add the milk chocolate and pinch of salt to a large bowl. Pour the double cream into a pan and gently warm over a medium heat. You want this near boiling, so remove just before and immediately pour over the chocolate.
Cover the bowl with a plate or clean dishcloth for a minute or two before removing and mixing with a balloon whisk or rubber spatula, till smooth and glossy. Leave to one side to cool. If you find you still have some unmelted chocolate still sitting at the base of your bowl, transfer the whole mix to your pan and gently heat, mixing often until smooth.
For the malt cream, add the egg yolks and caster sugar to a heatproof bowl. Mix well using an electric hand whisk until smooth – you want this to be mixed for a good couple of minutes before you move on to really start working some volume into the mixture.
Sit the bowl on top of a pan of simmering water to gently cook the yolks for approx. 10 mins. It’s important you keep on whisking the yolks with the electric hand whisk whilst they are cooking to increase the volume and to ensure the bottom of the bowl doesn’t catch - by the time the yolks are cooked, the mixture should be pale and thick.
Carefully remove the bowl from the heat and allow to cool for 15 mins before adding the mascarpone to the cooked yolks and mixing well until thoroughly combined. Leave to one side.
Pour in the double cream, caster sugar, vanilla paste and malt powder (aka horlicks) to the mascarpone bowl and use an electric hand whisk or stand mixer to bring to just near stiff peaks.
Give it taste for no other reason than it being bloody delicious.
Did you try it? See, I was right, wasn’t I??
The good news is it is time to assemble. Grab yourself a deep dish approx. 18 cm by 24 cm and spread a third of the cream over the bottom and level out evenly.
Dollop spoonful’s of the cooled chocolate ganache on top and use the back of a spoon to swirl.
Dip the sponge fingers into the cooled malt chocolate soak, letting them sit for a minute or so (I prefer less for more bite but go as soggy as you wish) and layer on top of the cream.
Repeat the cream, ganache and sponge finger process one more time before finishing with a smooth layer of cream and pouring on top the remaining chocolate ganache. If your ganache isn’t pourable or is a little too thick, add an additional 50 ml of double cream to your ganache and gently heat to loosen. Allow to cool before using because we don’t want to end up with melty mush.
Use an offset palette knife or back of a spoon to spread before dusting the entire top with cocoa powder.
Pop in the fridge for at least 4 hours but preferably overnight for a cleaner, sturdier, more intensely flavoured slice.
Go ahead. Go enjoy and go savour this life changing moment. Doesn’t it feel good?
Finishing up the newsy this week is our main bake of the day, and continuing our tiramisu-athon, is my Banana Pudding Tiramisu. Is this inspired by Magnolia Bakery’s Banana Pudding? 100% 10000% 100000000%.
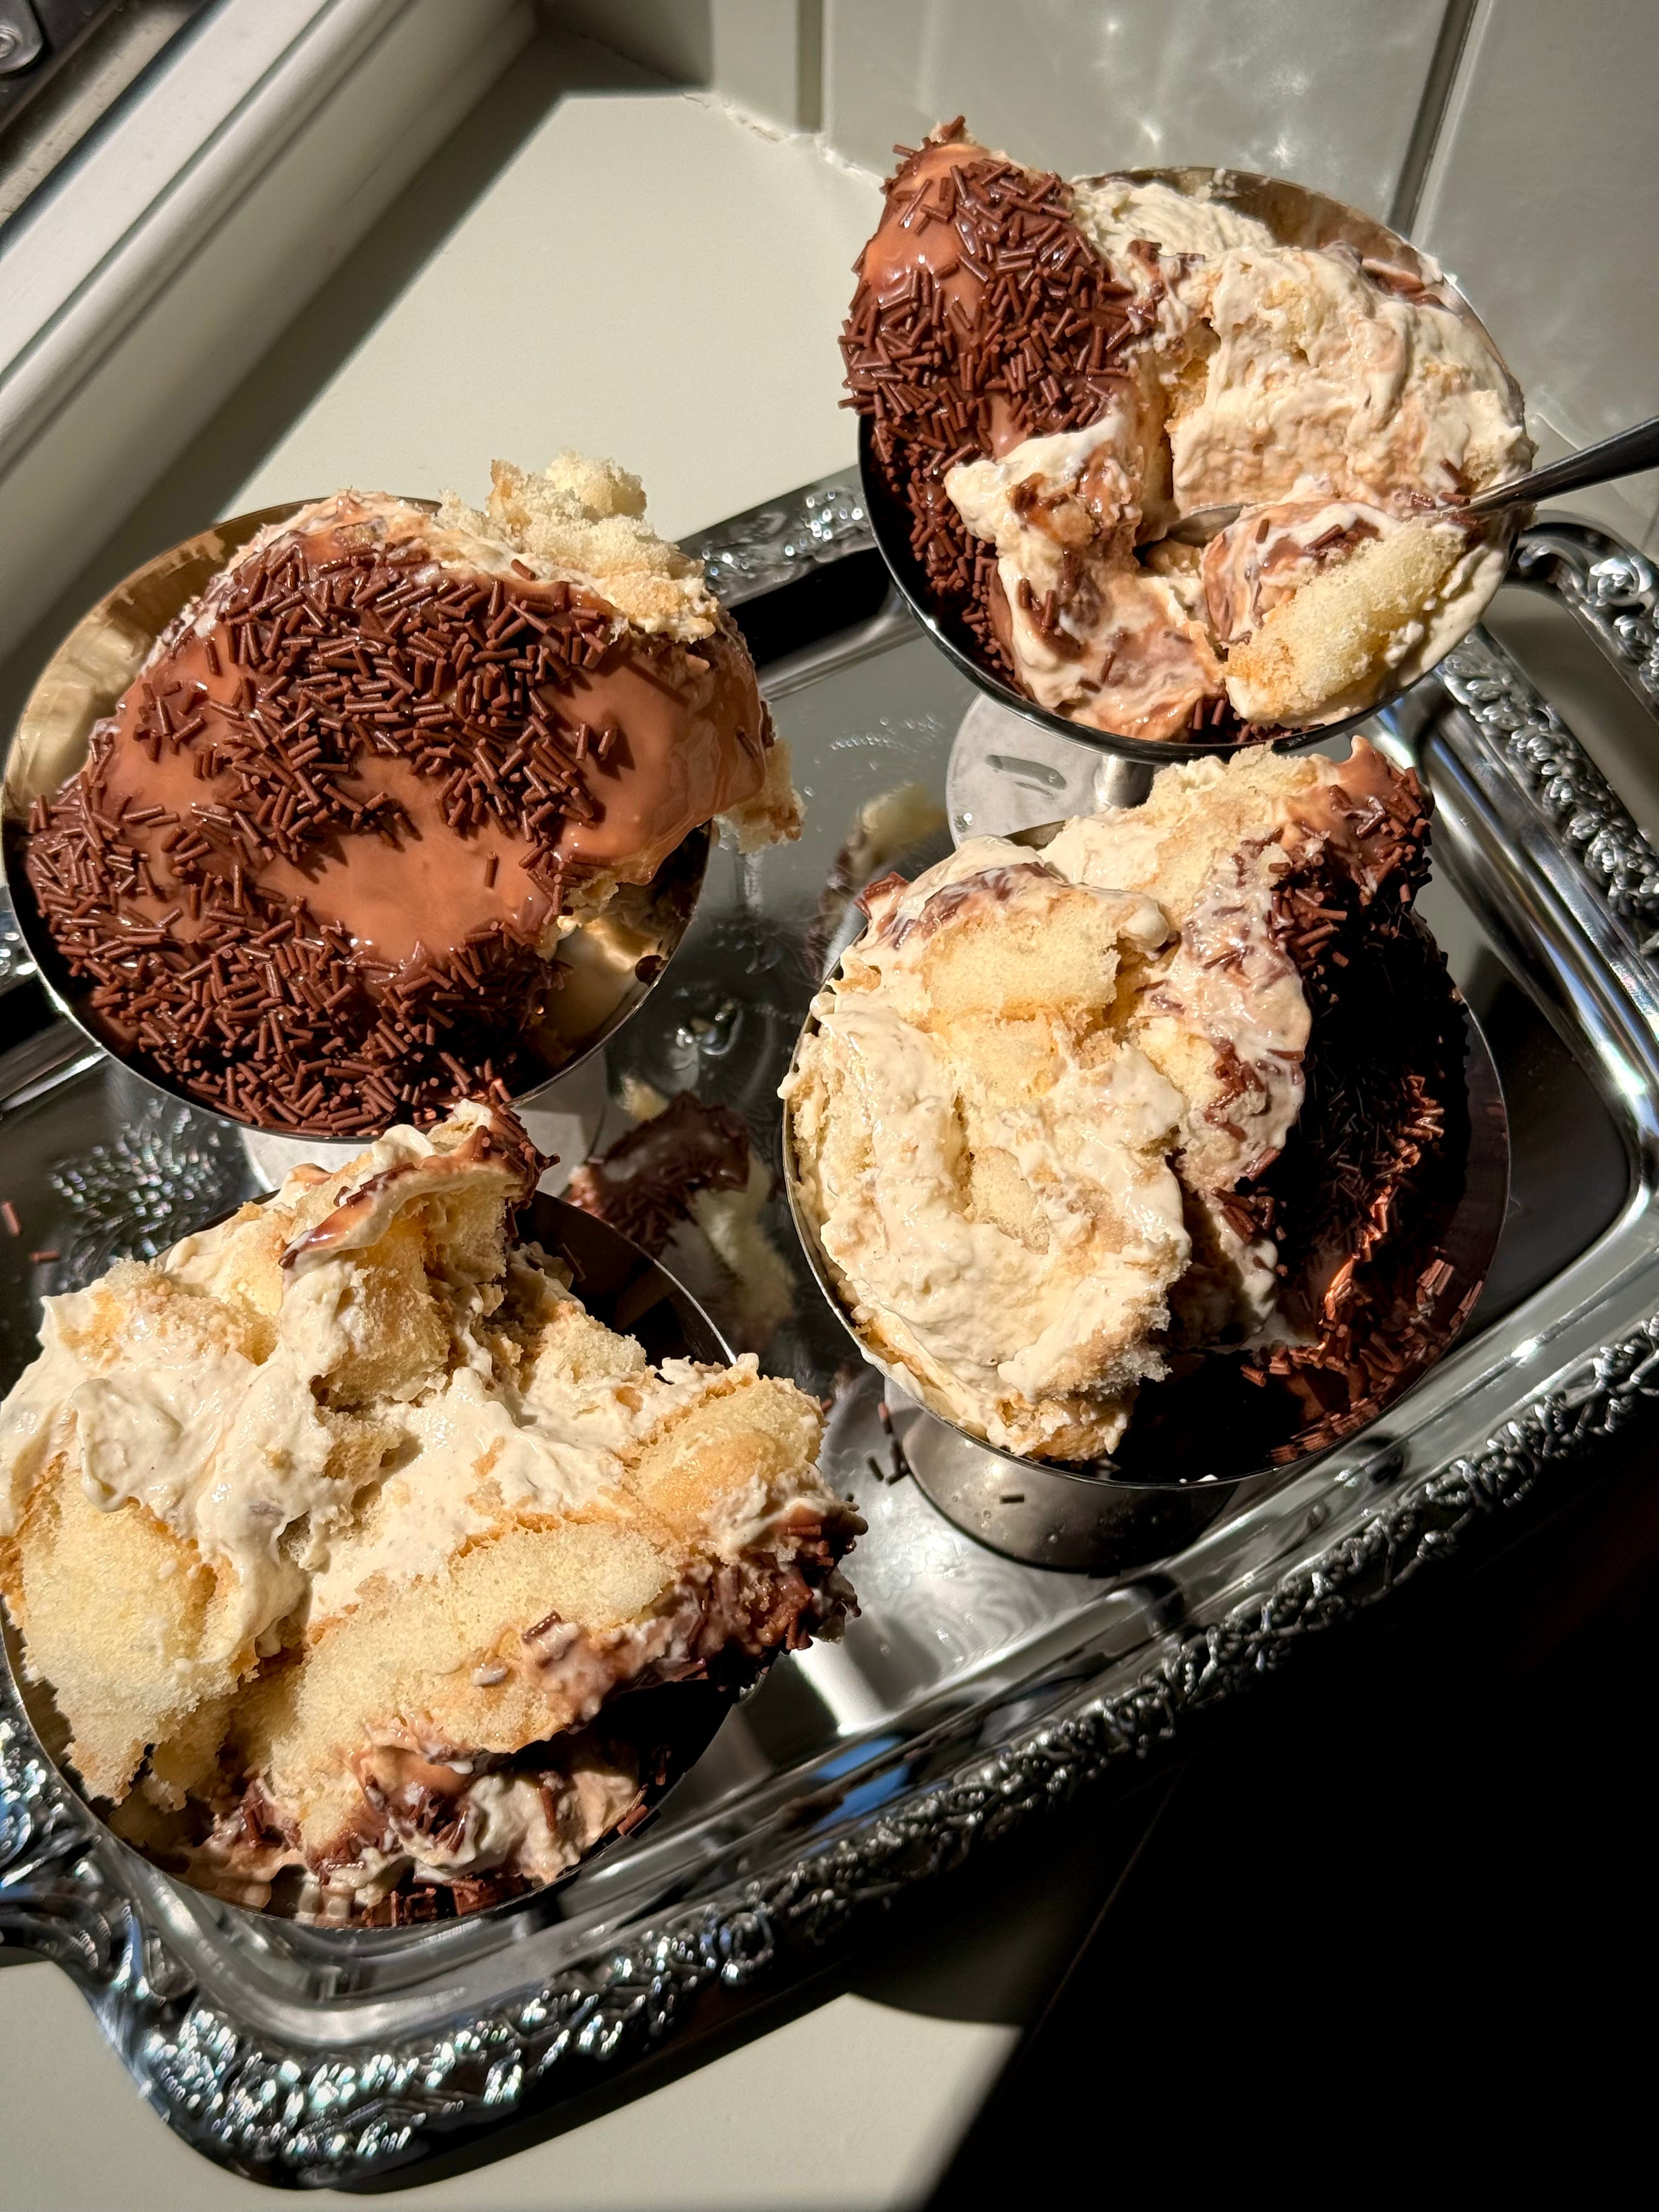
The weather has been scorching this week so I wanted something that was relatively low on effort, didn’t require me to turn my oven on for a long period of time but something that tasted unbelievably delicious and decadently filthy. Yes, my friends, I wanted to do nothing and but yet get everything all at the same time this week.
And guess what, this was exactly that. I don’t know about you but the minute the sun starts to shine, the weather creeps up a notch or two, strands of hair start sticking to my forehead and everything feels a little…moist – my appetite declines, along with my ability to withstand any time in the kitchen. But in order to right some wrongs, I wanted to make myself something so scrumptious. I wanted to spend a teeny tiny bit of time making myself something from scratch. Something homemade. Something that wasn’t just fruit and a yoghurt, although arguably this is just a levelled-up version of said fruit and ‘yoghurt’.

It’s bananery, it’s custardy, it’s creamy and biscuity with a cheeky little layer of milk chocolate ganache to really get things going. It is so moreish and whilst I would encourage you to slice and serve onto plates, I would also highly recommend you to scoop into coupes, sprinkle the top with hundreds and thousands and enjoy a classy yet fun serving of tiramisu. I’m not going to lie to you, I am salivating slightly whilst writing about it so I’m going to go help myself to another serving of it right now.
We’ve got layers of banana and coconut milk soaked ladyfingers, smothered in a banana custard mascarpone cream with chunks of broken up ladyfingers to mimic a cheats version of nilla wafers folded through, all finished with a velvety smooth layer of salted milk chocolate ganache to finish. We got texture. We got sweetness. We got a bit of saltiness. All you need to bring is some stretchy waistbanded pants.


Perfect for an occasion, ideal if you’re hosting and just simply magical if you’re making a half batch just to eat entirely yourself. If you have any leftovers (what are those?), pop them into a sealed container and stash away in the freezer. Whenever the craving calls, you’ve got yourself frozen banana pudding ice cream.
A 2 in 1 dessert? You are welcome.
Recipe Makes: 1 x 20 by 25 cm / 8 by 10 inch deep dish
Recipe Serves: 12 to 15
