

A Naughty Tart
A mountain of sweet goodness this week including my Rhubarb & Custard Tart, Brazilian Bolo de Brigadeiro, Apple Caramel Crumble and homemade Chilli, Cheese & Onion Bread Rolls.


Hey friends!
THANK goodness we have finally hit February. I swear January lasted 6207 days and whilst February is no better, the mere sighting of daffodils threatening to bloom sure has put a pep in my step. Granted, that last sentence has indeed made me sound 5000 years old but folks, she’s a country gal now. And by country, I mean somewhere that isn’t London, has donkeys and Shetland ponies as neighbours and can blissfully walk outside on her own after 6.30pm without constantly looking over my shoulder cause the only people roaming the streets then are the OAP’s on their way to the aerobics class down at the local village hall and 87 year old Harold on his zimmerframe and I blooooody LOVE IT.
Long gone are my party girl days from my twenties. Do I miss it? Do I miss the buzz of hearing my favourite song in a bar, screaming cause what else do you do when you hear your favourite song in a bar and slut dropping it down even though my knees could never hack it? Now that I say all that, I definitely could be partial to a little outing which I inevitably don’t remember the next day but then I am snapped back to reality of when I went down to the local pub here a few weeks back with some neighbours (actual people, not the ponies this time round), drank 3 ciders (lol who am i??? I’m a hard seltzer or vodka, soda, lime girly through and through) and had the worst case of hangziety the next day. I could barely sleep as my heart was pounding and my stomach was in knots over a situation I could not put my finger on.


Still. Was fun though but country Rubes is settling in well. Could I jump on a flight and be reckless for a few nights in vegas like I used to? Heck yes but do I also now like to go to bed at 9.30pm, decompress for about an hour and then go to sleep at 10.30pm, also heck yes.
If you couldn’t tell, I am a Libra through and through. And whilst I will forever be in the pursuit of more in just about every avenue of my life, right now, in my little cottage (lol whoooooo am I), I am pretty damn happy where life has currently got me. So thank you for being here. Thank you for listening to my random rambles which are never planned, never thought out and never reread because I fear my word vomit will make no sense and I will have to start again – which at 8pm on a Thursday night, when my bedtime is precisely in 1.5 hours, I ain’t gonna do.
Okay love ya, bye for now.

We have a whole truckload of deliciousness on the menu this week, featuring a whole lotta sweet and a tiny bit of savoury which makes for a bundle of yum for every tum.
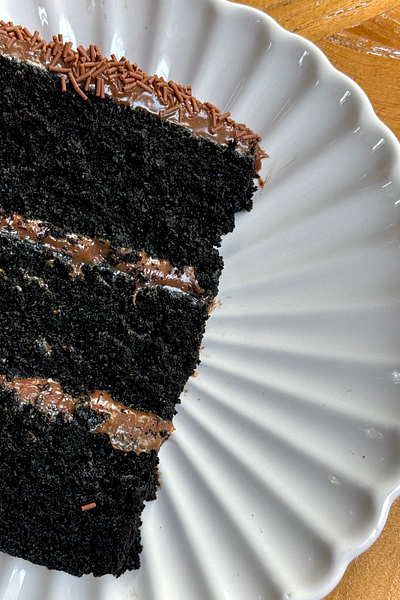
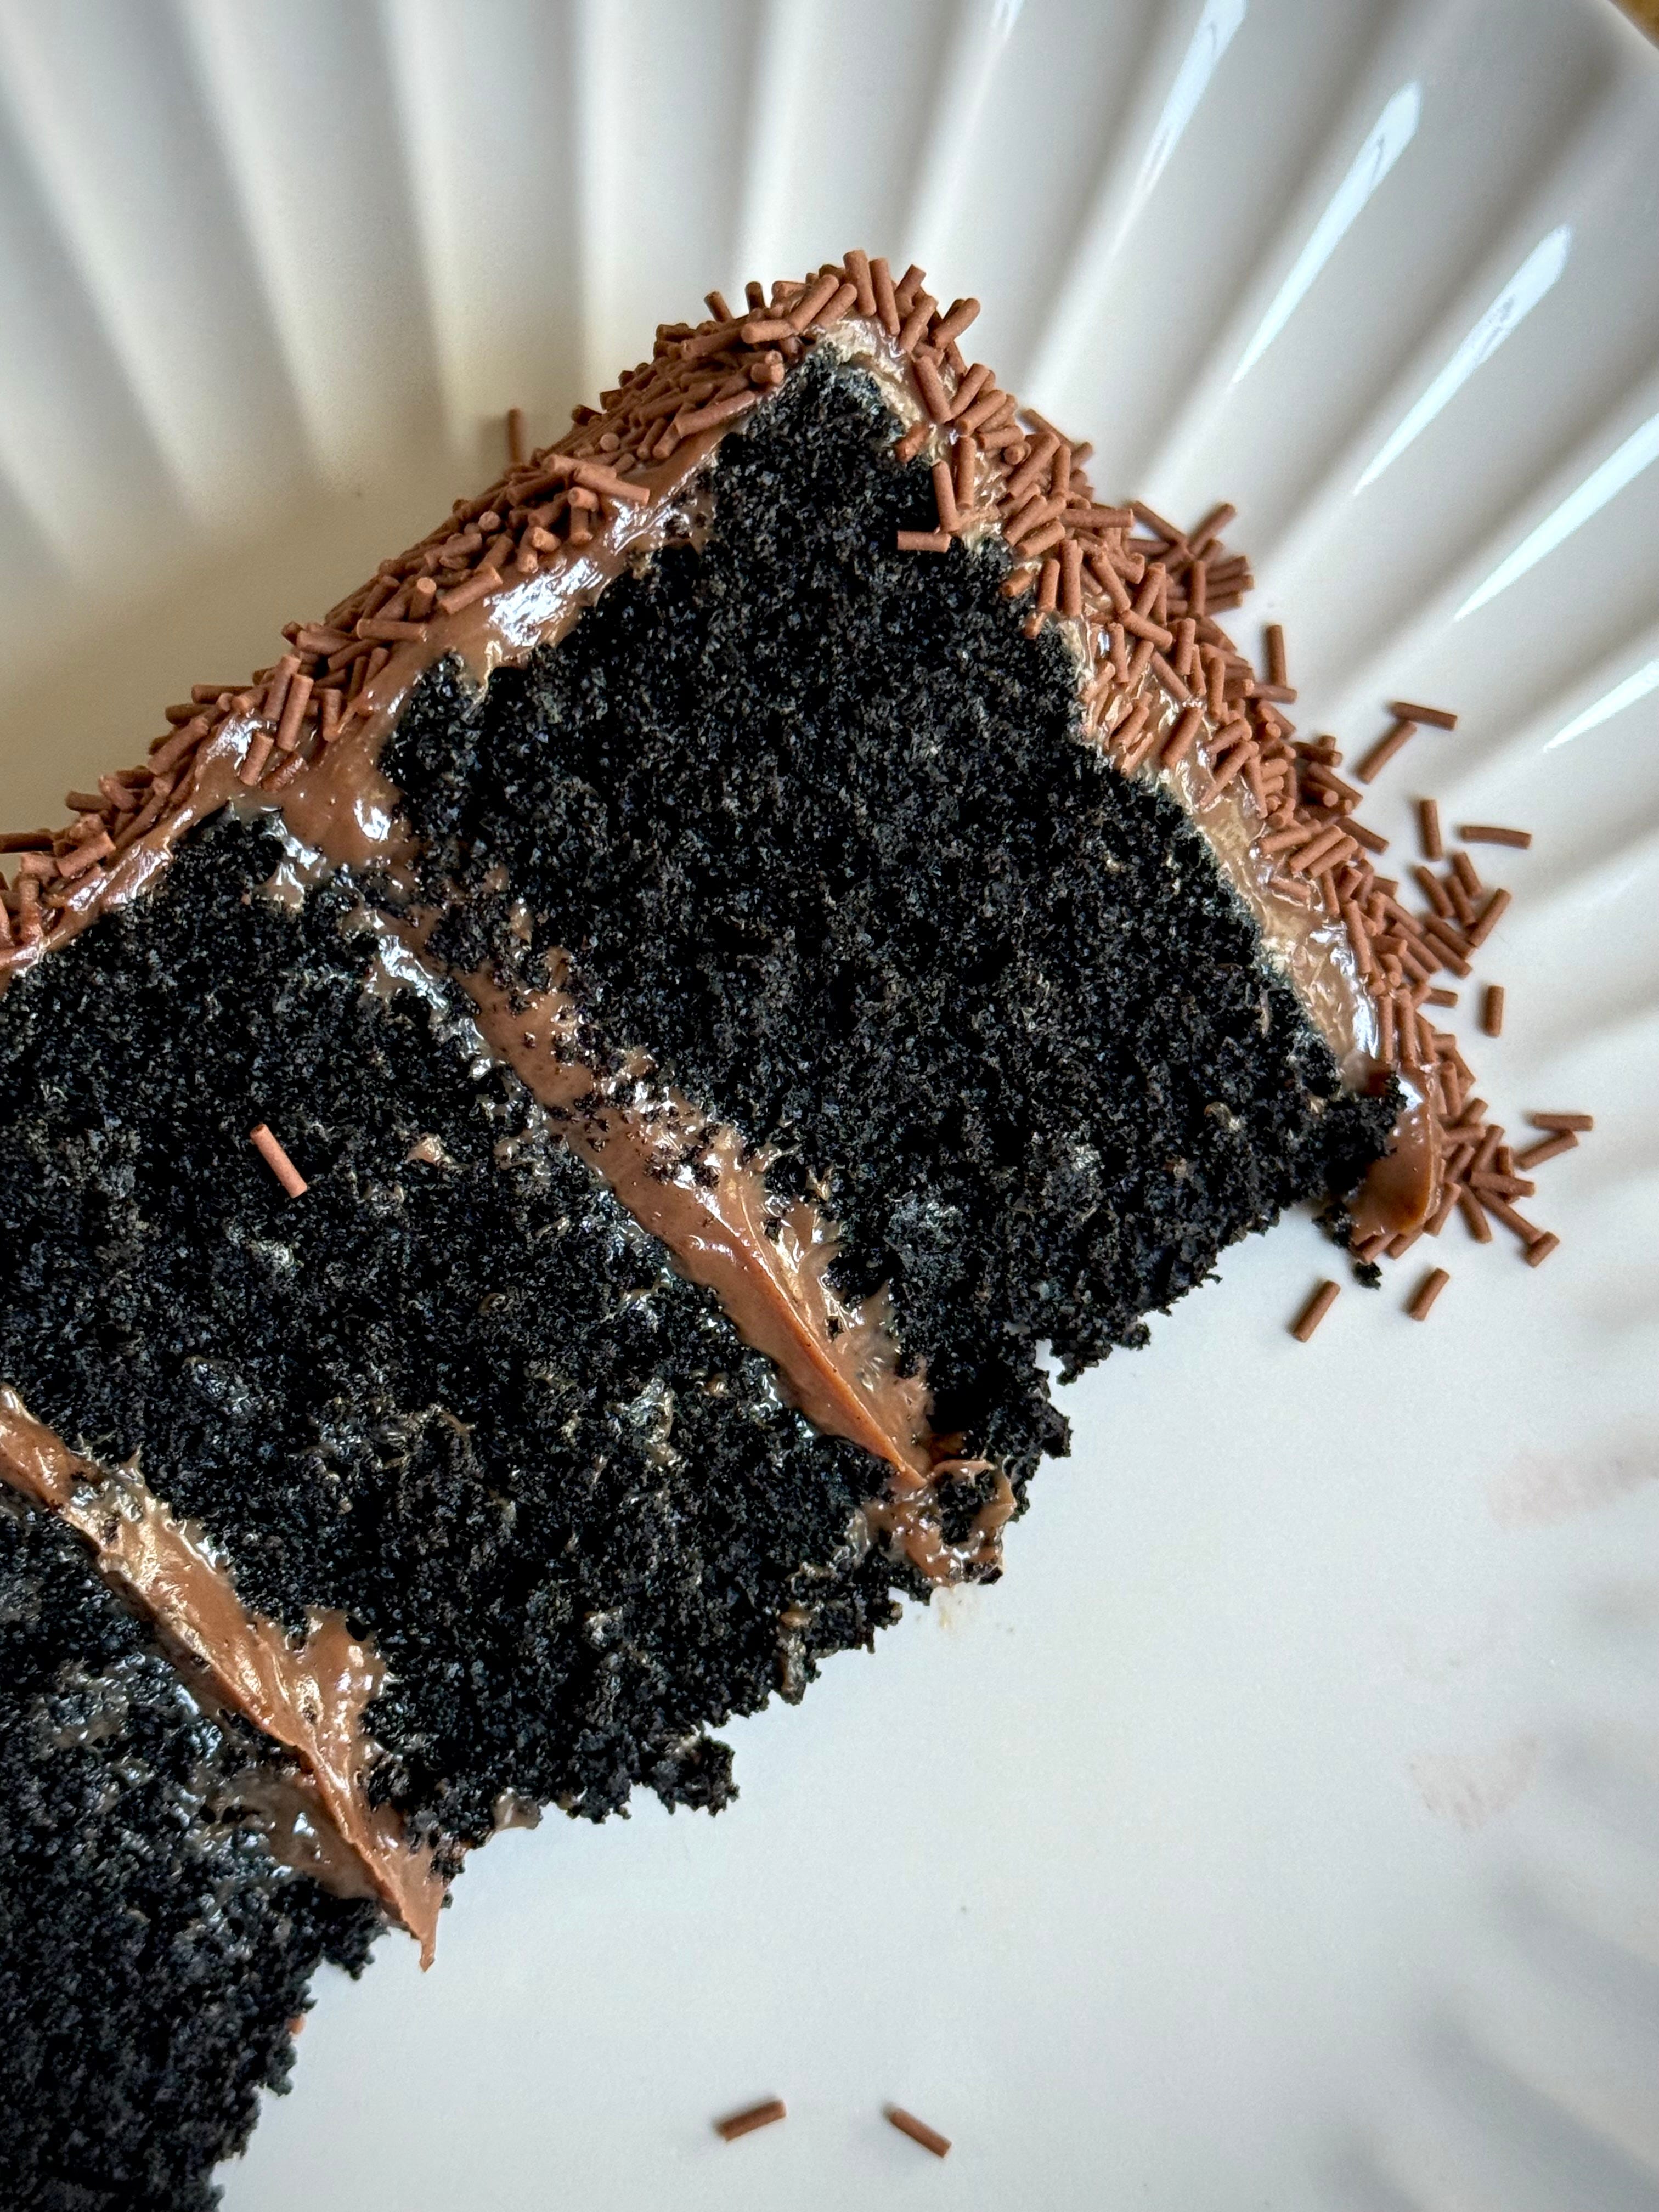
First up, we go back to Brazil for the latest ‘Around the World’ cake. Their beloved Bolo de Brigadeiro is a staple at birthday parties, and I can totally see why. It’s a simple but simply done well chocolate cake with a delicious brigadeiro filling - think along the lines of a fudgy, chocolate truffle sort of consistency and then finished off with a bucket load of chocolate sprinkles for that added magic.


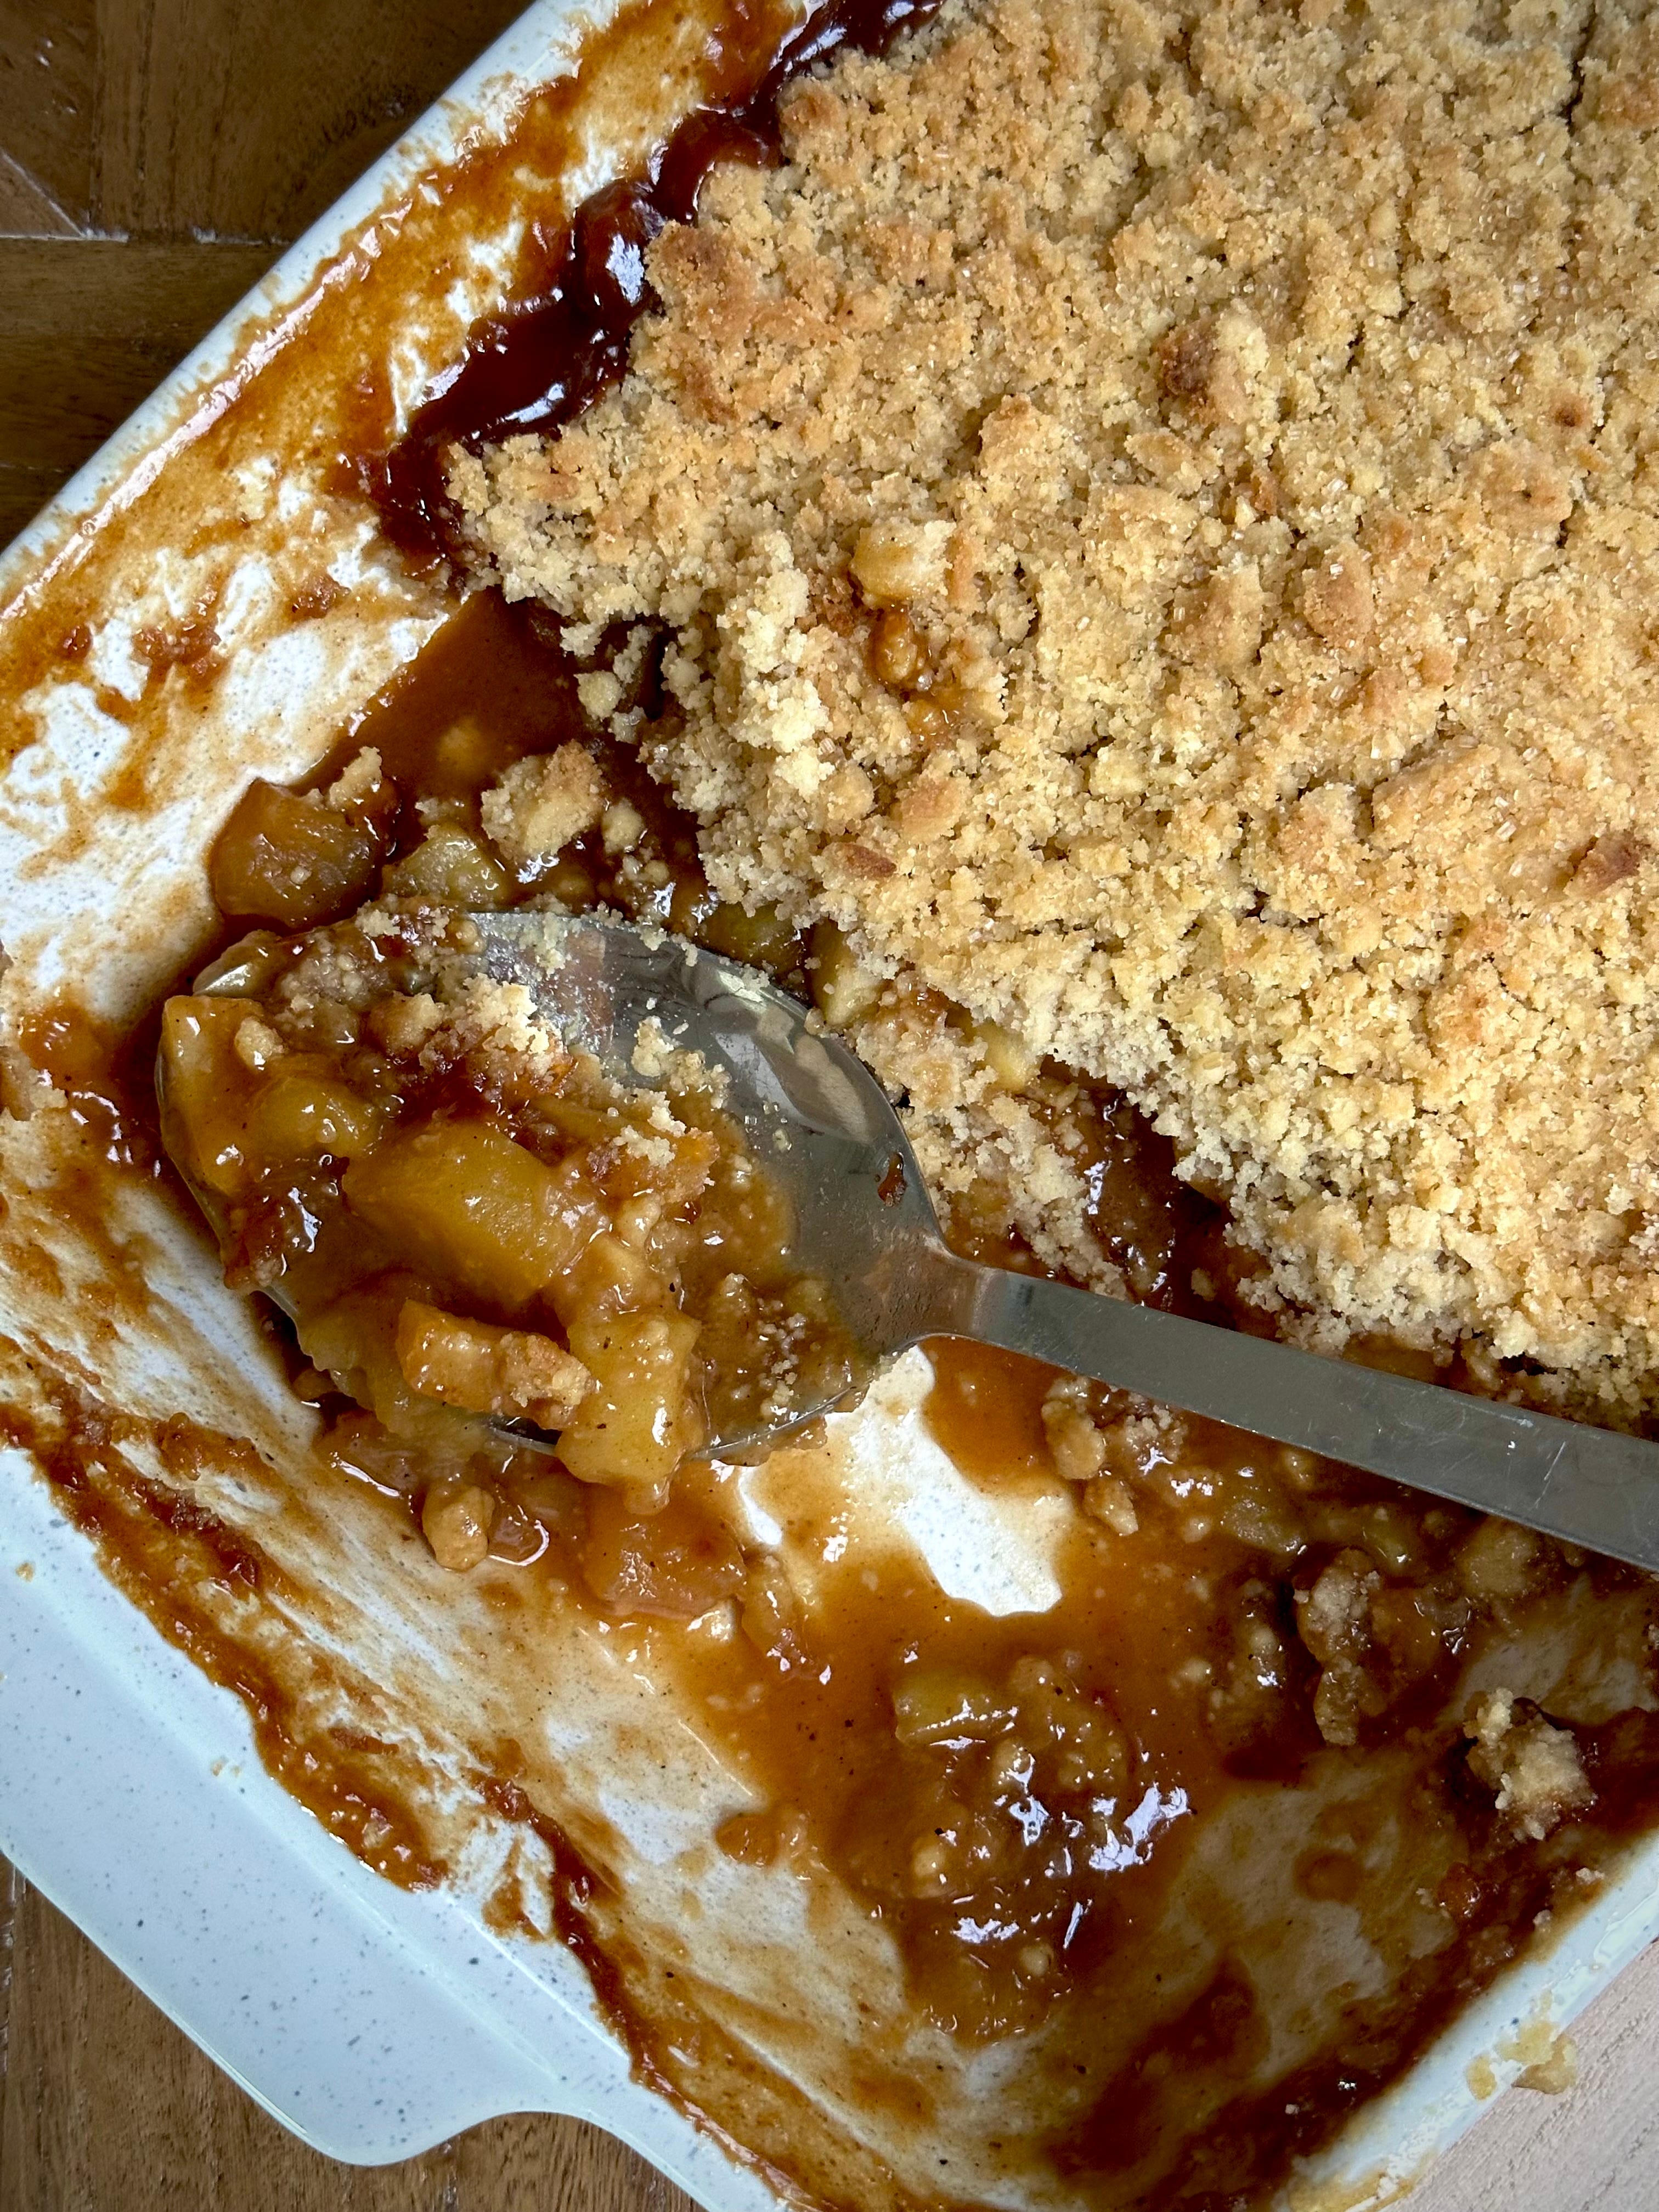
Every man, nan, woman and their dog has their go to recipe for that classic, comforting winter warmer apple crumble and I am no different. But folks, unlike theirs, mine is a touch filthier, a whole lot more delicious and equally as easy (a slight lie). We’ve got spiced, tart apples smothered in a cinnamon caramel and topped with an outrageous amount of almond crumble. Finished off with a drizzling of extra caramel sauce and that is how my Spiced Apple Caramel Crumble will beat any other hands down.
The main bake this week is a week I look forward to all year round – it’s FORCED RHUBARB WEEK BABY. Slight overreaction to a vegetable (yes, it’s a veg and not fruit – no seeds dumb dumb, talking to myself here ‘cause I was mildly surprised at this google outcome and then realised like obviously??) but forced rhubarb comes in and out of season so quickly and that hint of pink in the food aisles of greige and green really perks me up during the drab early months of the year. We are keeping it classic with the flavour pairing but doing it in tart form this year-round. My Forced Rhubarb, Cardamom and Custard Tart is painfully pretty and a deserved showstopper in her own right.


Finishing the plethora of carbs on offer today is the very first bake I ever baked. The bake that started it all and the bake that eventually led me to the tent a year later. Whilst it was kept super simple back then, we’ve jazzed up the bake with a few additional flavours but this a great bake if you don’t own any fancy pants equipment but still want that home baked satisfaction of freshly baked carbs. Nothing fancy but my simply scrumptious Chilli, Cheese & Onion Bread Rolls finish up the menu this week.

Let’s get stuck into the first tasty morsel on the menu today – the next bake in the never ending, forever lasting, why is she making such slow progress series to ever exist on social media, a Bolo de Brigadeiro. Since I started this series, there has been a resounding, constant request to make this cake and holy moly, let me tell you, Brazil ain't here to play. We all know I love a good choccy cake and whilst there has been a few featured on the list so far, this one definitely did not disappoint.
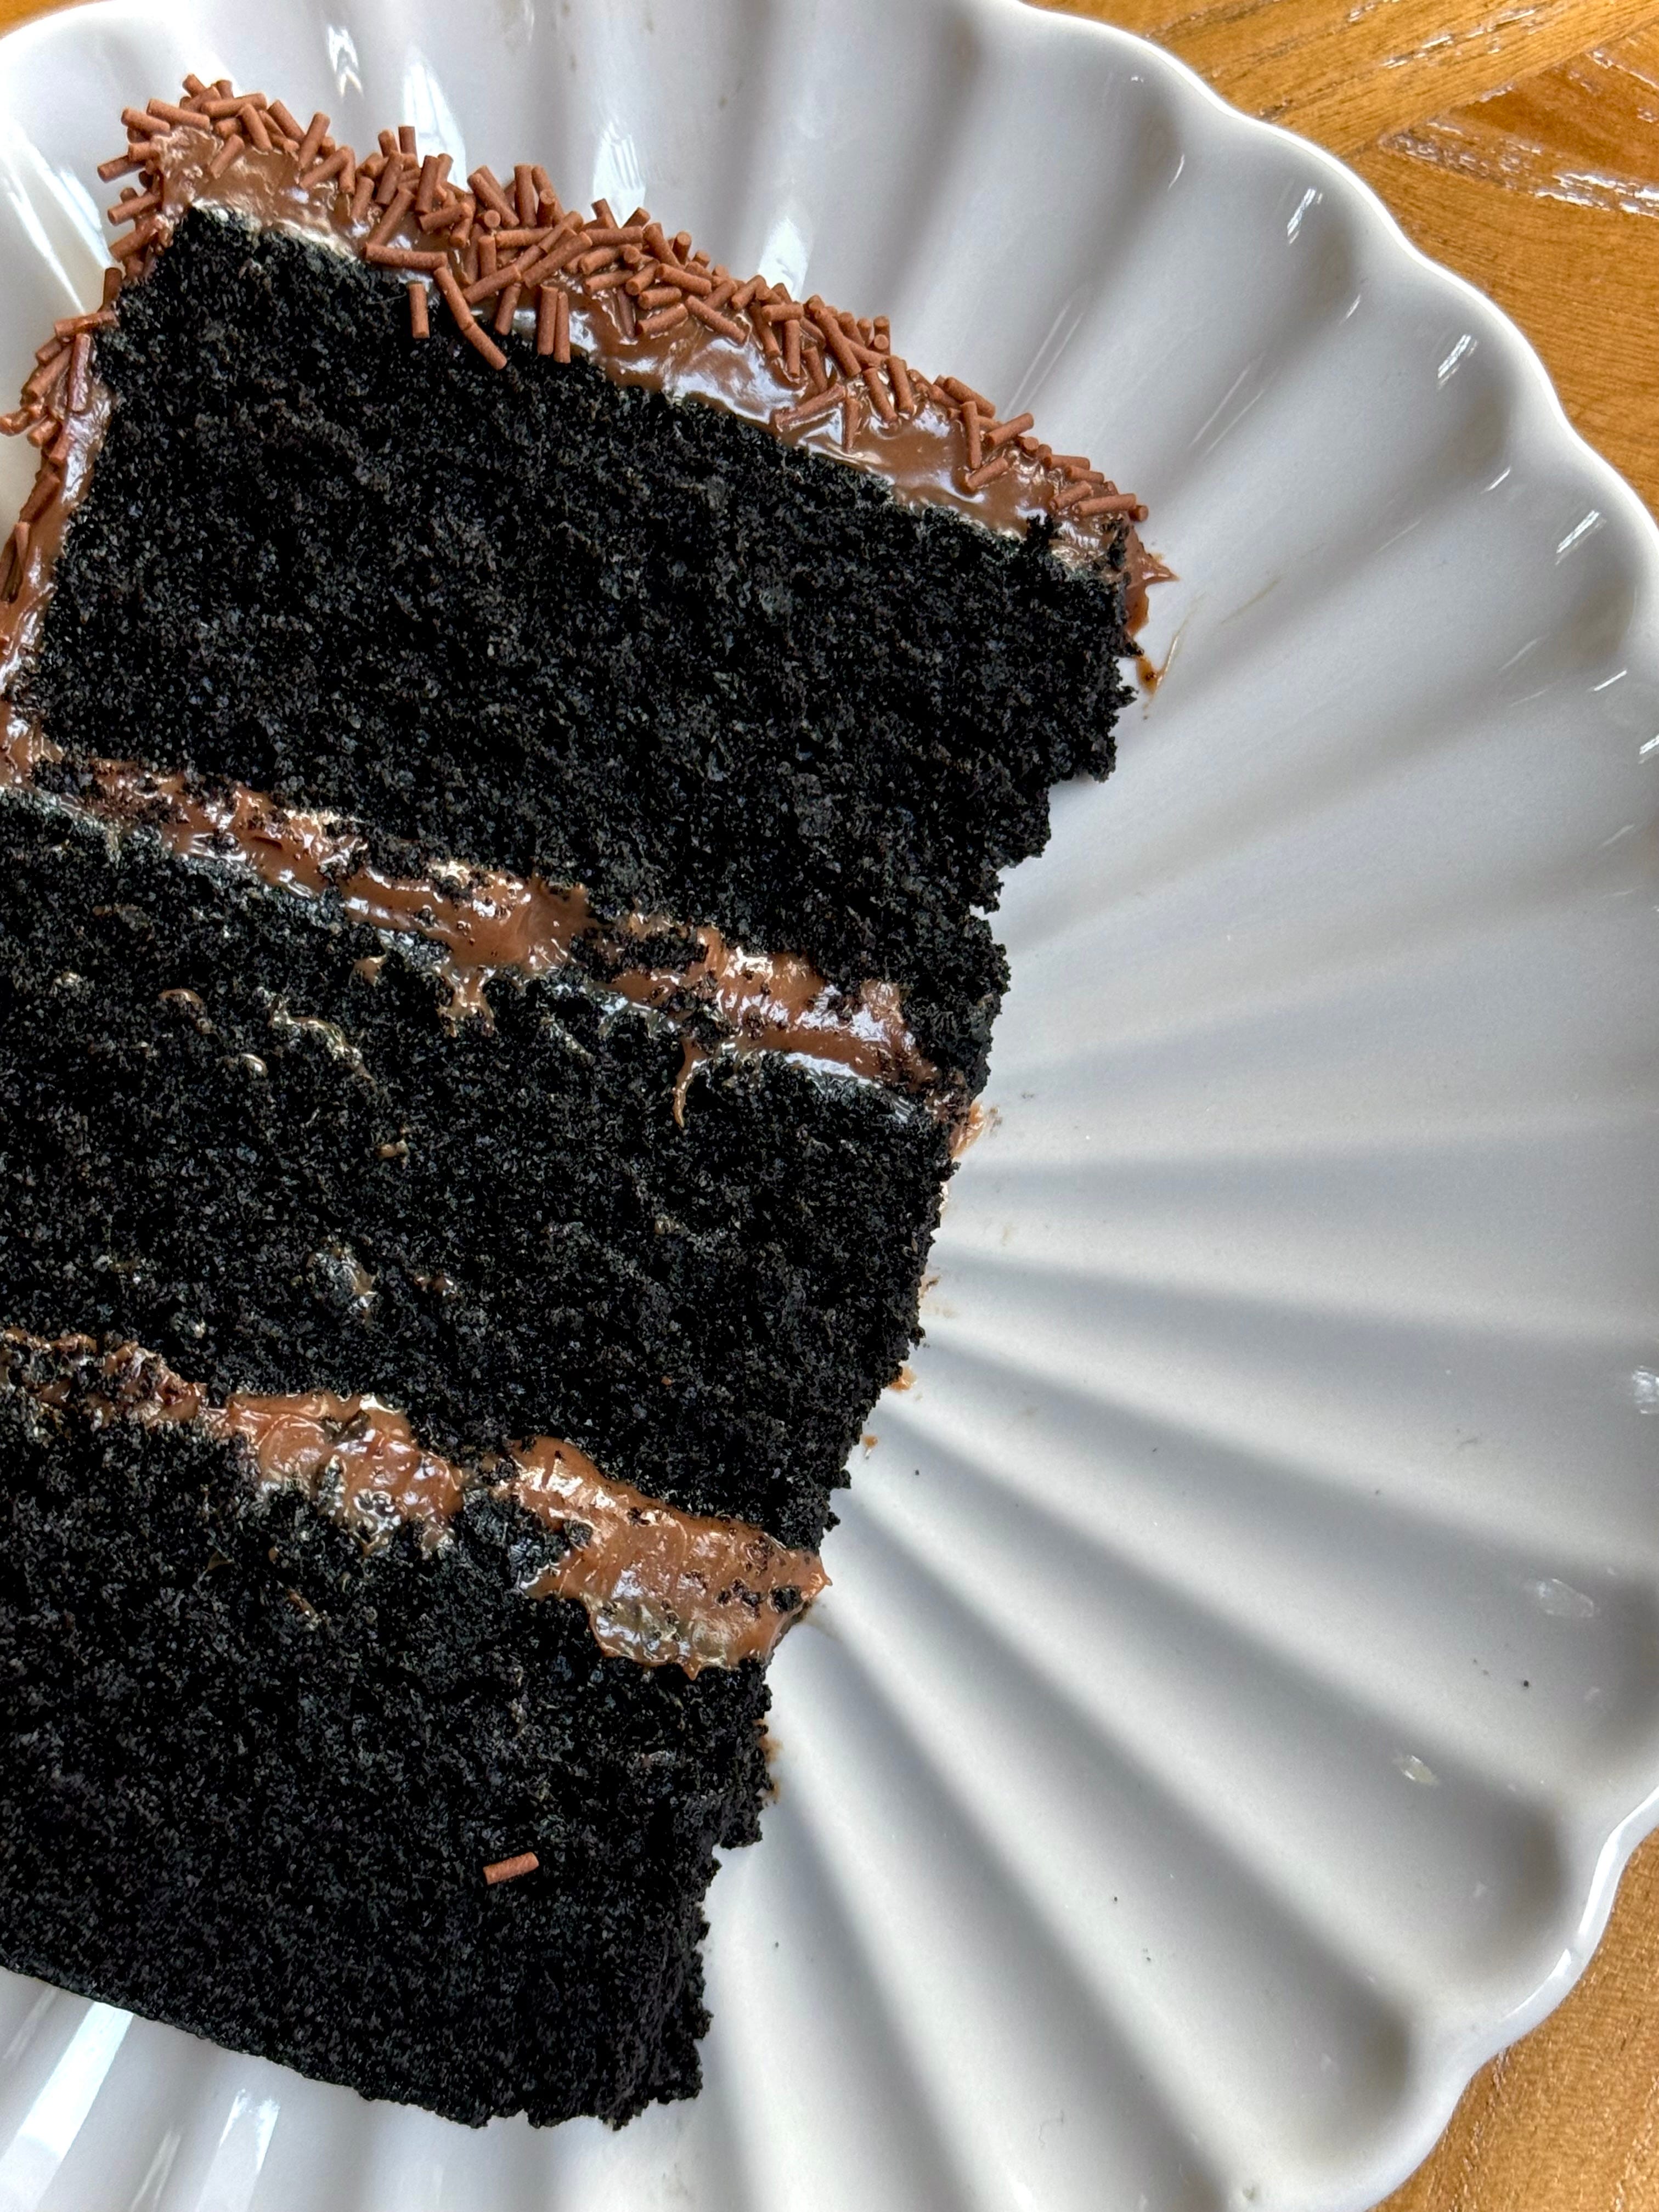
It's made up of a rich, chocolate sponge layered and smothered in brigadeiro (think along the lines of a fudgy, chocolate truffle taste and consistency) and finished with a hefty covering of chocolate sprinkles. Commonly found served up at birthday parties and I can totally see why. She's a good time gal, life and soul of the party, memorable and comforting all in one. If this was getting served up at the birthday parties I was being invited to, I’d probs stop being so antisocial and turn up for once but until then, I ain’t going.
All I gotta say is, after the Bolo de Cenoura and now this? Brazil, I love you. Someone adopt me - I want in.
I followed a recipe I found online by Brazilian Kitchen Abroad but amended the cups to grams (or thereabouts because WHY CUPS FOLKS, WHYYYY?!!!! Please let’s stop with this nonsense) and utilised ingredients I could find locally, so whilst the below isn't entirely traditional, it's the closest I could do. I also had to use Black Cocoa instead of regular as I ran out when I came to making the recipe the 2nd time round (let's not talk about the first attempt – I am blaming the dodgy cup to grams conversion).


Whilst the brigadeiro didn’t come out completely correct (I have been told from people on Instagram that you only need 3 ingredients: cocoa, condensed milk and butter), it still came out tasting absolutely delicious. What I would say is, keep the cake chilled and use dowels to support as the sponge and filling are both soft. And we all know what happens with soft cakes? They collapse. RIP first attempt.
Recipe Makes: 3 x 20 cm / 8 inch sponges
Recipe Serves: it’s a chunky hunk, so I would say about 12 good slices
Y O U – W I L L – N E E D –
Sponge
500 g Caster Sugar
170 ml Vegetable Oil
60 g Unsalted Butter, melted
3 Large Eggs
2 tsp Vanilla Extract
360 g Plain Flour, sifted
100 g Cocoa Powder, sifted
2 tsp Baking Powder, sifted
1 tsp Bicarb, sifted
Good Pinch of Salt
360 ml Whole Milk
Brigadeiro Filling & Frosting:
2 x 397 g Condensed Milk
170 ml Single Cream* (recipe states Table Cream but this isn’t available to my knowledge in the UK)
200 ml Whole Milk
2.5 tbsp Cornflour, sifted
150 g Hot Chocolate Powder (recipe states Nesquick but again could not locate)
15 g Unsalted Butter
*since posting this recipe on insta, I have been told that Sour Cream is a good sub for the Table Cream. I can’t deny nor confirm but that’s what my sources say so use this if you wish instead of single/half half
M E T H O D –
Preheat oven to 150C Fan/170C/350F and grease and line 3 x 20 cm / 8 inch sponges.
Into a mixer bowl, add the sugar, oil and melted butter. Use the paddle attachment to mix until well combined.
Add the eggs to the bowl, mixing well after each addition. Once all the eggs have been added, add the vanilla and mix for a further few minutes until you reach the ribbon stage.
In a separate bowl, add the flour, cocoa powder, baking powder, bicarb and salt. Use a balloon whisk to mix until well combined.
Add half of the flour to the mixer bowl and pour in half the milk. Mix on the lowest setting for a few rotations until you are left with little to no visible flour streaks.
Remove the bowl from the machine and add the remaining flour and milk. Use a balloon whisk to fold through until smooth. Transfer the batter equally between the 3 tins and pop into the oven to bake for 30 to 34 minutes. NOTE: I like to go for less for a fudgier, just baked finish, even if it does result in a slightly caved in top.
Once baked, remove from the oven and allow the sponges to sit in the tins for 5 minutes before turning out onto sheets of clingfilm/saran wrap. Wrap the sponges well and leave to completely cool.
Whilst the sponges are cooling, make the Brigadeiro by adding all the ingredients to a large saucepan, bar the butter.
Use a balloon whisk to mix until smooth, add the butter and place over a medium heat.
You want to cook this mixture until very thick – you are after a thick pudding consistency. This will take about 15 to 20 minutes so have patience and remember to stir well and often to avoid the bottom from catching.
Once thickened, pass the mix through a sieve to remove any lumps and transfer to a shallow dish. Cover with clingfilm (ensure the film touches the Brigadeiro to avoid a skin/crust from forming). Leave to cool at room temperature for approx. 2 hours before placing in the fridge to set (approx. 4 hours but ideally overnight).
Once the sponges and Brigadeiro have cooled, level off each sponge if needed with a serrated knife.
Place one of the sponges onto your serving dish/cake board (use some Brigadeiro to glue the base sponge to the board).
Transfer the Brigadeiro to a piping bag (trust me, it is much easier this way) and pipe ¼ of the mix onto the first sponge. Use an offset palette knife or back of a spoon to spread to an even layer.
Place the second sponge on top, pipe ¼ of the Brigadeiro on top and level out again.
Top with the final sponge and use the remaining ½ of Brigadeiro to crumb coat and final coat. Use a cake scraper to smooth down the final coat and pop in the fridge to set for 30 minutes. NOTE – the sponge and Brigadeiro is soft, so I used a dowel in the middle for stability.
Once lightly set, sprinkle over a copious amount of sprinkles over the top and use your hand to press the sprinkles into the side of the cake to completely cover. Pop back in the fridge to completely set and remove just before serving.
Moving onto the next bake on the menu this week, my Apple Caramel Crumble. I stupidly decided to start a new mini series over on insta whilst I begin recipe developing and writing for the 2nd book. Do I really have the time to be doing a new series when we have so many cakes left on the list? Absolutely not. Am I going to bury my head in the sand and persevere anyway? Of course I am.
I know a lot of the cakes and bakes I share with you all do require a certain amount of skill, patience and money (let’s be fr, baking can be VERY expensive) and so I wanted to share some easier, more approachable recipes. Recipes which don’t take days to make, recipes that aren’t made up of a million and one components and recipes which just make you feel good.
They may not be the prettiest. They may be extremely beige but 9 times outta 10, it's the sort I want to be demolishing at this time of year. Serve me up a plate of Good Mood Food and I’ll be a happy bunny from here on out. It’s just a little series where I show you how I make cosy, comforting, easy, soul warming recipes you wanna tuck into, face plant and lick the plate clean. The sort you can make on Sunday morning and tuck into in the afternoon, banishing any Sunday scaries as you snuggle on down into a cosy, comforting carb coma.


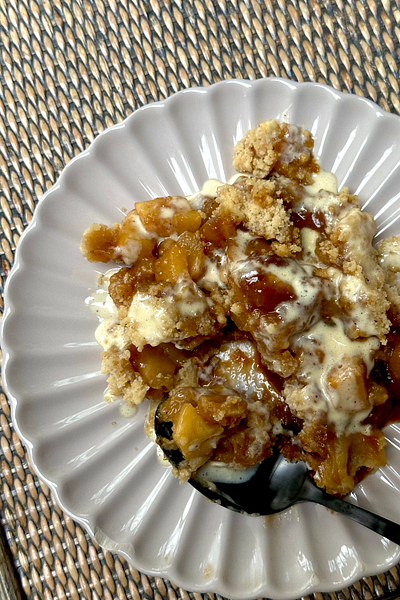
First up, we have the humble Apple Crumble. Every nan and their dog has a recipe for it and I'm no different BUT I guarantee you, this version is hands down better than the rest (soz to your nan). Hitting up the 5 C's for the ultimate apple dessert, we've got Cardamom spiced apples, bathed in a Cinnamon Caramel, topped with a hefty amount of almond Crumble and served topped with another drizzle of caramel for good measure and drowning in a homemade Custard. This is the sorta good mood food we all truly deserve.
I am using my All Things Butter Cinnamon Bun to add a good whack of flavour to the caramel and crumble topping but if that isn’t readily available for you to buy, you can substitute the butter for equal quantity Unsalted Butter + ½ tsp Ground Cinnamon Powder + tiny tiny tiny pinch of salt.
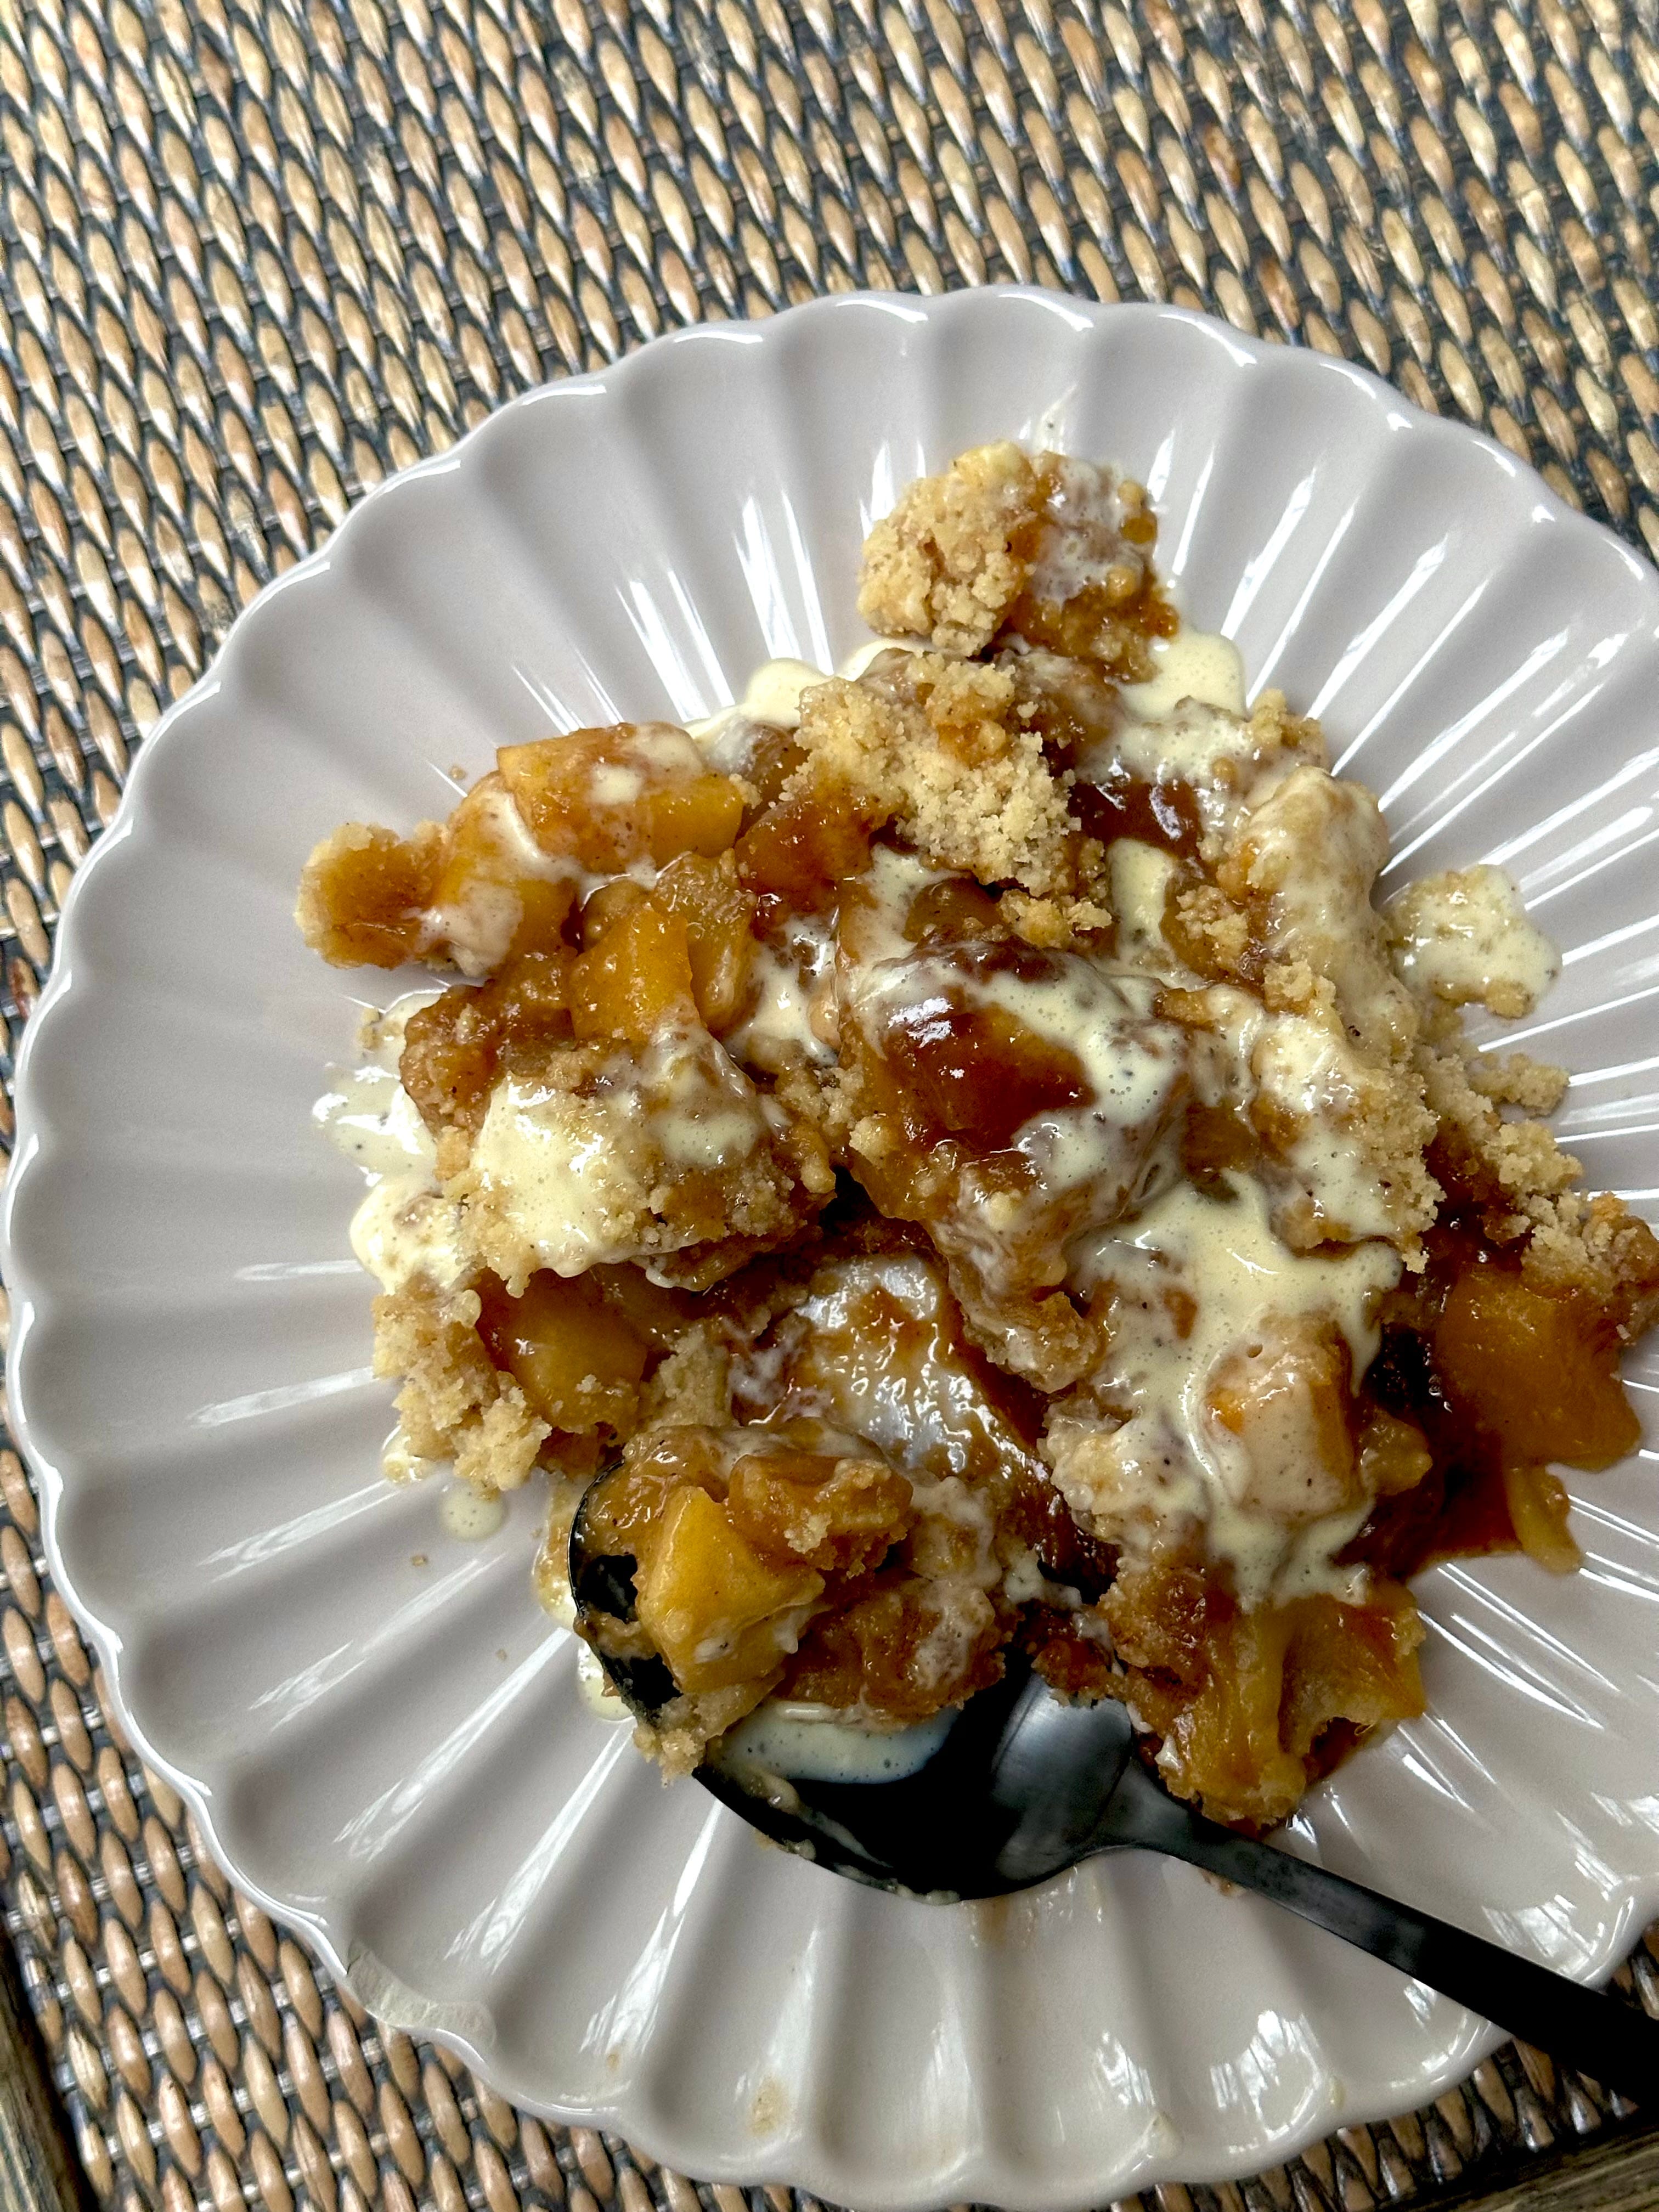
Best eaten hot, cold, on it’s own, drowning in custard or topped with ice cream. You can’t go wrong with a little crumble to settle any rumble in your tum-ble. If you are looking for a speedier option, use store bought salted caramel to bathe your apples in but you didn’t hear that from me.
Recipe Makes: There’s no rules here – pop it in whatever sized dish that tickles your pickle
Recipe Serves: 12 decent portions
Y O U – W I L L – N E E D -
Filling
1.5kg Granny Smith/Bramley/Braeburn Apple (or any seasonal variety)
Squeeze of Lemon Juice
2 piece Stem Ginger, finely grated (approx. 40 g)
1 tsp Cinnamon Powder
¼ tsp Cardamom Powder or 3 pods, crushed
½ tsp Vanilla Bean Paste
1 Star Anise
50 g Light Brown Sugar
1.5 tbsp Cornflour, sifted
Caramel
200 g Caster Sugar
90 g All Things Butter Cinnamon Bun, diced
115 ml Double Cream, room temp
Pinch of Sea Salt
Crumble
300 g Plain Flour
100 g All Things Butter Unsalted, fridge temp
50 g All Things Butter Cinnamon Bun, fridge temp
75 g Caster Sugar
30 g Demerara Sugar
1 tsp Almond Extract
M E T H O D -
Start with your filling. Peel apples and roughly dice – I like to keep some chunky and some smaller for a variety of texture once baked. When peeling/dicing, transfer the apples to a bowl full of water, alongside a good squeeze of lemon to prevent the apples from browning.
When done, drain the apples, add stem ginger (if using), cinnamon powder, cardamom, vanilla, star anise (if using), light brown sugar and cornflour. Give it all a good mix until the apples are coated and let them sit.
Move onto the caramel. Place the sugar into a heavy bottom pan and place over a medium heat. Allow the sugar to gently caramelize (DO NOT move, touch, or stir the sugar to avoid crystallizing) and let it do it’s thing. I warn you, it will do nothing for ages and then you’ll blink and it’s burnt.
You’ll know the caramel is done when it hits 160C or is a deep amber colour.
Remove from the heat and add the butter. Stir well to combine and once smooth, pour in the double cream and add the pinch of salt. Important your cream is room temp to avoid the caramel splitting. Mix well again until smooth.
Add the apples (and any juice) to the caramel. Mix well to coat and pop the pan back on the heat for about 5 minutes to allow the caramel to slightly thicken. Remove from the heat and allow to lightly cool.
Grab your baking dish, lightly grease the base with some butter and preheat the oven to 180C Fan/200C/390F.
Make the crumble by adding the flour, butters and almond extract to a bowl. Use your fingertips to rub the butter into the flour until it resembles breadcrumbs.
Add the caster sugar and half the demerara, and rub in to the flour mix.
Before you transfer the spiced apples to your buttered dish, remove 200 ml of liquid and reserve to one side. Pour the rest into the dish and scatter on top the crumble mix and sprinkle over the remaining demerara.
Bake for 40 minutes until the top is golden brown. Let the crumble sit for 10 minutes before serving.
Pop the reserved caramel liquid into a pan and place over a medium heat for 5 minutes until thickened. Drizzle the sauce over each serving for added yum.
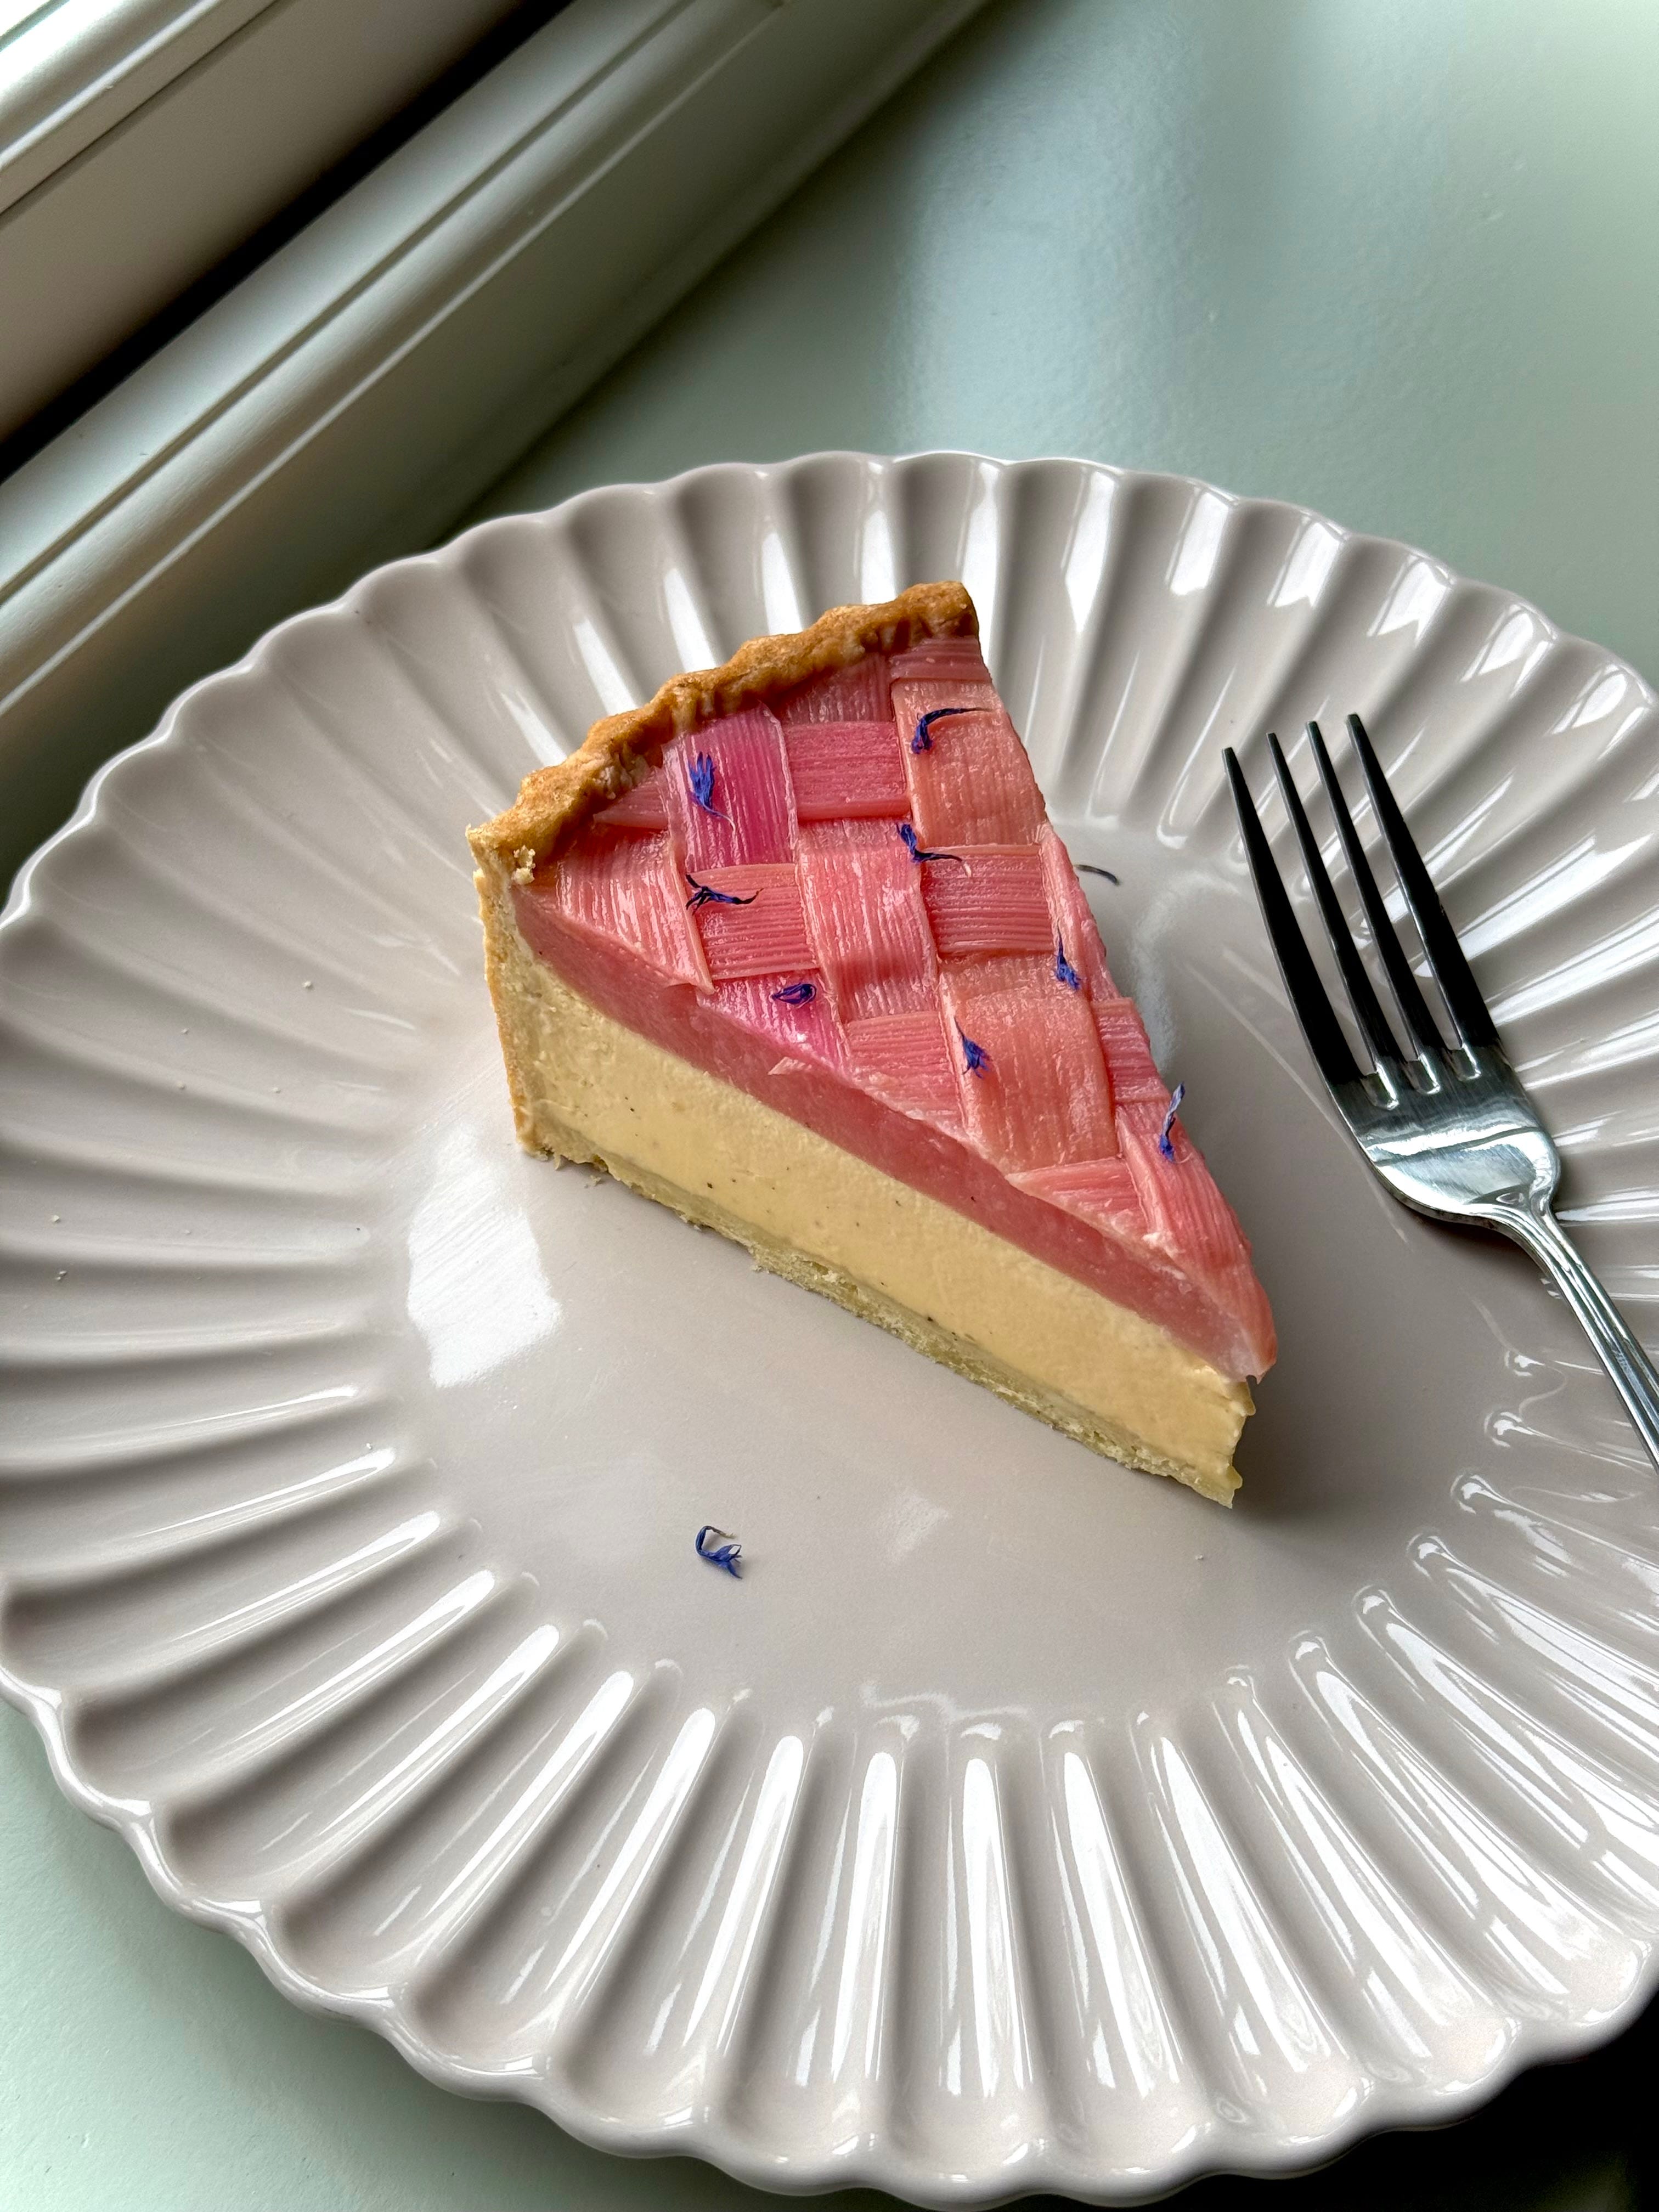
Now we FINALLY get to the main bake of the day. The beauty queen that she is, it’s my Forced Rhubarb, Cardamom and Custard Tart. Not only is she a total looker – yes, I very much wove strips of perfectly poached pink rhubarb into a lattice to adorn a sumptuously soft, velvety smooth baked vanilla egg custard, that sits snug in a lightly cardamom spiced, crisp, golden brown sweet pastry case – she tastes outrageously good too.
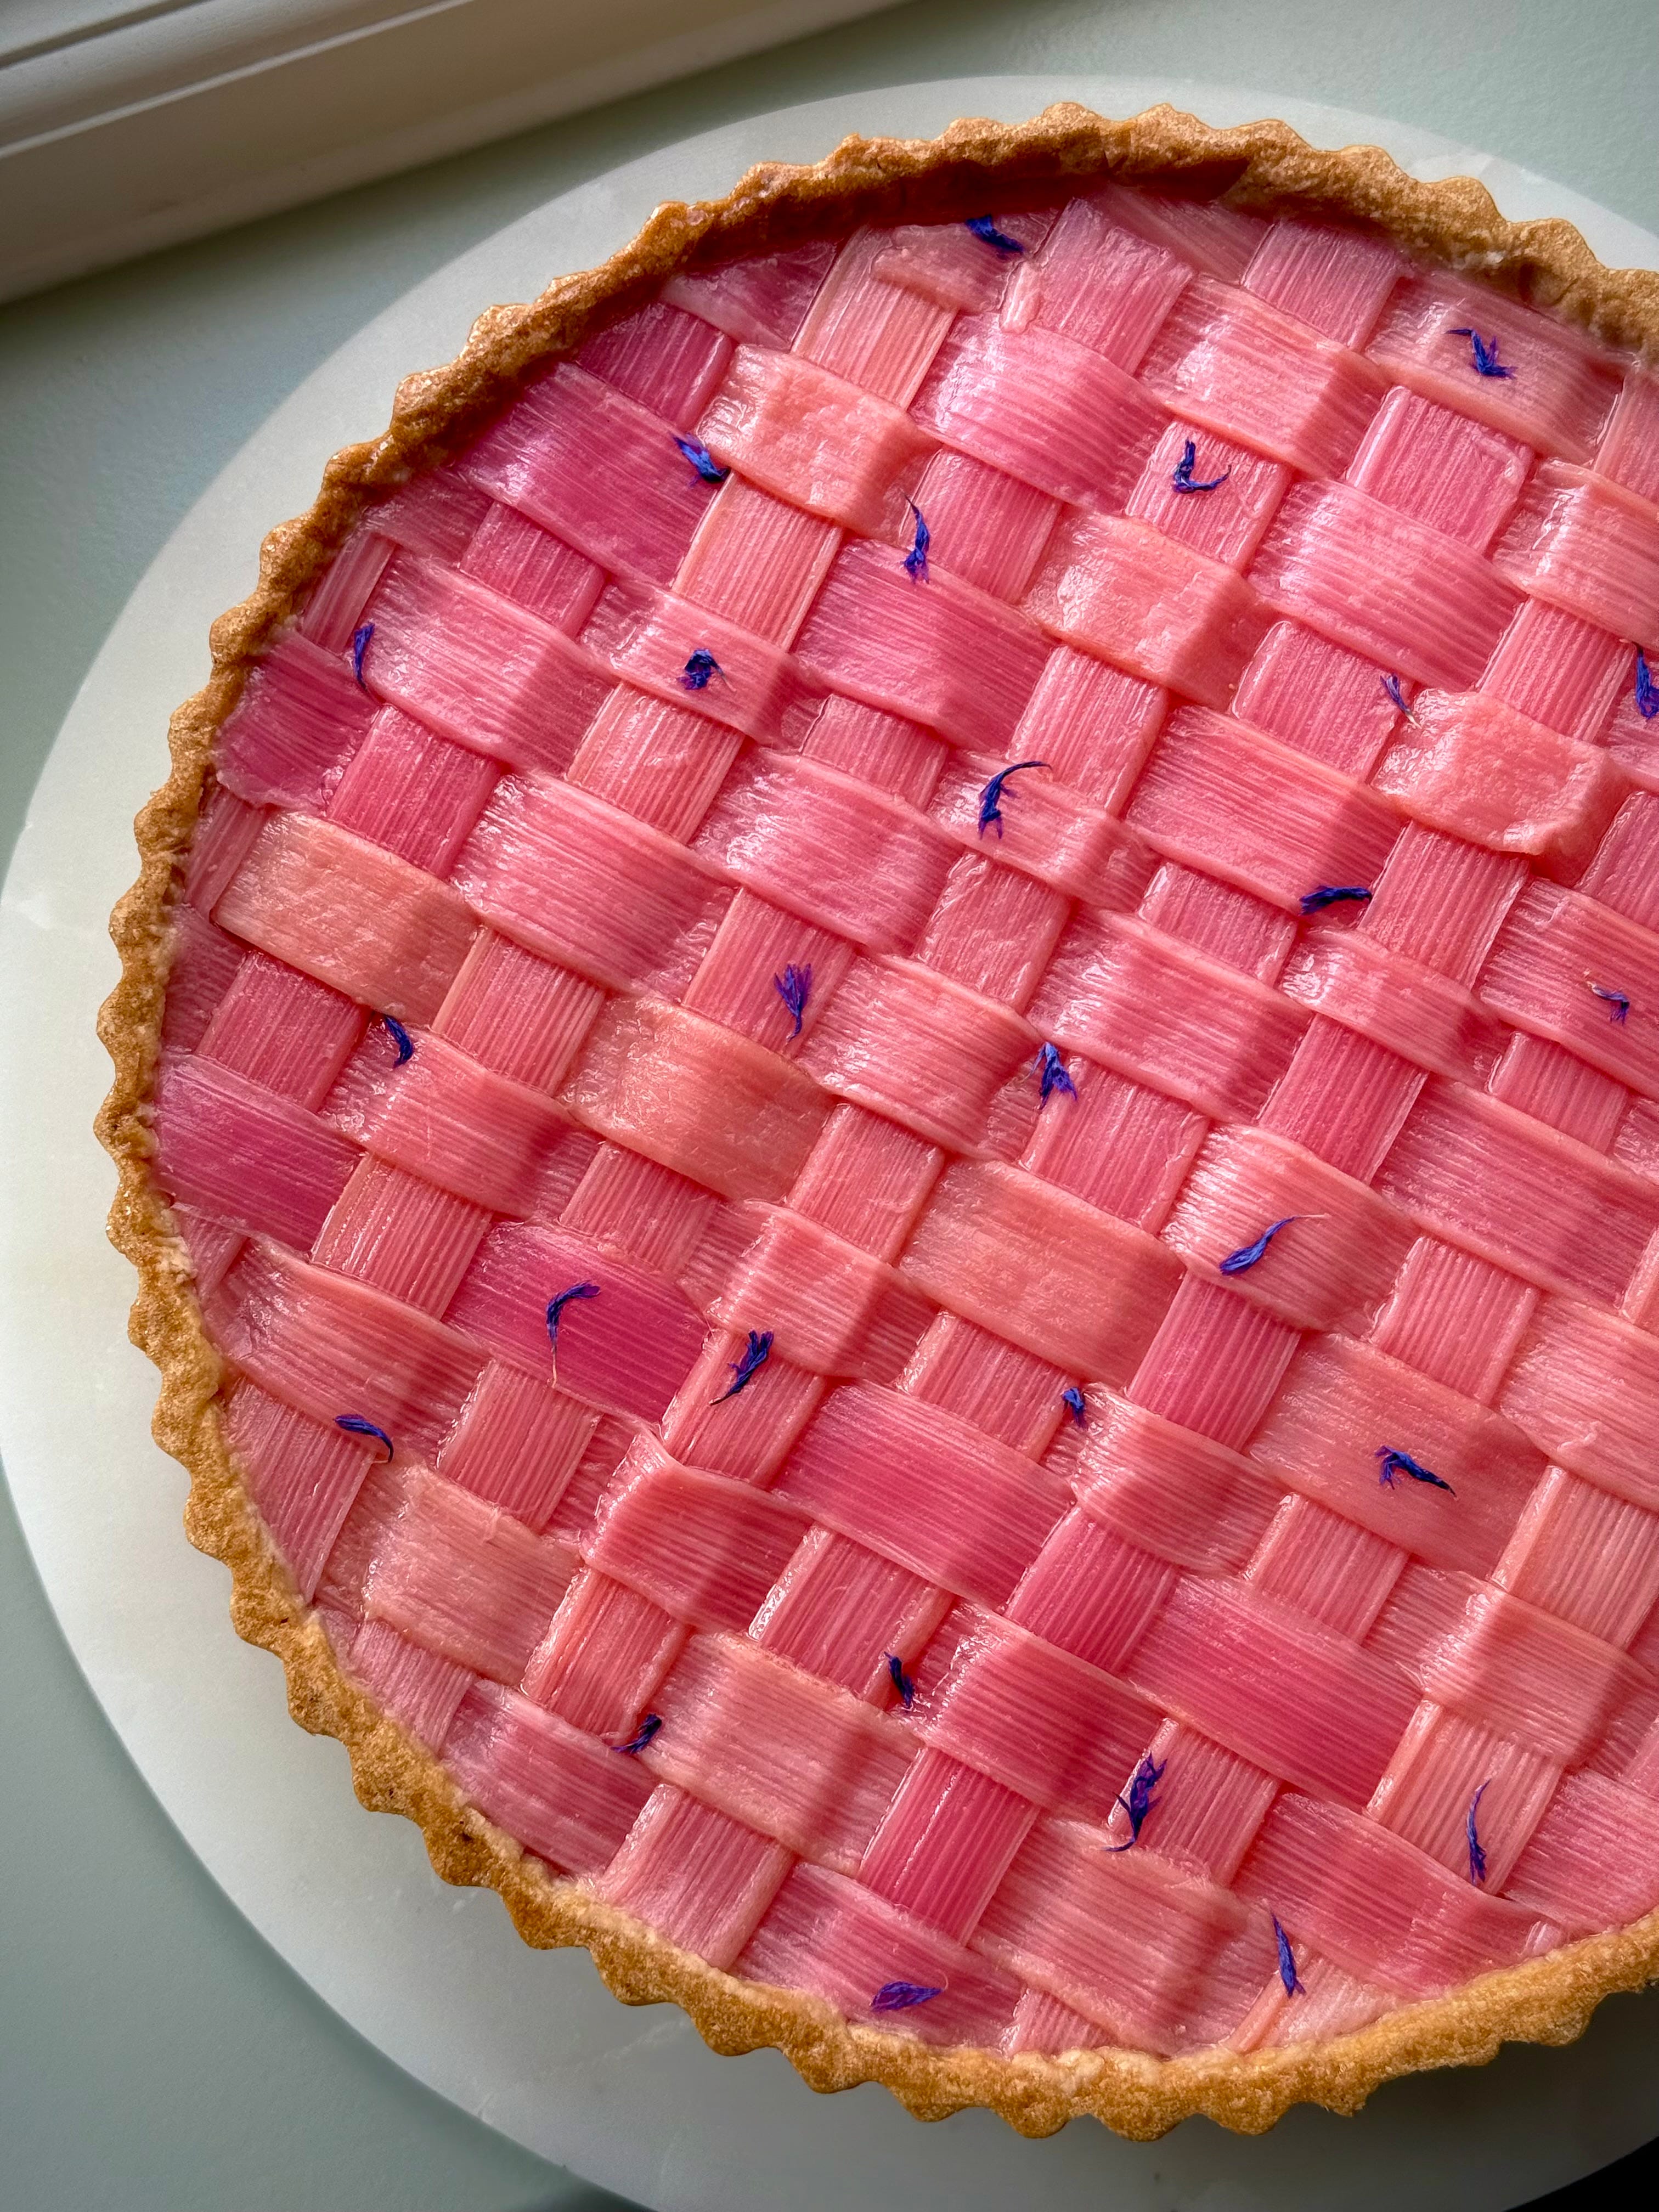
I am going to prewarn you and say it does use an extortionate amount of egg yolks but what else do we expect from an egg custard tart?? That being said, don’t worry it doesn’t taste eggy in the slightest – I really can’t stomach that raw egg taste so this one sings with sweet, sweet vanilla.
This is a sophisticated slice of nice. It’s fruity, it’s sharp, it’s warming, it’s indulgent and luxurious. And let’s be real: for February, she’s a total heartbreaker. If you haven’t tasted Rhubarb before, it’s a sour little number which often requires a fair bit of sugar to help balance out the tartness. A big benefit of Forced Rhubarb is that it is in season early in the year – anytime between January and March so offers up some refreshing variety to the abundance of apples and pears of this time of year.


That ruby red of the rhubarb glistens amongst a sea of greige fruit and veg (greeny beige, you know what I am talking about) and is only about for a short time. A good time. It can be tart, sour, make the back of your cheeks squeal in delight but treat it right and it can be deliciously sweet and juicy. You have to be quick though as the season is short and sweet, which makes each dessert you make with it feel like a total treat.
Because of the way it is grown (it is taken out of its winter hibernation and into warmth and darkness), growth is encouraged forcing it to be harvested earlier. As its exposure to light is limited, the stems preserve their cerise pink colour and freshness resulting in a sweeter, less sharp flavour. I think it can be quite a love it or hate it sort of vegetable – YES VEGETABLE – but treat it with the right sorta love and the right amount of care and you are left with something quite special.
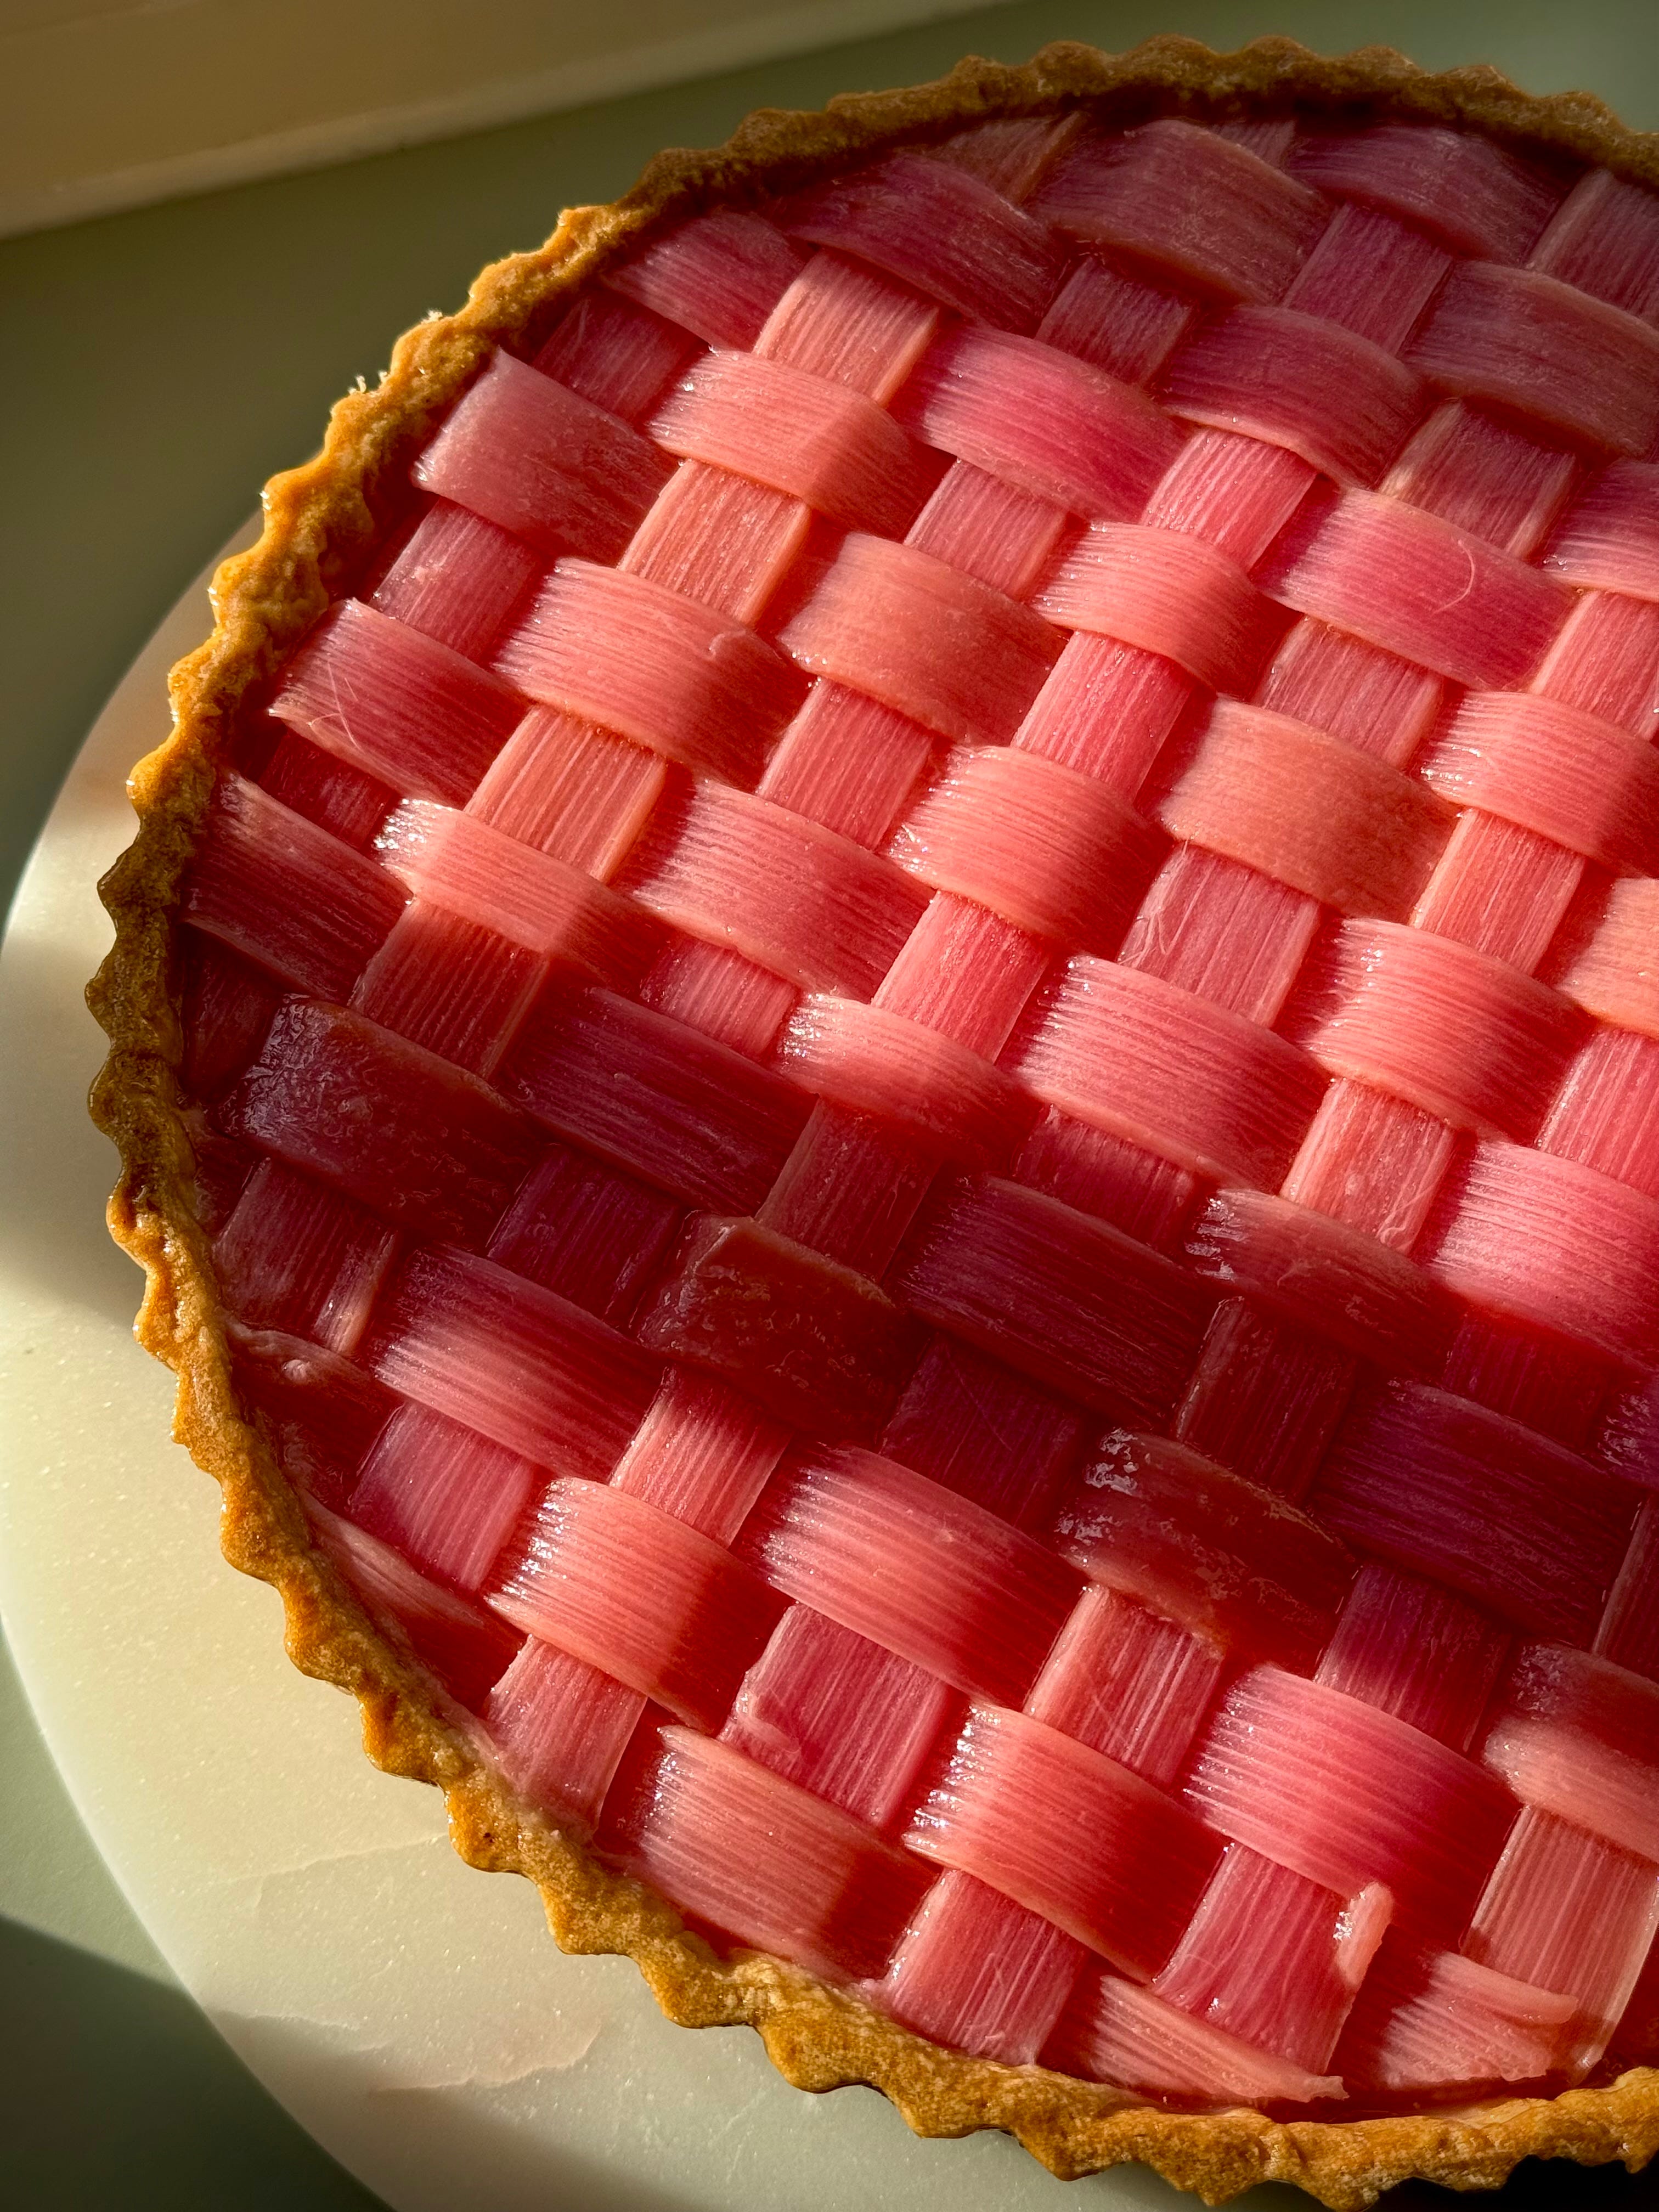
Aesthetically, she stuns but to ensure you don’t lose the colour or the shape, you gotta have patience and you gotta poach. Poaching means cooking something by submerging it in a liquid, as opposed to cooking it via a direct source of constant heat. You bring your poaching liquid up to a boil, remove from the hob/gas and allow the residual heat to gently cook the rhubarb. The gentle cook helps you maintain the shape of the rhubarb and to an extent, the colour.
And because you are putting a bit of love into making a poaching syrup – DO NOT THROW IT AWAY! I use the syrup to drizzle over each slice of the tart when served but you can also use it to:
Make jelly (rhubarb jelly and vanilla ice cream? Easiest yum about)
Use the syrup as a drizzle over crepes
Reserve some of the poached rhubarb and syrup to make a granita. This is basically just a frozen dessert which you make by blending a fruit/vegetable plus liquid, freezing until iced and then flaked through with a fork and left to freeze once again. It’s a really refreshing dessert and would work well paired with some fresh mint but an easier alternative to a sorbet and a lighter option to a full carb fest.
Use the syrup to enhance cake batters and buttercreams, or as a glaze for pastries and sweet breads.
For cocktails and mocktails, or as a cordial.
As a soaking syrup for cake sponges. This poaching liquid plus a moist almond sponge? COULD YOU IMAGINE THE YUM?!


Basically, whether you poach it, roast it, jam it or boil it – it’s definitely one to embrace. Much like this tart.
Recipe Makes: 1 x 25 cm / 10 inch loose bottomed tart tin
Recipe Serves: 8 good slices. 12 if you are stingy.
